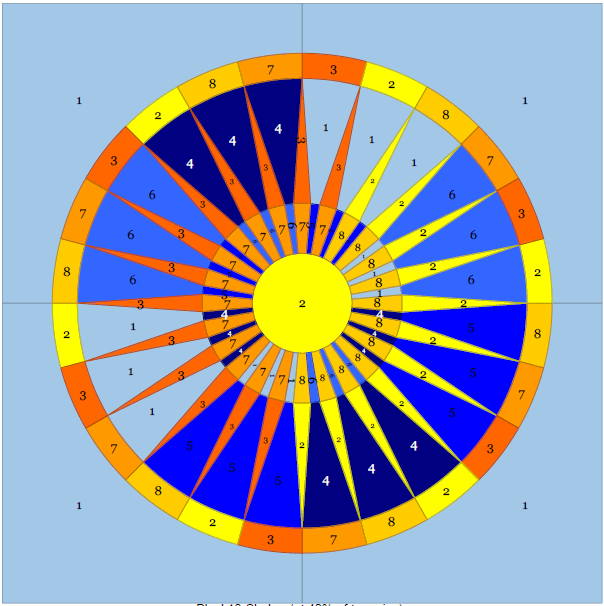
I finished quilting the Chakra Block, Block Ten of the Dreamcatcher Round the Year quilt today!
The Chakra – Block Ten of the Dreamcatcher Round the Year quilt
I quite love the way it has turned out! A close-up of the quilting…
The ‘Dharma Chakra’…
You can follow this link to find the pattern for this block inspired by the ‘Ashok Chakra’, or the Dharma Chakra ( Wheel of Righteousness), which finds the pride of place at the centre of the Indian national flag and is taken from the edicts of the great emperor Ashok, who ruled over almost the entire sub-continent, in the third century B.C.
Just three more blocks to do, then I move to the outer dark blue fabric panels! Do share your quilt blocks on my facebook page ‘Patchwork of My Life’. Have a great weekend!
This block has to be my absolute favourite. For one, it is a tribute to my country, India, on our Republic Day falling on 26th January. Secondly, it is designed by me, not based on any other quilt block that I have seen.
The Ashok Chakra, which is the inspiration for this block, is at the centre of India’s national flag. It is taken from the edicts of the great emperor Ashok, who ruled over almost the entire sub- continent, in the third century B.C. I quote from Wikipedia : The “Ashoka Chakra” … is the wheel of the law of dharma. Truth or satya, dharma or virtue ought to be the controlling principle of those who work under this flag. Again, the wheel denotes motion. There is death in stagnation. There is life in movement. India should no more resist change, it must move and go forward. The wheel represents the dynamism of a peaceful change.
I tried to be true to the proportions of the Ashok Chakra on our flag. The block, a 15″ square set in an 18″ circle, is the tenth block in the Round the Year BOM quilt. It is surprisingly easy to piece the foundation paper piecing way, and assembly is also simple enough. (Except that you have to be really fond of hand appliqué to add those half circles using the method I employed!)
As mentioned above, the block finishes at 18″ square with a 15″ inset circle.
I have used four shades of blue (coded 1, 6, 5, 4 from light to dark) and four contrasting colours ranging from yellow to orange ( coded 2, 8, 7 and 3 ) for the block in the Dusk colourway.
For this block, I have assembled the full circle and plan to appliqué it to the background. A background template is, therefore, not provided. The block is mainly paper pieced with some appliqué for the half circles. (You could fuse these if you have access to Heat ‘n Bond Red or equivalent; which case, do not cut fabric** for the half circles at this stage.)
Fabric Requirement
Fbric Colour
Fabric code
Outer Ring
(3″ x 1.5″)
Middle Ring
Inner Ring
Inner Circle
Background
Count your pieces
Lightest Blue
1
2.5″ x 30″
(Cut 6 rectangles 2.5″x 5″)
6 rectangles 1″ x 2.5″
19″ square
13
Light-Medium Blue
6
2.5″ x 30″
(Cut 6 rectangles 2.5″x 5″)
6 rectangles 1″ x 2.5″
12
Medium-Dark Blue
5
2.5″ x 30″
(Cut 6 rectangles 2.5″x 5″)
6 rectangles 1″ x 2.5″
12
Deep Blue
4
2.5″ x 30″
(Cut 6 rectangles 2.5″x 5″)
6 rectangles 1″ x 2.5″
12
Yellow
2
3″ x 9″
(cut into 6 rectangles)
1.25″ x 55″ ( Cut into 11 rect 1.25″x 5″)
**Rectangle 4″x 6″ for six circles 1.5″ diam.
3.5″ diameter circle
24
Gold
8
3″ x 9″
(cut into 6 rectangles)
**Rectangle 4″x 6″ for six circles 1.5″ diam.
1.5″x 27.5″
( Cut into 11 rectangles 1.5″x 2.5″)
23
Light Orange
7
3″ x 9″
(cut into 6 rectangles)
**Rectangle 4″x 6″ for six circles 1.5″ diam.
1.5″x 33″
( Cut into 13 rectangles 1.5″x 2.5″)
25
Deep Orange
3
3″ x 9″
(cut into 6 rectangles)
1.25″ x 65″ ( Cut into 13 rect 1.25″x 5″)
**Rectangle 4″x 6″ for six circles 1.5″ diam.
25
Printing Instructions
Please note that I revised the pattern template `naming’ after piecing my block. Don’t let the piece numbering on the pictures confuse you.
Print first two pages of the Instructions File for ready reference.
Cutting the fabric strips
Print Paper piecing templates file at 100% (or actual size ) in portrait mode and cut out the templates.
You can decide if you wish to use the **circle templates and print the file as and when you need it. . I printed the 1″ circle templates on freezer paper.
If you are interested in English paper piecing or regular piecing for this block, I have also provided the option of individual templates in a separate file.
Piecing Instructions
Piece the inner ring templates A,B, C and D.
Make piles of the rectangles for the inner ring – all four shades of blue and two shades of the contrast fabric (light orange and gold) are used here. Reduce the stitch length on your sewing machine, so that the paper can be torn off easily once you are done.
Pile the strips for easy access
The strips in the inner ring are ready at less than a ¼”. Fold the paper on the incoming seam and trim the seam allowance to slightly less than ¼”, before you join the next strip.
Fold the paper template away on next seamline and trim the seam allowance to 1/4″ before sewing the next piece.
Piece the middle ring templates E, G. I. K. M. and O. Here, we will use the other two shades of the contrast fabric (deep orange and yellow) with the four shades of blue.
Again, trim the seams before you join the next rectangle.
The outer spokes of the wheel under construction
Piece the outer ring templates F, H, J, L, N and P. It is possible to chain strip piece these, which is what I did.
I used strips to chain piece the outer ring. It is as easy to use rectangles.
Prepare the twenty four 1″ circles for appliqué. I must be a glutton for punishment, as I prepared the circles using the pulled thread method and appliquéd them by hand!
Cutting 6 circles at one go using freezer paper templates.
Cutting twenty four 1″ freezer paper circles using the Circle templates… the most tedious part of this bock!
Iron the paper circles at centre of the fabric circles.
The ‘pulled thread” method for preparing the circles for applique. Note the long ‘tail’ on both ends of the running stitch.
Applique the circles to outer edge of pieced wedges F, H, J, L, N and P referring to the colour design.
Note only half the circle is visible in the finished piece. Tack the circle to the edge of the corresponding template piece, such that the midpoint of the circle falls on the centre of the seam line at the outer edge of the piece. About ¼’ of the circle will stick out and beyond the template. Applique it in place using an invisible stitch.
Tack the circles on the middle ring (in correct order!) matching the centre of circle to seam line.
I love to hand appliqué so I really enjoyed my afternoon doing this step!
You could possibly machine appliqué the circles, if you are confident about getting such a small circle right by machine. You could also fuse one inch fabric circles in place if you have access to double sided fusing like Heat ‘n Bond (Red) or equivalent.
Or you could even omit the half circles altogether!
Arrange everything in order of assembly and gloat!!!
Assembly Instructions
Chakra Round the Year Quilt Master Template
Refer to the Master Template given here to assemble the block. Note it is a mirror image, and shows the block as it would look from the printed paper side.
Join E to F; G to H, I to J, K to L, M to N and O to P. ( The half circle should match the colour of the adjoining outer ring piece). I experimented with several methods to see what works best. The last method was the easiest and worked best!
First, I trimmed the seam allowance on the paper templates F, H, J, L N and P. I left the half circle on corresponding untrimmed and pinned the first pair at every possible point! (Do not attempt this, it added no value).
That paper is not necessary – remove it!
The paper kept getting in the way, so I removed it for the next pair. The pinning was the same and the circles were left intact. The circles got in the way of aligning the edges of the pieced templates – not recommended.
Those circle bits sticking out – trim them, BEFORE you join the two templates.
I trimmed the circles to the template edge…
Trim the circles like this!
…pinned and sewed another pair together.
Even so much pinning is not necessary. Keep only the pins to match the corners and one each at the seams.
Finally, I used just 5 pins, one each on the corners and three to match the seams. The seams abut against each other and join beautifully, without any additional pins. That is the one I did not take a picture of :-p. This gave me the smoothest curve! And this is what I recommend – trim the circles to the template edge, remove paper from outer ring templates and pin minimally.
The next step is to join the outer six wedges in threes.
Join EF to GH to IJ
Join KL to MN to OP
Before you do that, remove the extra paper on the seam allowance and press the seam outward. Pin at corners and at centre.
Three pins to have everything aligned. Note the paper removed from the seam at the `skirting’?
Next, join the innermost pieced rings in pairs.
Join A to B
Join C to D
The inner ring templates are joined in pairs while the outer in threes. Remove as much of the paper as you can – on at least alternate pieces.
Join AB to EFGHIJ
Join CD to KLMNOP.
This was surprisingly quick and did not need any pinning, as the seams worked as alignment markers.
Join the two circle halves.
Just one more seam and the circle is done, barring the centre piece.
Tada!!
Pretty, pretty!!!
Yes, I can see a couple of unmatched seams and plan to re-do those when I do the last steps, that is, firstly appliqueing the circle to the background and then finally to applique the centre circle Q1 (3″ diameter ready).
You can purchase the Instructions and the Template files from my MadsPatch Store on Ecwid (link below). You would need Adobe Reader ( free online download available) on your computer to be able to open these files.


You must be logged in to post a comment.