


After several weeks, I finally got around to a little bit of sewing and I decided to try out a YouTube tute on an easy and quick method for a nine-patch block, which I had seen long, long ago! In fact, almost five years ago, I had adapted this method to test and write one of my most popular tutorials, the one on how to sew an easy and perfect four-patch. So without much ado, here we go on my adaptation of the same tute to make several nine-patch blocks in a batch!
I will do this tute in two parts. In the first I will show you how I made several nine-patch blocks in one go. In the second part I will give you Maths for various sizes and some tips, including those for perfectly matched points on your blocks.
The Method
For my project, I need several nine-patch blocks of 0.75″. Yes, you read that right, 3/4″ blocks! Almost impossible to manage by the regular methods, one would think, since each of the nine square patches would be 3/4″ to start with, and end at 1/4″!
1. I begin with 2 strips of 2.5″ width in the fabrics I will be using for my block. Actually 2.25″ would have been sufficient, but remember a good rule to follow when working with miniature blocks is wherever possible, sew bigger and then trim to size. I will discuss the length of the strips later.

2. I sew a scant 1/4″ seam on both long edges.

3. Now I do something one doesn’t usually do! I trim the seams by about 1/16″ or 4-5 threads. Remember the final size of the pieces is only 1/4″? Unless I trim the seams, things are going to get difficult and messy at the back!

4. Measuring from just inside the seam, I make a long cut 1/2″ inside on the joined strips. ( 1/4″ is the size of the final patch, plus 1/4″ for the seam. ) Similarly inside the other seam.

5. I now have this:
Two pink-white strips and one each of pink and white strips about 1″ wide.

6. I press open the two pink-white strips…
Important: Do not iron open the seams. Instead, press them to one side. I ironed them to the darker, pink side.

7. I now sew the pink strip and the white strip to these, to get one pink-white-pink and the other white-pink-white strips and press it open, seams are again pressed to the darker ( pink) side.

8. Measuring from just beyond the seam, I trim the newly added pink strip to 1/2″. Had I worked with 2.25″ strips, this would not have not been required, as my recently added strip would have been 3/4″ instead of 1″.

9. And similarly, the white strip. The final white-pink-white strip will be just the scantiest bit wider than 1.25″, as will be the pink-white-pink strip.

10. I now cut 2.5″ long pieces from the lengths of the two strips.

I had begun with 10″ long strips, so I have 4 pairs of 2.5″ long strips at the end of this stage. ( I now made another 5 sets of these readied strip pairs, using 12.5″ strips, so don’t let the coming pictures confuse you!)
11. Now comes the most exciting part, where the magic starts to reveal! I pick up each pair, right sides together, and sew 1/4″ seams along the shorter edges. I had pressed the seams towards one colour; this ensures that the seams ‘lock’ and my points match beautifully.

Remember, chain stitching makes things move really fast!
12. You may have guessed what comes next? A cut 1/2″ from inside both seams. I could, of course, measure 3/4″ from the edge. But measuring from the seamline ensures accuracy of my ready size, because it takes into account that my 1/4″ seam may be a tad more or less than 1/4″!
13. Have we forgotten something here? Yes. We had to trim the seam (allowance) by 1/16″.

14. Press open the (6-patch) side pieces; again, seam to one side – do not press seam open. Which side? I pressed half of them on one side and the remaining nine on the other and made two separate piles of these 6-patches. I realised later this could get a little complicated with regular sized blocks! How? I will try to answer this later in the “Tips” section.
I joined the centre strips to side pieces appropriately. the white-pink-white to one pile and the pink-whie pink to the other.

15. Once sewn, I first press the seams towards the edge and am ready for the last step …

16. …the last strip joined has to be trimmed to 3/4″.

Here we are, the final eighteen!

Nine blocks have white squares in the corners and centre. The other nine are reversed.
The Maths
Width of Strips
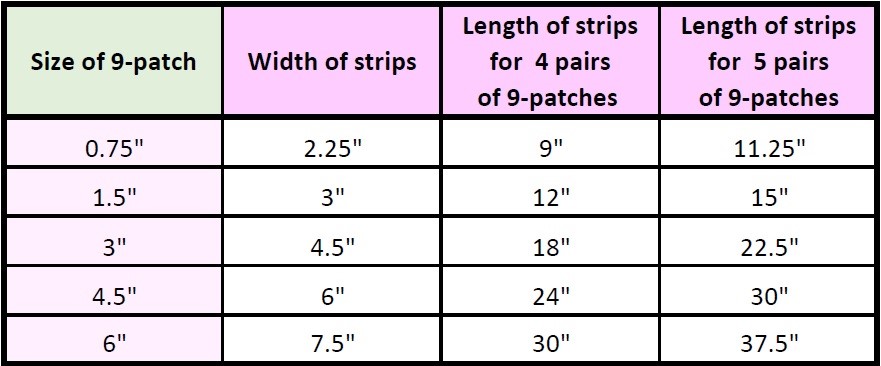
The Maths is very simple. Just add 1.5″ (for 6 seam allowances of 1/4″ each) to the size of your ready nine-patch, to get the width of your strips. So if you want a 6″ patch, begin with 7.5″ strips, if you want a 3″ strip, start with 4.5″ wide strips.
Length of Strips
This will depend on the number of blocks you need. The minimum nine-patches you can make by this method is two, one the colour reversal of the other.
If you need just two blocks, begin with 2 squares. The size of the square? Easy! Size of ready nine-patch plus 1.5″ . So for a pair of 6″ nine-patches, you need two squares of 7.5″. And, if you need a pair of nine-patches of 3″, start with two 4.5″ squares.
If you have a set of 5″ charm squares lying around and are wondering what to do with them, it may be a great idea to pair up contrasting colours and make 3″ nine-patches with them. The strips will have to be cut at 1.25″ from the seam at Stage4 and the centre strip will require trimming as it will be 2″ wide.
Add one width to the length, for each extra pair that you require. For two pairs of 6″ squares, the two strips will be 7.5″ x 15″. For 3 pairs, 7.5″ x 22.5″, for 4 pairs 7.5″ x 30″ and so on…
Tips
- Caution: This method gives you two sets of nine-patches, which are colour reversals of each other. It will not work if you want identical nine-patches. Of course, you could put away the unwanted 9-patches for another project or use them in a border or something. If doing miniature blocks like I am making, I recommend this method every time. You can always use up the extra blocks.
- I am repeating myself: press the seams to one side, consistently. Like I said, things get complicated when we reach the last stage of assembling the nine patch.
a) If making mini-blocks, press towards the strip which will be on the edge. Thus if you are making a block with 5 pink patches and 4 white ones, press towards the strip which has pink-white-pink patches. And vice versa with the colour reversal patch. In other words, half of them to one side and the other half to the other, like I did. Your finished nine-patches will look like this from the back. The last two seams face the edges.

b) If making regular sized blocks, which will be attached to other nine-patch blocks to make perhaps a border or larger units, I would follow the traditional method. Press seams on the blocks in one direction consistently, towards the pink-white-pink strip. In half of these blocks ( 5W-4P) the two last seams will end up facing each other towards the centre, in the other half (5P-4W) towards the edge. Then when these nine-patches are being joined together, seams will lock in to give you perfectly matched points.
c) If making regular-sized blocks which will not be attached to other nine patches, press seam towards edge like in a) above.
Well, I really can’t think of anything else, so…
Are you wondering what I am going to do with all these miniature 9-patches? What is coming up next? Well, you’ll just have to wait and watch, won’t you?
I sign off wishing all my friends across the world a Very Happy Diwali, the Hindu Festival of Lights! May our Earth see the victory of prosperity over want, of peace over war, of good over evil, of health over disease, of hope over despair, of love and compassion over hatred…of light over darkness, everywhere and for all its inhabitants.

You must be logged in to post a comment.