

Block Ten is ready for assembly and Block Twelve is on its way. I am undecided about Block Eleven.
And I am still looking for block testers!
How is everybody else doing on their Round the Year quilts?

Block Ten is ready for assembly and Block Twelve is on its way. I am undecided about Block Eleven.
And I am still looking for block testers!
How is everybody else doing on their Round the Year quilts?

Have you not always wanted to make a double wedding ring block? A whole quilt would be too much, but just one block? We have a comparatively complicated block lined up for the next fortnight and many of us have a few pending blocks to catch up with. Plus, I celebrate my 33rd wedding anniversary this January – that clinched it for me! A wedding ring block it is, to start 2015!
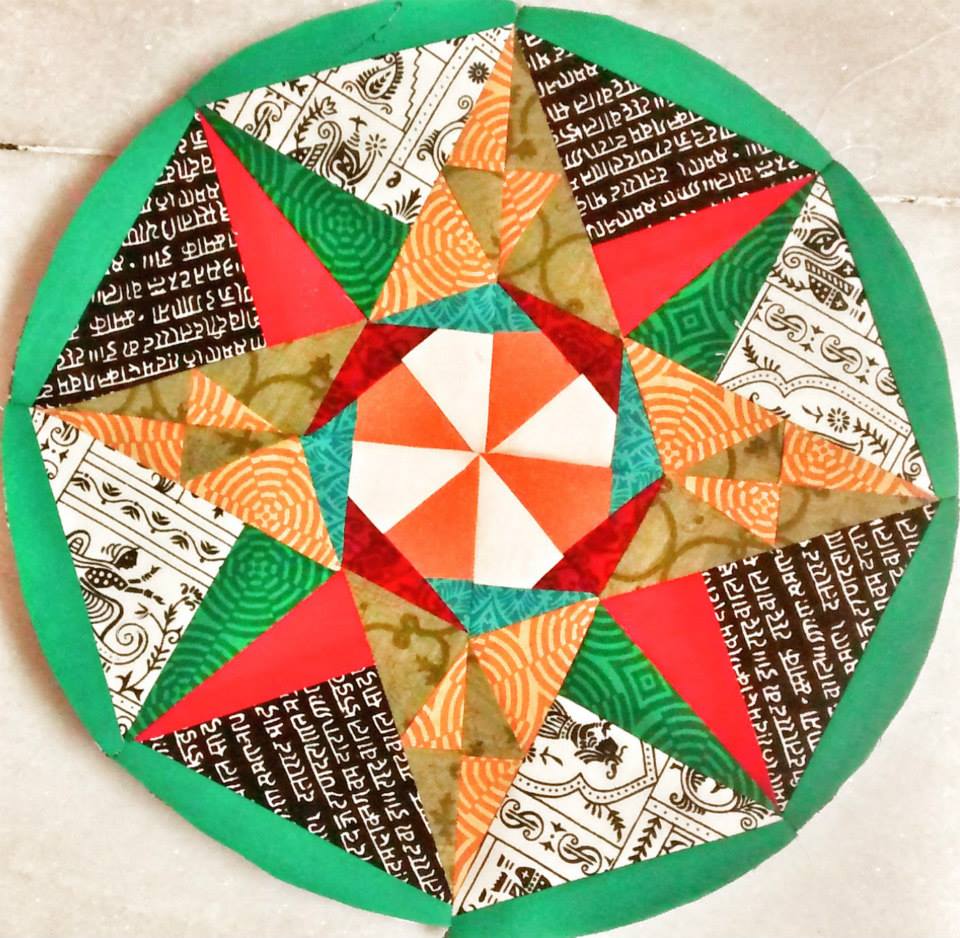
You may like to see how I used this block to make a wedding anniversary gift for my sister-in-law a couple of years ago.
This 18″ block, with a 15″ paper pieced wedding ring, is the ninth of the Dreamcatcher Round the Year Block of the Month quilt, which began mid July 2014.
Click the link at the end of this post for templates and instructions (including fabric requirements) in downloadable .pdf format.

I have used 5 shades in the blue- violet spectrum and 3 shades in the yellow-orange range to piece this block. The background is in two shades of grey.

Templates.1 Twelve paper piecing templates for ring – A to L
Templates.2
Templates R1 and R2 for background. You need to glue at edge as indicated in template – cut 2 each from fabrics #1 and #2. I am not joining the pieced circles to background right now; I shall do them all together. For this particular block, I recommend assembling the entire circle and the attaching it to the background.
Template M for melon – Cut two from each of the Fabric#4 (deep blue) and Fabric #3 (lightest blue)
Template Q in two parts – glue at edge indicated to make into one template.
Please refer to this Master Template as a guide for piecing and assembly. Remember, it is a mirror image, and shows the block from the reverse, printed paper side!

It is easy to chain strip piece the ring templates A, B, C, D. Detailed instructions for this technique of foundation paper piecing are given with the Block One, Dahlia pattern!

Remember

And remember, what not to do!

Jack (the Ripper) had to intervene!
Next step – to piece Templates E, F, G, H and I, J, K, L…
… and arrange them all together and admire them!

But not for long! The outer ring templates are to be joined – E to I, F to J, G to K and H to L as shown in the Master template. ( Theoretically, these could be glued and pieced as one – EI, FJ, GK and KL respectively. Since the templates are printed on A4 size paper, they are broken into two parts!)

That was quick!
Now to attach the melons M, N, O and P to the pieced inner rings A, B, C and D respectively.
First, I trimmed the pieced templates carefully on the dotted line for an accurate ¼” seam allowance!
I used a couple of pins to align the melon to the ring. I folded the melons into half to find the centre and pinned them, seam to seam at centre of piece #4 on the templates – A4, B4, C4 and D4.

I then matched the blunt edges at the corner where I would begin my seam line, and secured them with another pin.

I chose the 1/4″ stitch option on my Hasina Husqavarna Viking machine, reduced the speed to a minimum and gently eased the melon curve to sew it to the template, moving 2-3 stitches at a time.

I pressed the seam towards the melon. My seam is a little uneven, but this does not bother me. The best thing I like about curves is that they just fall into place if you press them down gently!

The next step involves attaching the inner ring to the melon. Is this going to get a bit more challenging? Referring to the Master Template, I attached EI to AM; FJ to BN, GK to CO and HL to DP.

After aligning the two pieces at the centre – melon to outer ring template, I used vertical pins to align the corners at the edge of the rings ( A7 to I4 in this instance). I then secured them with a pin in the centre.
You will notice that I pinned only at the corner at which I started the seam, not at the end. I find that a pair of tweezers helps in keeping everything in place.


I `fixed’ the thread as I started, kept the needle in the ‘down’ mode and move very slowly. And yet…

Perhaps it would be better to keep the ring template on top, to get a perfect seam?
I finished the four melons and pressed seams inwards, towards the melon. This was surprisingly easy and done in less than 15 minutes, pinning and all!
Centre
To move to the centre now – I first made a pinwheel using the two 5.5″ squares each of Fabric # 3 and Fabric #4. I used the easiest way of making the pinwheel. I paired the light squares with the dark and drew a line on one diagonal on each top light square.


I sewed a ¼” seam on either side of the diagonal and then cut along the centre pencil line. I now had four HST (half square triangle) squares. I usually press the seams to the darker side, but here I chose to press them open.
I then joined the four squares to make a pinwheel; pressed open the seams again, to reduce bulk.

Perfect? No! As it turns out, I joined this wrong; the dark patches should be where the light ones are and vice versa. You may think this does not matter, but it does, in my colour scheme! You will soon know why!
I printed only one half of the Template Q and used this to trim the centre. I pressed the freezer paper template to the pinwheel, matching the seams to the lines on the template…

…trimmed one side…

…and the other. The centre was fast work too!
Alternatively you can cut HSTs from the squares and paper piece the centre.
I now trimmed the freezer paper template to the seam line and pressed it in place, on the right side of the pieced centre. The markings on the template helped me align the centre to the melons.

Ready for final assembly!
Final Assembly
I first joined the melons on opposite sides of centre Q.
Now is the time to bring on the pins! I inserted vertical pins through the two patches at corners, and on alignment markers about an inch to inch and a half apart

I then attached horizontal pins on the seam as shown, removing the vertical pins as I went along. Pins stuck in this way are easy to pull out and unlikely to prick your hands.

I removed the template before I sewed the two patches together. I then pinned the template on the opposite side.

Upto this step, everything went off unexpectedly quickly, other than that small encounter with the ripper!
Now things started getting a bit tricky .

I had read on a blog somewhere, that you should not press your block at this stage, but I don’t think that works for me! I suggest you DO iron the seams towards the centre pinwheel, before you move to melons #3 and #4.
And don’t spare those pins! Especially at the corner, where the centre meets the melon. Join the melon in one smooth curve. My corners did not match on Lemon #3 and I had to do a bit of ripping at this stage, because I had not pressed the patch and I had not pinned enough. I could appreciate why this block is traditionally hand pieced; I was sorely tempted to do this step by hand to set those offending corners just right!
These few hiccups apart, this was a simple block to make – I could finish it in an afternoon.
One last thing – the seams! Press the seams on Lemon#3 and Lemon#4 outward – towards the edge of the circle!

Voila! We are done with Block Nine!

Now to come back to the little matter of the clockwise pinwheel. Can you see that the dark triangle on the pinwheel is touching the dark (blue) side of the inner ring? Would it not have been prettier to have the yellow-orange contrast against the dark blue, like in the original design?
Before I upload the Instructions and Template Files, one more thing! Many of you have asked me for a mirror image of the block in colour to help in assembling the block – I do not know how useful that can be – but here it is!

You can download the free pattern and instructions from these links. You would need Adobe Reader (software available online for free download) on your computer to be able to view these files.
Have a wonderful year ahead! Happy quilting!
Please note that the downloadable patterns with paper piecing templates and instruction files for the Dreamcatcher Round the Year quilt blocks are being migrated to my store MadsPatch and will not be available for download for free from 15th November 2020 onwards.
The last pending block, Lollipop Candy, is done! So here, finally, are all the eight blocks of the Dusk version, in one place…

…as seen from the other end of the table.

Here is a closer look at Block 6, Lollipop Candy, that I finished today. The original design had a deep blue centre. I am thinking now of a yellow.

I don’t know why I thought I had made four blocks from the Rainbow version – it seems only three are done!

Would you like to make your own Round the Year Quilt? You can access all the free patterns on this page. Why don’t you join us from January 1st? You can finish this BOM in 2015!
Today I have started working on Block Nine and will get back to you in the new year with a new block! Happy holidays to you all!
The last pending block of the Dusk Round the Year Quilt is coming up, slowly and steadily!

Once this is done, there are four blocks of the Rainbow colourway to be done…
I have lots to share with you today…blocks made by other quilters, members of my virtual quilting group, Desi Quilters. So without much ado, here we go! Here are the blocks Sobana made in the last two weeks; she now has only two more blocks to make to catch up with all her pending blocks!


Other Desi Quilters have also been catching up! Here is a look at their blocks.


Have you made any blocks during catch-up December? Why don’t you share your work on my facebook page Patchwork of my Life? The blocks are majorly foundation paper pieced and much easier to construct than what you may believe looking at them. So, if you have still not started on your blocks from the Block of the Month Quilt `Dreamcatcher Round the Year’, you can head here to my MadsPatch Store on Ecwid!


You must be logged in to post a comment.