


Lollipop Candy is the sixth of the Blocks of the Month of the ‘Dreamcatcher Round the Year’ Quilt.
Like the previous blocks, this is also foundation paper and finishes at 18″ square with an inset circle of diameter 15″.
This block can be constructed, if you have the patience, by cutting and piecing over 350 rectangular pieces! But there are less tedious ways to make the block. There is the much simpler Bargello method; however, that involves a lot of fabric wastage and I have not yet tested it. So we will go with chain strip piecing for this block. Those of you who have pieced the Dahlia, Block One of this quilt, are familiar with the method.
This is designed in two colourways, here is the Dusk colourway, which uses 4 shades of blue fabric contrasted with orange and gold, with a touch of yellow to brighten up the proceedings, against a grey background.

I am using Fossil Fern by Bernatex as my fabric of choice.
Before you start cutting and piecing your fabrics, please read through the entire instructions – there are a few tips which may save you more than a little heartburn!
Printing Instructions & Templates
- Please print the instructions file and keep at hand. I suggest you print at least pages 1 to 5 of the file for ready reference.
- Print paper piecing templates (link at end of this post) at 100% or actual size in portrait mode.
-
Cut out the templates and place them in alphabetical order, in 4 sets:
A to F;
G to L;
M to R; and
S to X.
- Note that there are the following pairs of identical templates, A-B; C-D; E-F; G-H; IJ and so on till W-X.
- Y is the centre circle template.
- Z is one of the four background templates, in 2 pieces. Glue together on line indicated. AA, AB and AC are identical to Z, hence templates for these are not provided. Use Z to cut 4 ‘squircle’ pieces from the background fabric.
Fabric Requirement and Cutting Instructions

Tip – Pin a scrap of your fabric of your choice in Column 2 below, for ready reference.
Starch and press fabric before cutting.

You may also need to cut a few strips or need some scraps besides the above. Cut as you go, would be my suggestion.

The above Master Template is a mirror image, used to assemble the paper pieced block templates.
Step by Step Piecing Instructions.
The piecing is chain strip piecing like we did for the Dahlia.
We begin with a reminder from the previous section; arrange the templates in 4 sets, in alphabetical order; as follows , A to F; G to L; M to R; and S to X.

Arrange the fabric strips in the following order and pin them. Keep aside with each template set, using the table here as a guide:
| Template Set | Templates | Fabric Strip Set. (The number refers to the fabric colour code) |
| Set 1 | A to F | 8,6,4,2,5,3,7,6,4,2,5 |
| Set 2 | G to L | 6,4,2,5,3,7,6, 4,2,5,3 |
| Set 3 | M to R | 2,5,3,7,6, 4,2,5,3,7,6 |
| Set 4 | S to X | 5,3,7,6, 4,2,5,3,7,6,4 |
You may have noted that there are only 11 fabric strips in these sets, these will be used for Pieces# 1 to #11 in the templates. Pieces #12, 13 1nd 14 will be added after finishing this first lot of piecing on all 24 templates.
The piecing is chain strip piecing like we did for the Dahlia. I suggest we work with two sets at a time, to cut down trips to the ironing table and cutting mat. Piece the templates in alphabetical order.
Reduce the machine stitch length to between 1 and 1.5.
Chain piece the first two strips ( Fabric #8 and fabric #6) in Set1. And remember, right sides together, always!!!

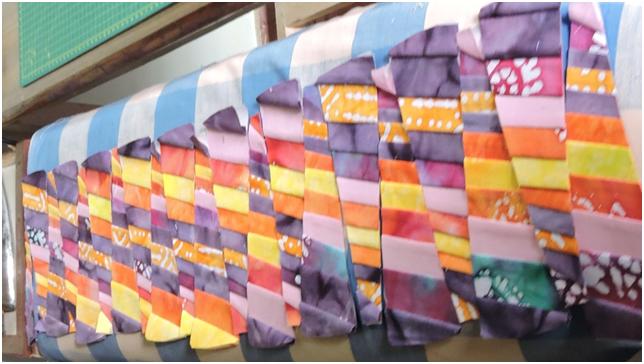
This picture above shows your template set as it will look going under the needle. The pins are placed on the seam line for illustrative purpose only. Try to keep the seam consistent at about ¼”, move the template to adjust to the seam.
In the above picture you can see that A and B are identical. But, on template C, Piece#1 is staggered by one position away from outer curved edge (on your right) as compared to A and B. So when strip piecing, we stagger the template, and begin one step away from the outside edge! D is the same as C.
Again the position of Piece#1 on template E is further away from the outside edge when compared to Templates D and C, and you again need a change in position. F is identical to E.
Check Again!
- Has the machine stitch length been reduced?
- Are the templates in alphabetical order?
- Have you picked up the correct fabric strip/s? Each piece position on the template carries the fabric code number. It is a good idea to check that once in a while.
- Is your strip #1 placed on position #1 on the templates? Is the wrong side of the strip touching the paper?
- Is the incoming strip placed right sides touching of previous one?
- Have you sufficient space between one template and the next?
Once you have ticked this checklist, it is unlikely that you will need the services of The Ripper.
Chain piece the first two strips in Set2, again in alphabetical order, G,H, I, J, K and L. Here the first two strips are in fabric #6 and Fabric #4.
Take to your ironing table. Press on the seams to set.
Fold back the paper to expose the seam, and trim the seam to ¼” . Press open fabric strip.


Now, we cut apart the templates. Preserve all the scraps, they may be useful for piecing near the centre.
Don’t let the upcoming pictures confuse you, I had instructed my tester, Sobana,who has taken these photographs, to piece the templates from centre outwards. I changed the instructions here, because changing the piecing order ensures that there is sufficient space between templates. Your pieced block will be different from the pics below, as I have revised the design somewhat. But that is a story that deserves its very own blogpost.
Here you will see there is insufficient space between templates.

Another thing to remember, do not cut apart the templates without pressing open the strip!
Presuming you have everything in order, finish piecing the first two sets up to Piece/Position #11. Now it is the turn of sets 3 and 4. Piece these also for positions # 1 to 11.
Now judge what fabric scraps are left over. You may or may not need more strips. Cut as required and add piece #12 on all templates, working alphabetically. Refer to the colour guide, or the colour code on the template itself.
Position/ Piece#13 on all templates is the innermost piece, near the centre. Use the 2″ strip of Fabric #8 for Position12 on templates C, D, G, H, K, L, O, P, S, T, W and X.Scraps of Fabric#2 (Deep blue here) can be used for Templates A, B, E, F, I, J, M, N, Q, R, U, and V. Sew on piece #14 and our templates are done!
Assembly Instructions
Do not remove paper pieces before your template is ready to actually go under the machine! Arrange the 24 templates, printed side up, using the Master Template as a guide.

If you want to see if all is on order, pin each template to the adjacent one on the seam line and flip over as a whole. Flipping a template at a time can be confusing, as the Master template is a mirror image! My block tester friend tried it and was really upset, as this what she came up with!

So, at all times, keep the printed side up, pick up a pair of adjacent templates, remove the paper, sew them together. Put back in place, with the template name pinned on a piece of paper on each! Go on to the next pair. At all times, remember to keep track of template numbers!
I would suggest you finish the assembly in quadrants. Join quarter circles to the background squircles ( Square minus circle = squircle). Applique the centre circle the last thing!

Unless of course, you want to piece the whole circle, and appliqué the small circle in the centre. And then, appliqué the whole Lollipop Candy to a background square.
Please note that the downloadable patterns and instruction files for the Dreamcatcher Round the Year quilt blocks are being migrated to my store MadsPatch and will not be available for download for free from 15th November 2020 onwards.
You can purchase the pattern including the templates and instructions from my store. You need Adobe Reader to be able to download these.
1. Paper Piecing Templates, Lollipop Candy – Block Six of Dreamcatcher Round the Year Quilt.
2. Instructions (Fabric Requirememt, Cutting, Piecing & Assembly ) -Lollipop Candy – Block Six of Dreamcatcher Round the Year Quilt.

I found it simple not to remove the paper piece while sewing the templates together! I plan to remove them when I am done joining them totally!