

Cathedral Window Quilt
-
I cut thirty six 5″ base squares in cream fabric. (Warning – unless you are a serious small/ mini quilt maker, ensure your squares are at least 8″)

Cut squares numbering – Number of Columns x Number of Rows -
Folded them and stitched along the shorter side. I took only a 1/6 inch seam here, as I was not working to any specific size. ( I goofed up and stitch a few along the longer side! My friend Jack – The Ripper – came to my rescue, again.)

Fold squares in half, and sew on one short edge. Chain piecing is efficient! -
And then along the other side! Chain ’em up!

Now sew the other short edge. With chain piecing, in no time, all the squares are done! -
Unchained them – set them free, but not for too long

Unchained! -
Pinned each of them, seams lined up just so. I aligned the seams in opposite directions. You could also open the seams – it is suggested in quite a few tutorials.

Bring together the two seams and pin. Sew along the raw edge, leaving a small gap. -
Stitched along the raw edge – leaving about an inch and a half to turn it inside out. Trimmed the corners and the threads.

-
Turned the `pockets’ inside out.

- Use a toothpick to pick out the corners. Many people slip stitch to close the pockets. I did not. Now I had my 36 pockets ready – thoroughly creased 🙁
-
Sorry , no pictures of this step – brought in the four corners to the centre and steam pressed! You could also finger press the corners to the centreJ
This is what my squares looked like at the end of this!

-
Back to the sewing machine! Stitched up the squares in pairs – along the pressing line on the flaps.
I did not pin at this stage.
I chain stitch wherever I can! But here I did take a `backtrack’ even while joining them in chains.
Then I made rows of four. And I ironed the rows individually, taking care not to iron on the edges. In a few places I did manage to iron off the fold crease lines. I just ironed them back!

-
Joined 2 rows, pinning is quite important here, I discovered.
And then another!

-
And so it came along nicely…

-
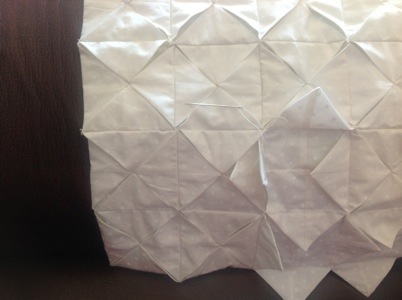
So here are my 9 rows from the front. J

…and from the back!

So are the window panes ready for the stained glass? Not quite!
I shall be doing the next steps after a few days – shall continue this post then! There are also lots of things I learnt through this – shall talk about those too in my next post!
June 8, 2012
I am just finishing the next step in my my cathedral window quilt…
Joining the flaps – not doing a terribly neat job, I am afraid. But, more importantly, it is getting done!
Now I have to wait for my fabric which I have ordered online to make the window panes!
Wait for the next post….
Post -Script: The story continues here 🙂

Madhu. The instructions are clear, and you make it sound so easy! Thanks for sharing!
Reblogged this on betukbandi.