Block Twelve Dozens Squared, Dreamcatcher Round the Year Quilt

This is a block that has given me much heartache , and that story deserves its very own blogpost! Meanwhile, here it is, Dozens Squared, the twelfth block of the Round the Year Block of the Month Quilt.

Block Twelve Dozens Squared, Round the Year Quilt BOM (Rainbow)

The block finishes at 18.5″ square (including seam allowance), with a 15″ inset circle. It is partly paper foundation pieced; the templates and instructions  can be downloaded in PDF format from the links at the end of this post.

What’s in a name?

This Block 12 of the Round the Year BOM Quilt is inspired by the beautiful Jack’s Chain block. I couldn’t decide what I wanted to call it. I thought of something to do with 9-patches and then Jill’s Chain! But then I counted the number of pieces in the circle – 144. It could not be chance that Block Twelve should contain twelve twelves, could it? The name would have to to have some reference to this, I thought. No way I was going to call it ` Gross’, which is the correct nomenclature for a dozen dozens! Dozens Squared sounded better, also as the dozens would in any case be inset in a square!

Fabric Requirement

The fabric requirement for the block is given for the Dusk colourway. I have scrapped the block that I made in the Dusk colours (not this) – I thought it looked quite ugly (gross?)!

Block Twelve Dozens Squared, Round the Year Quilt – Dusk – Fabric Code
Fabric Colour

Fabric Code

Background

Nine patches

Centre

Spiked wedges

Circle edge wedges

Lightest blue

1

19″ square OR
10.5″ x 25″
Two 6″ squares 2.25″ x 8″    
Medium Blue

4

  Two 6″ squares 2.25″ x 8″   Two 2″ x 8″
Medium-dark blue

3

  Two 6″ squares 2.25″ x 8″   Two 2″ x 8″
Deep blue

2

    2.25″ x 20″ 2.5″ x 36
2.0″ x 36″
Two 2″ x 8″
Yellow

8

    2.25″ x 6″    
Gold

6

      2.5″ x 12″
2″ x 12″
 
Light Orange

7

      2.5″ x 12″
2″ x 12″
 
Orange

5

      2.5″ x 12″
2″ x 12″
 

Please refer to the downloadable Instructions File, if you want detailed cutting instructions!

Printing Instructions

Please remember to print the Templates file with your printer
setting at 100% or Actual size in portrait mode. Cut out the paper piecing Templates.

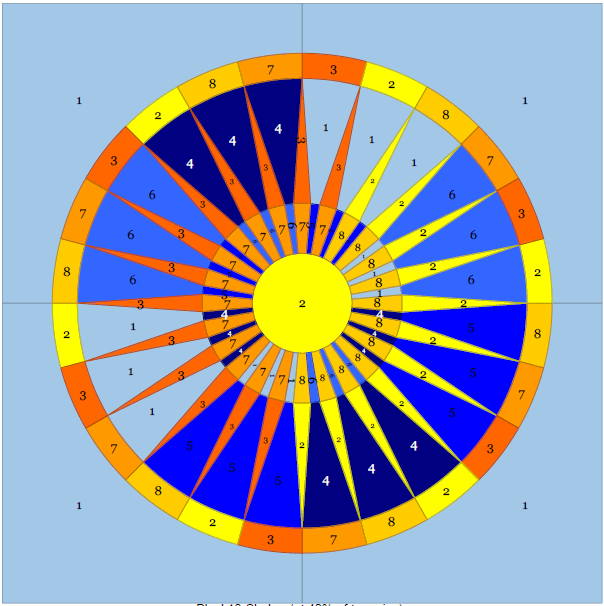
I recommend printing also the Instructions file and keeping the Master Template (provided in the Instructions File) at hand when assembling the block. A line drawing version of the Master Template is also included in the file (also a mirror image ). You can use colour pencils to experiment with your own colour combinations!

Piecing Instructions

The Nine-Patches Quick Method

Piece the six 9-patches A, B, C, D, E and F using the quick 9-patch method. The pictures I am showing here are for the rainbow block. You will start with 3 pairs of 6 inch squares.

For the Dusk version, team upthe squares in 3 pairs.
For the Dusk version, team up the squares in 3 pairs.


Note that we do not measure 2" from edge, but 1.75" from seamline!
Note that we do not measure 2″ from edge, but 1.75″ from seamline!


Similarly from the other seam!


Quick NIne Patch Square
Sew to get two strip sets. Press to darker side – I chose blue here.


Quick Nine Patch Square
If you are doing the Dusk version, you would already be working with 6″ squares. This would be irrelevant!


Quick 9 patch squares
Pair up the strip sets. Careful! Check you have the right pairing!


Sew on the shorter sides.


Quick 9 patch squares
Cut 1.75″ from both the seams…


Quick 9-patche squares
…and sew the centre strip to the double strip sets from the sides

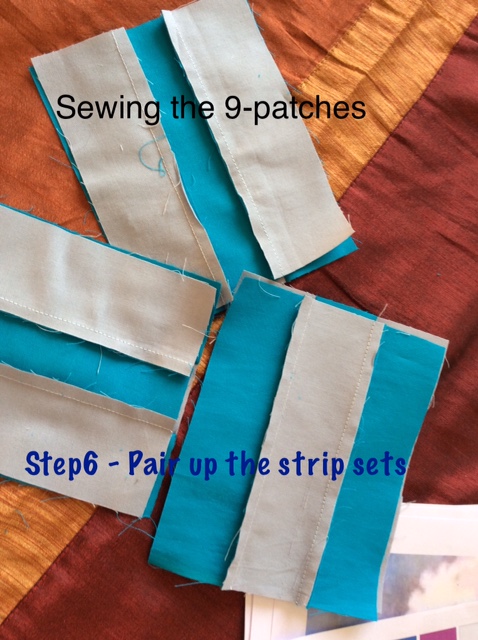
For the block we need 9-patches which finish at 3.5″, so we will need to trim these to 4″,  with centre square remaining at 1.5″.

Quick 9-patch
Mark the centre ( of the centre square!) and trim to 2″ from it on all sides.

You could also use the template A to match and trim the 9-patches to size.

Quick 9 -patch squares
Done!

Piecing the Centre

I would suggest cutting the strips into triangles before you start piecing. Lay the 60 degree line in alternating directions as you cut the triangles – remember to leave 1/4″ on the top before you cut in the opposite direction.

Block Twelve Dozens Squared, Round the Year Quilt
I used strips left over from previous blocks;  in paper piecing, one need not be accurate in cutting! The next set of triangles will be cut by changing the ruler direction.

If doing the Rainbow block, I may mention that a 6″ x 2.25″ yields 3 traingles quite comfortably. I used 8 different colours for the centre.

The pieced centre triangle templates from the Dusk block

In no time, you would have the templates S, T, U, V, W and Xpieced. Put these aside.

Spiked Wedges

Now we come to the 12 spiked wedges G, H, I…Q, R.

Each of these wedges has 5 pieces. Before you start the actual piecing, I suggest you pin pieces # 1  (2.5″ x  1.5″) and #2 (HST 2.5″) on all the templates. This helps save time in sorting colours and sizes of the upcoming pieces!

IMG_1648

Block 12 Dozens Squared

Chain piecing must be the greatest innovation in sewing, don’t you think? In no time we are ready for piece#3, (which is the largest piece, at 2″ x 4″)

Align the corner of the rectangle to the busiest corner on the template!


Note the angle and placement of the piece.
Note the angle and placement of the rectangular piece. It should completely cover the area under Section #3 when opened out.

Trim the excess seam allowance.

Step 2 continued... trim to seam allowance!
Step 2 continued… I like to trim to upcoming seam allowance – 1/4″ beyond the seamline!

Press open. Piece #4 is easy! Just align the long edges of the two pieces and sew!

I like to trim the just stitched piece to just 1/4" beyond the upcoming seam line!
Add piece #4

Chain piecing, as usual!

Piece#4 chained in place

Block 12 Dozens Squared

We are ready for the last step – sewing piece #5 – a rectangle 2″ x 2.5″ ( I used 1.5″ x 2.5″ rectangles, but they made a tight fit, so I have changed the width to 2″.) Again, please check the rectangle placement before sewing to ensure you have the paper section fully covered.

IMG_1698

All our piecing is done, all that remains is the assembly!

Assembly Instructions

Assemble the block, using the Master Template as a guide. Remember, the Master Template is a mirror image and shows the block as it would look from the printed paper (reverse) side. As seen here, what is on left appears on right and vice versa.

1. Sew the spiked wedge (halves) to either side of the respective 9-patches.

Sew G and J to opposite sides of A; M and P to opposite sides of C; H and K to opposite sides of E;

Sew N and Q to opposite sides of B; I and L to opposite sides of D; O and R to opposite sides of F.

2. Sew the centre pieced triangles to the 9-patch template sets.

Sew S to GAJ; V to MCP; T to HEK; W to NBQ; U to IDL and X to OFR.

3. Sew the respective circle edge wedges to the just assembled template sets. Here is some auditioning of fabric for the circle edges…

Block 12 Dozzens Squared Round the Year Block 12 Dozzens Squared Round the Year Block 12 Dozzens Squared Round the Year Block 12 Dozzens Squared Round the Year

…before I settle on this!

Block 12 Dozzens Squared Round the Year

Final Assembly

Option 1


Join background pieces AE1/ AH1 to wedge set containing A and B;

Join the background pieces  AF1/AI1 to wedge set containing F and E;

Join background pieces  AG1/AJ1 to wedge set containing D and C.

Join in threes – pieced set AE1, AF1 and AG1 to form one half; and the other 3 pieced sets to form the other half

Join the two halves to form the full block.

Option 2

Join the pieced sets to form the full circle and appliqué it to the background square using your favourite method.

Trim to 18.5″ square.

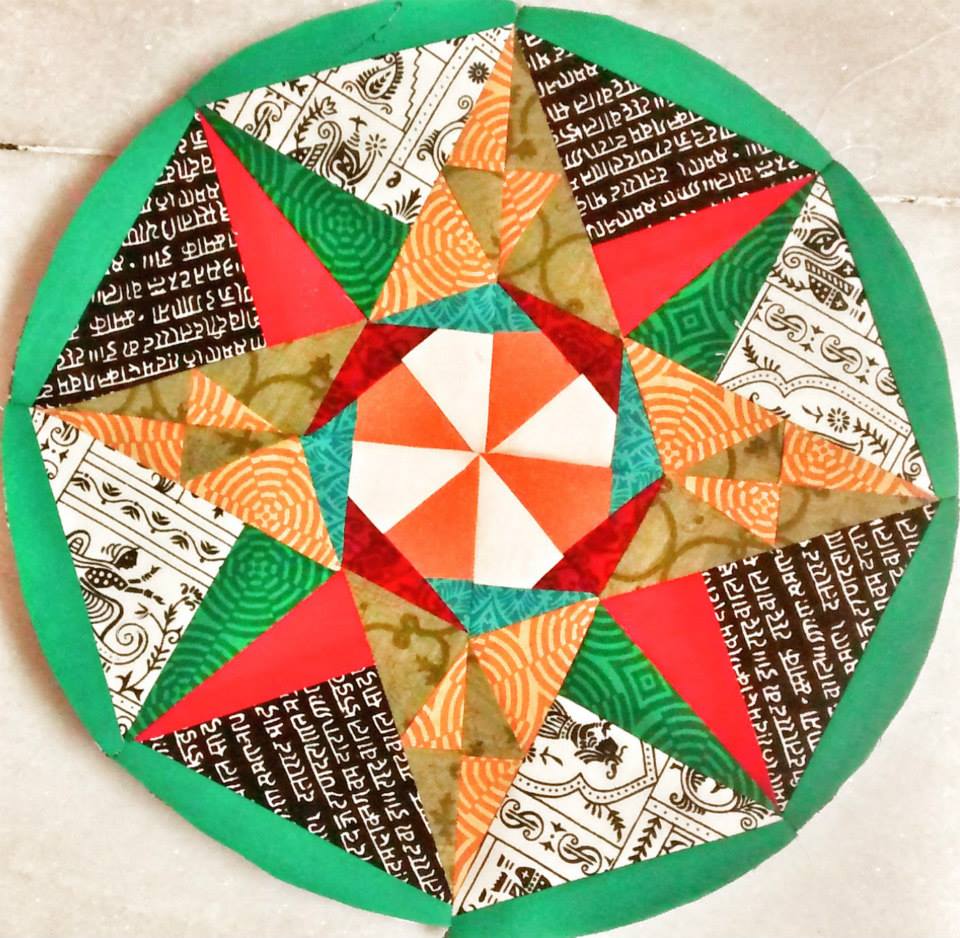
Here is a look at the Dusk version of the Dozens Squared block


Dreamcatcher Block 12
Patchworkofmylife

Please note that the downloadable patterns with paper piecing templates and instruction files for the Dreamcatcher Round the Year quilt blocks have been migrated to my store MadsPatch and are not be available for download for free from 15th November 2020 onwards.

Blue Aster – Block Eleven of the Dreamcatcher Round the Year Quilt

Blue Aster Quilt Block Round the Year Quilt Block 11The Blue Aster is Block 11 of the Dreamcatcher Round the Year Quilt. The 15″ pieced circle is inset in an 18″ ( finished) square.

The foundation paper pieced block is very quick to piece. The centre introduces inset or y seams for the first time in this BOM.  The block was tested for me by the lovely Anuradha Ramesh, who also tested the Sapphire Fire block!

If you want the patterns of the previous ten blocks of this quilt, you can find all the links on my MadsPatch Ecwid Store. The Templates and Instructions for this block can be downloaded in printable pdf format from the links  at the end of this post.

BUY THE PATTERN

Fabric Requirement

In the Dusk colourway, the block uses 4 shades of blue for the petals besides some small scraps of yellows and oranges.

Fabric Coding for Blue Aster

Fabric For Petals For Centre ( pieces# 3 & 4on I to L) For Edges
Light Blue

1

2.25″ x 7.5″ ( 8 pieces)
Medium Light Blue

2

2.25″x 6.5″ ( 8 pieces)
Medium Dark Blue

3

2.5″x 7.5″ ( 4 pieces)
Deep Blue

4

2.5″x 6.5″ ( 4 pieces)
Deep Orange

5

1.75″ x 5″ 1.75″ x 2.5″ ( 8 pieces)
Light Orange

7

1.75″ x 5″ 1.75″ x 2.5″ ( 8 pieces)
Gold

8

1.75″ x 5″ 1.75″ x 2.5″ ( 8 pieces)
Yellow

6

1.75″ x 5″ 1.75″ x 2.5″ ( 8 pieces)

 Printing Instructions

  1. Print the Templates File with your printer settings at 100% or actual size in portrait mode.
  2. Print and keep a copy of the Instructions File for ready reference.
  3. Cut out the paper piecing templates.

Piecing and Assembly Instructions

1. Follow the step by step Instructions for best utilization of your fabric to piece templates A to H.

2. Piece templates I to L

The Master Template is a mirror image – the paper pieced block from the printed paper side!

3. Follow the Master template to join the templates as follows:

Join A to B; Join C to D; Join E to F; Join G to H. You can press seams open to reduce bulk. (I originally did, but then sewed a couple of them to one side with the next seam. I think I  will never be able to sew with seams pressed open!)

We now encounter inset ot `y’ seams at the next step. You may refer to the step by step instructions if you are uncertain how to proceed.

Begin at the pointed end of the wedges, leaving ¼” for insetting seam to join AB to I at A1 ; join CD to J At C1, join EF to K at E1 and join GH to L at G1.

Now match the seams at the centre and join IAB to JCD.

Similarly, join KEF to LGH.

Finally join the two halves to make your full flower.

Applique the circle to an 18.5″ background square to complete your full block 11, Blue Aster. I recommend taking a larger square and trimming it to size.

BUY THE ASTER PATTERN HERE

 Step by Step Instructions

For general tips on paper piecing for the blocks in this BOM, you can look at this post I published some time back.

It is a good idea to pin when handling large or unwieldy fabric pieces!

Pin the Fabric#1 strips on the templates I, J, K and L and keep aside.

You may have noticed that we cut only 4 pieces  of the medium and dark blue fabric, whereas they are used in 8 places each! One thing I hate about paper piecing is the amount of fabric one wastes. So, this is how I found a way out, without complicating the cutting instructions!

We `prepare’ templates A to H for piecing.

Pin the rectangular piece of Fabric#3 on piece A1, C1, E1 and G1, aligning one long edge of the fabric ¼” beyond seamline between piece#1 and #3 on the template(s).

Pin for 1/4″ seam, letting the excess fabric hang out

Trim the excess fabric piece.

The excess fabric is trimmed away …

Pin the excess pieces of fabric at piece#1 on templates B, D, F and H.

… and used on the other 4 templates!

Fold the template at seam line between pieces # 1 and #2 on all the templates A to H and trim the fabric beyond the seam line towards circular edge (adding ¼” seam allowance).

I have discovered that trimming to the seam allowance BEFORE piecing makes life easier!

We are ready to start piecing templates A to H. Remember the wrong side of the fabric should touch the paper. Also, travel ¼” beyond the seam line when piecing.

Initially, I used strips of the yellow- orange fabrics to piece the small wedge to the `petals’, but later concluded that piecing with the 1.75″ x 2.5″ rectangles was more efficient and facilitated chain piecing. I am not giving a picture so that I can avoid confusion!

Chain piece all templates A to H up to piece #4.

Add the fifth piece only to templates A , C, E and G, aligning one edge of the fabric as we did for piece #1.

Now fold back the paper on the incoming seam line like in the picture below. Do not worry about the paper getting torn at the seam.

Using one rectangle to piece two long triangles!

Trim, allowing for a ¼” seam.

Don’t throw away that trimming!

This excess fabric piece will be used for piece#5 on templates B,D, F and H.

Use it here!

Add piece#6 on all the templates A to H. With this, templates B, D, F and H are pieced and can be kept aside. Proceed to finish piecing templates A, C , E and G; and I to J.

When piecing I to J templates: first sew the respective 1.75″ x 5″ strip at piece #3 on each of the templates. Trim off and keep the excess fabric piece for sewing at place#4 on the other templates as required. 

TThis block is perhaps the quickest to cut and piece!

 Assembly Instructions

Flip the pieced templates to the printed side and arrange the templates using the Master Template as a guide.

Pin templates A to B; C to D; E to F and G to H, taking care to ensure you have the right edges together…

Ensure you have the correct edges together!

…and sew. I pressed open the seams ( temporarily, as the final picture will confirm!), but you could also press them downwards, towards the edge.

Remove the excess paper from the seams.

It has been easy so far. Now comes some not-so-simple sewing!

We are ready to join AB to I, CD to J, Ef to K and GH to L.

Pin the edges on the alignment markers. Begin the seam, sewing from centre to edge, on the seam line, leaving the ¼” seam allowance at the top unstitched.

This is how it looks from the other side…

At the end of this, you will have 4 joined templates, IAB, JCD, KEF and LGH. We are ready to join these in pairs.

Again we begin sewing at the centre. If your centre looks good, the rest of the block looks good too!

Start sewing from the corner of the centre and stop short of the end by ¼” , just where the `petals’ begin.

Now align the `petals’ and sew  down the straight edges out to the circumference.

You can start this seam from the corner, including the 1/4″ shown left unstitched in this picture. I went back and sewed that bit afterwards.

One half is ready!

There actually no points to match, so everything falls in place neatly!

Similarly join the other pair KEF to LGH.

Now to join the two halves…again we begin at the centre, matching the centre seams, and leaving ¼” at both ends.

Again, begin at the centre…this is the only time you have to match points!

We are down the last two seams!

… the final seams are down the petals to the circle edge.

Turn it around!

Press the seams.

Flip over and admire your Blue Aster.

Applique your circle to a 19″ square. Trim to 18.5″ square.

You can click on the links below to purchase the pdf pattern for this simple block  designed by me ( if anyone else has also had the same idea, my apologies for claiming it  – as far as I know, it is an original!) .

BUY ASTER PATTERN NOW

For other Dreamcatcher Patterns, visit my online store, MadsPatch!

Chakra – Block Ten, Dreamcatcher Round the Year Quilt

Chakra, Block Ten Round the Year Quilt

This block has to be my absolute favourite. For one, it is a tribute to my country, India, on our Republic Day falling on 26th January. Secondly, it is designed by me, not based on any other quilt block that I have seen.

The Ashok Chakra, which is the inspiration for this block, is at the centre of India’s national flag. It is taken from the edicts of the great emperor Ashok, who ruled over almost the entire sub- continent, in the third century  B.C.  I quote from Wikipedia : The “Ashoka Chakra” … is the wheel of the law of dharma. Truth or satya, dharma or virtue ought to be the controlling principle of those who work under this flag. Again, the wheel denotes motion. There is death in stagnation. There is life in movement. India should no more resist change, it must move and go forward. The wheel represents the dynamism of a peaceful change.

 I tried to be true to the proportions of the Ashok Chakra on our flag. The block, a 15″ square set in an 18″ circle, is the tenth block in the Round the Year BOM quilt. It is surprisingly easy to piece the foundation paper piecing way, and assembly is also simple enough. (Except that you have to be really fond of hand appliqué to add those half circles using the method I employed!)

BUY THE CHAKRA PATTERN

 For the other block patterns, please go here.

Fabric Code DesignThe Chakra (Wheel)

As mentioned above, the block finishes at 18″ square with a 15″ inset circle.

I have used four shades of blue (coded 1, 6, 5, 4 from light to dark) and four contrasting colours ranging from yellow to orange ( coded 2, 8, 7 and 3 ) for the block in the Dusk colourway.

For this block, I have assembled the full circle and plan to appliqué it to the background. A background template is, therefore, not provided. The block is mainly paper pieced with some appliqué for the half circles. (You could fuse these if you have access to Heat ‘n Bond Red or equivalent; which case, do not cut fabric** for the half circles at this stage.)

Fabric Requirement

Fbric Colour

Fabric code

Outer Ring

(3″ x 1.5″)

Middle Ring

Inner Ring

Inner Circle

Background

Count your pieces

Lightest Blue

1


2.5″ x 30″

(Cut 6 rectangles 2.5″x 5″)

6 rectangles 1″ x 2.5″


19″ square

13

Light-Medium Blue

6


2.5″ x 30″

(Cut 6 rectangles 2.5″x 5″)

6 rectangles 1″ x 2.5″


12

Medium-Dark Blue

5


2.5″ x 30″

(Cut 6 rectangles 2.5″x 5″)

6 rectangles 1″ x 2.5″


12

Deep Blue

4


2.5″ x 30″

(Cut 6 rectangles 2.5″x 5″)

6 rectangles 1″ x 2.5″


12

Yellow

2

3″ x 9″

(cut into 6 rectangles)

1.25″ x 55″ ( Cut into 11 rect 1.25″x 5″)

**Rectangle 4″x 6″ for six circles 1.5″ diam.


3.5″ diameter circle


24

Gold

8

3″ x 9″

(cut into 6 rectangles)

**Rectangle 4″x 6″ for six circles 1.5″ diam.

1.5″x 27.5″

( Cut into 11 rectangles 1.5″x 2.5″)


23

Light Orange

7

3″ x 9″

(cut into 6 rectangles)

**Rectangle 4″x 6″ for six circles 1.5″ diam.

1.5″x 33″

( Cut into 13 rectangles 1.5″x 2.5″)


25

Deep Orange

3

3″ x 9″

(cut into 6 rectangles)

1.25″ x 65″ ( Cut into 13 rect 1.25″x 5″)

**Rectangle 4″x 6″ for six circles 1.5″ diam.


25

Printing Instructions

Please note that I revised the pattern template `naming’ after piecing my block. Don’t let the piece numbering on the pictures confuse you.

Print first two pages of the Instructions File for ready reference.

Chakra, Block Ten Round the Year Quilt
Cutting the fabric strips

Print Paper piecing templates file at 100% (or actual size ) in portrait mode and cut out the templates.

You can decide if you wish to use  the **circle templates and print the file as and when you need it. .
I printed the 1″ circle templates on freezer paper.

If you are interested in English paper piecing or regular piecing for this block, I have also provided the option of individual templates in a separate file.

Piecing Instructions

Piece the inner ring templates A,B, C and D.

Make piles of the rectangles for the inner ring – all four shades of blue and two shades of the contrast fabric (light orange and gold) are used here. Reduce the stitch length on your sewing machine, so that the paper can be torn off easily once you are done.

Chakra, Block Ten Round the Year Quilt
Pile the strips for easy access

The strips in the inner ring are ready at less than a ¼”. Fold the paper on the incoming seam and trim the seam allowance to slightly less than ¼”, before you join the next strip.

Chakra, Block Ten Round the Year Quilt
Fold the paper template away on next seamline and trim the seam allowance to 1/4″ before sewing the next piece.

Piece the middle ring templates E, G. I. K. M. and O. Here, we will use the other two shades of the contrast fabric (deep orange and yellow) with the four shades of blue.

Again, trim the seams before you join the next rectangle.

Chakra, Block Ten Round the Year Quilt
The outer spokes of the wheel under construction

Piece the outer ring templates F, H, J, L, N and P. It is possible to chain strip piece these, which is what I did.

Chakra, Block Ten Round the Year Quilt
I used strips to chain piece the outer ring. It is as easy to use rectangles.

Prepare the twenty four 1″ circles for appliqué. I must be a glutton for punishment, as I prepared the circles using the pulled thread method and appliquéd them by hand!

Chakra, Block Ten Round the Year Quilt
Cutting 6 circles at one go using freezer paper templates.


Chakra, Block Ten Round the Year Quilt
Cutting twenty four 1″ freezer paper circles using the Circle templates… the most tedious part of this bock!


Chakra, Block Ten Round the Year Quilt
Iron the paper circles at centre of the fabric circles.


Chakra, Block Ten Round the Year Quilt
The ‘pulled thread” method for preparing the circles for applique. Note the long ‘tail’ on both ends of the running stitch.

Applique the circles to outer edge of pieced wedges F, H, J, L, N and P referring to the colour design.

Note only half the circle is visible in the finished piece. Tack the circle to the edge of the corresponding template piece, such that the midpoint of the circle falls on the centre of the seam line at the outer edge of the piece. About ¼’ of the circle will stick out and beyond the template. Applique it in place using an invisible stitch.

Chakra, Block Ten Round the Year Quilt
Tack the circles on the middle ring (in correct order!) matching the centre of circle to seam line.

I love to hand appliqué so I really enjoyed my afternoon doing this step!

You could possibly machine appliqué the circles, if you are confident about getting such a small circle right by machine. You could also fuse one inch fabric circles in place if you have access to double sided fusing like Heat ‘n Bond (Red) or equivalent.

Or you could even omit the half circles altogether!

Arrange everything in order of assembly and gloat!!!

Assembly Instructions

Chakra Round the Year Quilt Master Template

Refer to the Master Template given here to assemble the block. Note it is a mirror image, and shows the block as it would look from the printed paper side.

Join E to F; G to H, I to J, K to L, M to N and O to P. ( The half circle should match the colour of the adjoining outer ring piece). I experimented with several methods to see what works best. The last method was the easiest and worked best!

First, I trimmed the seam allowance on the paper templates F, H, J, L N and P. I left the half circle on corresponding untrimmed and pinned the first pair at every possible point! (Do not attempt this, it added no value).

Chakra, Block Ten Round the Year Quilt
That paper is not necessary – remove it!

The paper kept getting in the way, so I removed it for the next pair. The pinning was the same and the circles were left intact. The circles got in the way of aligning the edges of the pieced templates – not recommended.

Chakra, Block Ten Round the Year Quilt
Those circle bits sticking out – trim them, BEFORE you join the two templates.

I trimmed the circles to the template edge…

Chakra, Block Ten Round the Year Quilt
Trim the circles like this!

…pinned and sewed another pair together.

Chakra, Block Ten Round the Year Quilt
Even so much pinning is not necessary. Keep only the pins to match the corners and one each at the seams.

Finally, I used just 5 pins, one each on the corners and three to match the seams. The seams abut against each other and join beautifully, without any additional pins. That is the one I did not take a picture of :-p. This gave me the smoothest curve! And this is what I recommend – trim the circles to the template edge, remove paper from outer ring templates and pin minimally.

The next step is to join the outer six wedges in threes.

Join EF to GH to IJ

Join KL to MN to OP

Before you do that, remove the extra paper on the seam allowance and press the seam outward. Pin at corners and at centre.

Chakra, Block Ten Round the Year Quilt
Three pins to have everything aligned. Note the paper removed from the seam at the `skirting’?

Next, join the innermost pieced rings in pairs.

Join A to B

Join C to D

Chakra, Block Ten Round the Year Quilt
The inner ring templates are joined in pairs while the outer in threes. Remove as much of the paper as you can – on at least alternate pieces.

Join AB to EFGHIJ

Join CD to KLMNOP.

This was surprisingly quick and did not need any pinning, as the seams worked as alignment markers.

Join the two circle halves.

Chakra, Block Ten Round the Year Quilt
Just one more seam and the circle is done, barring the centre piece.

Tada!!

Chakra, Block Ten Round the Year Quilt
Pretty, pretty!!!

Yes, I can see a couple of unmatched seams and plan to re-do those when I do the last steps, that is, firstly appliqueing the circle to the background and then finally to applique the centre circle Q1 (3″ diameter ready).

You can purchase the Instructions and the Template files from my MadsPatch Store on Ecwid (link below). You would need Adobe Reader ( free online download available) on your computer to be able to open these files.

BUY CHAKRA PATTERN NOW

Ring in the New Year with the Wedding Ring! Block Nine, Dreamcatcher Dusk Round the Year Quilt

Round the Year Quilt Block Nine Wedding Ring

 Wishing you a Very Happy New Year!

Have you not always wanted to make a double wedding ring block? A whole quilt would be too much, but just one block?  We have a comparatively complicated block lined up for the next fortnight and many of us have a few pending blocks to catch up with.  Plus, I celebrate my 33rd wedding anniversary this January – that clinched it for me! A wedding ring block it is, to start 2015!

You may like to see how I used this block to make a wedding anniversary gift for my sister-in-law a couple of years ago.

This 18″ block, with a 15″ paper pieced wedding ring, is the ninth of the Dreamcatcher Round the Year Block of the Month quilt, which began mid July 2014.

INSTRUCTIONS

Click the link at the end of this post for templates and instructions (including fabric requirements) in downloadable .pdf format.

Fabric Requirements

I have used 5 shades in the blue- violet spectrum and 3 shades in the yellow-orange range to piece this block. The background is in two shades of grey.

Fabric Requirement
Fabric Requirement

Printing and Cutting Instructions

  1. Take print outs of the 3 files Instructions, Templates1 and Templates2 with printer settings at 100% or actual size in portrait mode. I printed Templates.2 file on freezer paper for ease and accuracy in cutting fabric.
  2. You have the following templates:

Templates.1     Twelve paper piecing templates for ring – A to L

Templates.2

Templates R1 and R2 for background. You need to glue at edge as indicated in template – cut 2 each from fabrics #1 and #2. I am not joining the pieced circles to background right now; I shall do them all together. For this particular block, I recommend assembling the entire circle and the attaching it to the background.

Template M for melon – Cut two from each of the Fabric#4 (deep blue) and Fabric #3 (lightest blue)

Template Q in two parts – glue at edge indicated to make into one template.

Piecing and Assembly Instructions

Please refer to this Master Template as a guide for piecing and assembly. Remember, it is a mirror image, and shows the block from the reverse, printed paper side!

Master Template - Wedding Ring Block. This is a mirror image!
Master Template – Wedding Ring Block. This is a mirror image!

Step by Step Instructions

Melons

It is easy to chain strip piece the ring templates A, B, C, D. Detailed instructions for this technique of foundation paper piecing are given with the Block One, Dahlia pattern!

Chain strip piecing. Have you reduced the stitch length?

Remember

  • Strip for A1, B1, C1, D1 ( Fabric #9 here) will be placed, wrong side touching paper on unprinted side.
  • Incoming strip, for A2, B2, C2, D2 ( Fabric #7 here) will be placed right sides together with previous strip.
  • Keep sufficient space between templates when chain piecing.
  • Cut apart the templates before attaching next strip.
  • Press open the strip before you cut apart the templates!

Press open incoming strip before cutting templates apart.

And remember, what not to do!

Two templates stitched as one!

Jack (the Ripper) had to intervene!

Next step – to piece Templates E, F, G, H and I, J, K, L…

… and arrange them all together and admire them!

The rings are pieced, Stand back and admire!

But not for long! The outer ring templates are to be joined – E to I, F to J, G to K and H to L as shown in the Master template. ( Theoretically, these could be glued and pieced as one – EI, FJ, GK and KL respectively. Since the templates are printed on A4 size paper, they are broken into two parts!)

Sew together the outer ring templates in pairs.

That was quick!

Now to attach the melons M, N, O and P to the pieced inner rings A, B, C and D respectively.

First, I  trimmed the pieced templates carefully on the dotted line for an accurate ¼” seam allowance!

I used a couple of pins to align the melon to the ring. I folded the melons into half to find the centre and pinned  them, seam to seam at centre of piece #4 on the templates – A4, B4, C4 and D4.

Pin the melon to the inner ring on seam line at centre

I then matched the blunt edges at the corner where I would begin my seam line, and secured them with another pin.

Secure the start corner. The end corner remains free.

I chose  the 1/4″ stitch option on my Hasina Husqavarna Viking machine, reduced the speed to a minimum and gently eased the melon curve to sew it to the template, moving 2-3 stitches at a time.

Melon attached to inner ring. Press down seam.

I pressed the seam towards the melon. My seam is a little uneven, but this does not bother me. The best thing I like about curves is that they just fall into place if you press them down gently!

Perfect!
Perfect!

The next step involves attaching the inner ring to the melon. Is this going to get a bit more challenging?  Referring to the Master Template, I attached EI to AM; FJ to BN, GK to CO and HL to DP.

Attaching melon to outer ring : Align and pin on seam line.

After aligning the two pieces at the centre – melon to outer ring template, I used vertical pins to align the corners at the edge of the rings ( A7 to I4 in this instance). I then secured them with a pin in the centre.

You will notice that I pinned only at the corner at which I started the seam, not at the end. I find that a pair of tweezers helps in keeping everything in place.

Tweezers, ripper and scissors on call. Not visble - pin cushion!
Tweezers, ripper and scissors on call. Not visble – pin cushion!

Fix thread and needle down. Speed minimum
Fix thread and needle down. Speed minimum, stitch length 1.5.

I `fixed’ the thread as I started, kept the needle in the ‘down’ mode and move very slowly. And yet…

Oops! Something moved - needs re-doing!
Oops! Something moved – needs re-doing!

Perhaps it would be better to keep the ring template on top, to get a perfect seam?

I finished the four melons and pressed seams inwards, towards the melon. This was surprisingly easy and done in less than 15 minutes, pinning and all!

Centre

To move to the centre now – I first made a pinwheel using the two 5.5″ squares each of Fabric # 3 and Fabric #4.  I used the easiest way of making the pinwheel. I paired the light squares with the dark and drew a line on one diagonal on each top light square.

Diagonal on paired squares.


Sew 1/4' seam on either side of line and cut on line
Sew 1/4′ seam on either side of line and cut on line

I sewed a ¼” seam on either side of the diagonal and then cut along the centre pencil line. I now had four HST (half square triangle) squares. I usually press the seams to the darker side, but here I chose to press them open.

I then joined the four squares to make a pinwheel; pressed open the seams again, to reduce bulk.

Seams pressed open; the 4 squares joined together WRONG! The dark patches should be where the light ones are!
Seams pressed open; the 4 squares joined together. The patch in this picture is pieced WRONG! The dark patches should be where the light ones are!

Perfect? No! As it turns out, I joined this wrong; the dark patches should be where the light ones are and vice versa. You may think this does not matter, but it does, in my colour scheme! You will soon know why!

I printed only one half of the Template Q and used this to trim the centre. I pressed the freezer paper template to the pinwheel, matching the seams to the lines on the template…

Press freezer paper template Q in place.( I have only one half of the template)

…trimmed one side…

Trim along dotted line

…and the other. The centre was fast work too!

Alternatively you can cut HSTs from the squares and paper piece the centre.

I now trimmed the freezer paper template to the seam line and pressed it in place, on the right side of the pieced centre. The markings on the template helped me align the centre to the melons.

Centre done! Trim template to seam line to help pinning on alignment markers.


Ready for final assembly!

Final Assembly

I first joined the melons on opposite sides of centre Q.

Now is the time to bring on the pins! I inserted vertical pins through the two patches at corners, and on alignment markers about an inch to inch and a half apart

Pin
Pin.

I then attached horizontal pins on the seam as shown, removing the vertical pins as I went along. Pins stuck in this way are easy to pull out and unlikely to prick your hands.

Pin, pin!
Pin, pin!

I removed the template before I sewed the two patches together. I then pinned the template on the opposite side.

Pin, pin, pin!
Pin, pin, pin!

Upto this step, everything went off unexpectedly quickly, other than that small encounter with the ripper!

Now things started getting a bit tricky .

Worth all the pinning? Opposite melons attached.

 I had read on a blog somewhere, that you should not press your block at this stage, but I don’t think that works for me! I suggest you DO iron the seams towards the centre pinwheel, before you move to melons #3 and #4.

And don’t spare those pins! Especially at the corner, where the centre meets the melon. Join the melon in one smooth curve. My corners did not match on Lemon #3 and I had to do a bit of ripping at this stage, because I had not pressed the patch and I had not pinned enough. I could appreciate why this block is traditionally hand pieced; I was sorely tempted to do this step by hand to set those offending corners just right!

These few hiccups apart, this was a simple block to make – I could finish it in an afternoon.

One last thing – the seams! Press the seams on Lemon#3 and Lemon#4 outward – towards the edge of the circle!

Press last two seams towards edge.

Voila! We are done with Block Nine!

Yippeee!!!
Yippeee!!!

Now to come back to the little matter of the clockwise pinwheel. Can you see that the dark triangle on the pinwheel is touching the dark (blue) side of the inner ring? Would it not have been prettier to have the yellow-orange contrast against the dark blue, like in the original design?

Before I upload the Instructions and Template Files, one more thing! Many of you have asked me for a mirror image of the block in colour to help in assembling the block – I do not know how useful that can be – but here it is!

Coloured Master Template (Mirror Image) with fabric code

You can download the free pattern and instructions from these links. You would need Adobe Reader (software available online for free download) on your computer to be able to view these files.

  1. Instructions Block 9 Wedding Ring, Round the Year Quilt.
  2. Templates.1 Block 9 Wedding Ring Round the Year Quilt.
  3. Templates.2 Block 9 Wedding Ring Round the Year Quilt

Have a wonderful year ahead! Happy quilting!

BUY  NOW!

Please note that the downloadable patterns with paper piecing templates and instruction files for the Dreamcatcher Round the Year quilt blocks are being migrated to my store MadsPatch and will not be available for download for free from 15th November 2020 onwards.

Block Parade on Day Fourteen

I have lots to share with you today…blocks made by other quilters,  members of my virtual quilting group, Desi Quilters. So without much ado, here we go! Here are the blocks Sobana made in the last two weeks; she now has only two more blocks to make to catch up with all her pending blocks!

Sobana Sundar's Card Trick
Sobana Sundar’s Card Trick

Sobana's Sapphire
Sobana’s Sapphire,,,

...and this is Sobana's Venus
…and this is Sobana’s Venus

The stunning Southward Bound by Sobana

Other Desi Quilters have also been catching up! Here is a look at their blocks.

Diptee's `gemstone' block
Diptee’s `gemstone’ block

Smita Prabhu's  Dahlia Round the Year Quilt
Smita Prabhu’s peach of a Dahlia

Tina Katwal Dahlia Round the Year Quilt
Tina Katwal’s transparent Ribbon Dahlia with a pixellated centre

Alka Goel Venus Round the Year Quilt
Alka Goel used solids to make her Venus shine!

Have you made any blocks during catch-up December? Why don’t you share your work on my facebook page Patchwork of my Life? The blocks are majorly foundation paper pieced and much easier to construct than what you may believe looking at them. So, if you have still not started on your blocks from the  Block of the Month Quilt `Dreamcatcher Round the Year’, you can head here to my MadsPatch  Store on Ecwid!