The pattern for this gorgeous 15″ Chakra (Wheel) circle block set in an 18″ square is foundation paper-pieced and much easier to sew than it looks! And there are so many ways to use it!
The Chakra Block Pattern is now available on my Madspatch Ecwid Store! Check Link below.
The Chakra (Wheel) Block from my Dreamcatcher Quilt has to be my absolute favourite. For one, it is a tribute to my country, India! Secondly, it is designed by me, not based on any other quilt block that I have seen.
Why not celebrate India by making your own Chakra? The pattern is now available on my Madspatch Ecwid store! It is surprisingly easy to piece the paper-foundation paper piecing way, and assembly is also simple enough. The half-circles could be appliqued, fused or even omitted if you don’t feel up to it!
The block, a 15” square set in an 18” circle was designed as the tenth block in the Dreamcatcher Round the Year BOM quilt. However, like the other blocks of my quilt, it works great as a stand-alone small quilt! Here are some great options for you!
You could use just the centre circle as a great-looking round table runner.
The Chakra Block in its original Dreamcatcher by Dusk colours
Make it in the original indigo and white of our flag and bind with a green and saffron double binding to make it look special!
The Indigo and white Ashok Wheel round table runner with a tricolour double binding!
Substitute the colours on the pattern and make a couple for a pair of gorgeous tricolour cushion covers.
A pair of cushions in the saffron, green and white of the Indian tricolour
…Or you could combine with another two blocks from my store, the Lollipop Candy and Dahlia; add a 1.5” border and sashing to make a table runner 21”X 60”!
Or perhaps join four blocks two by two to make a stunning wall-hanging!
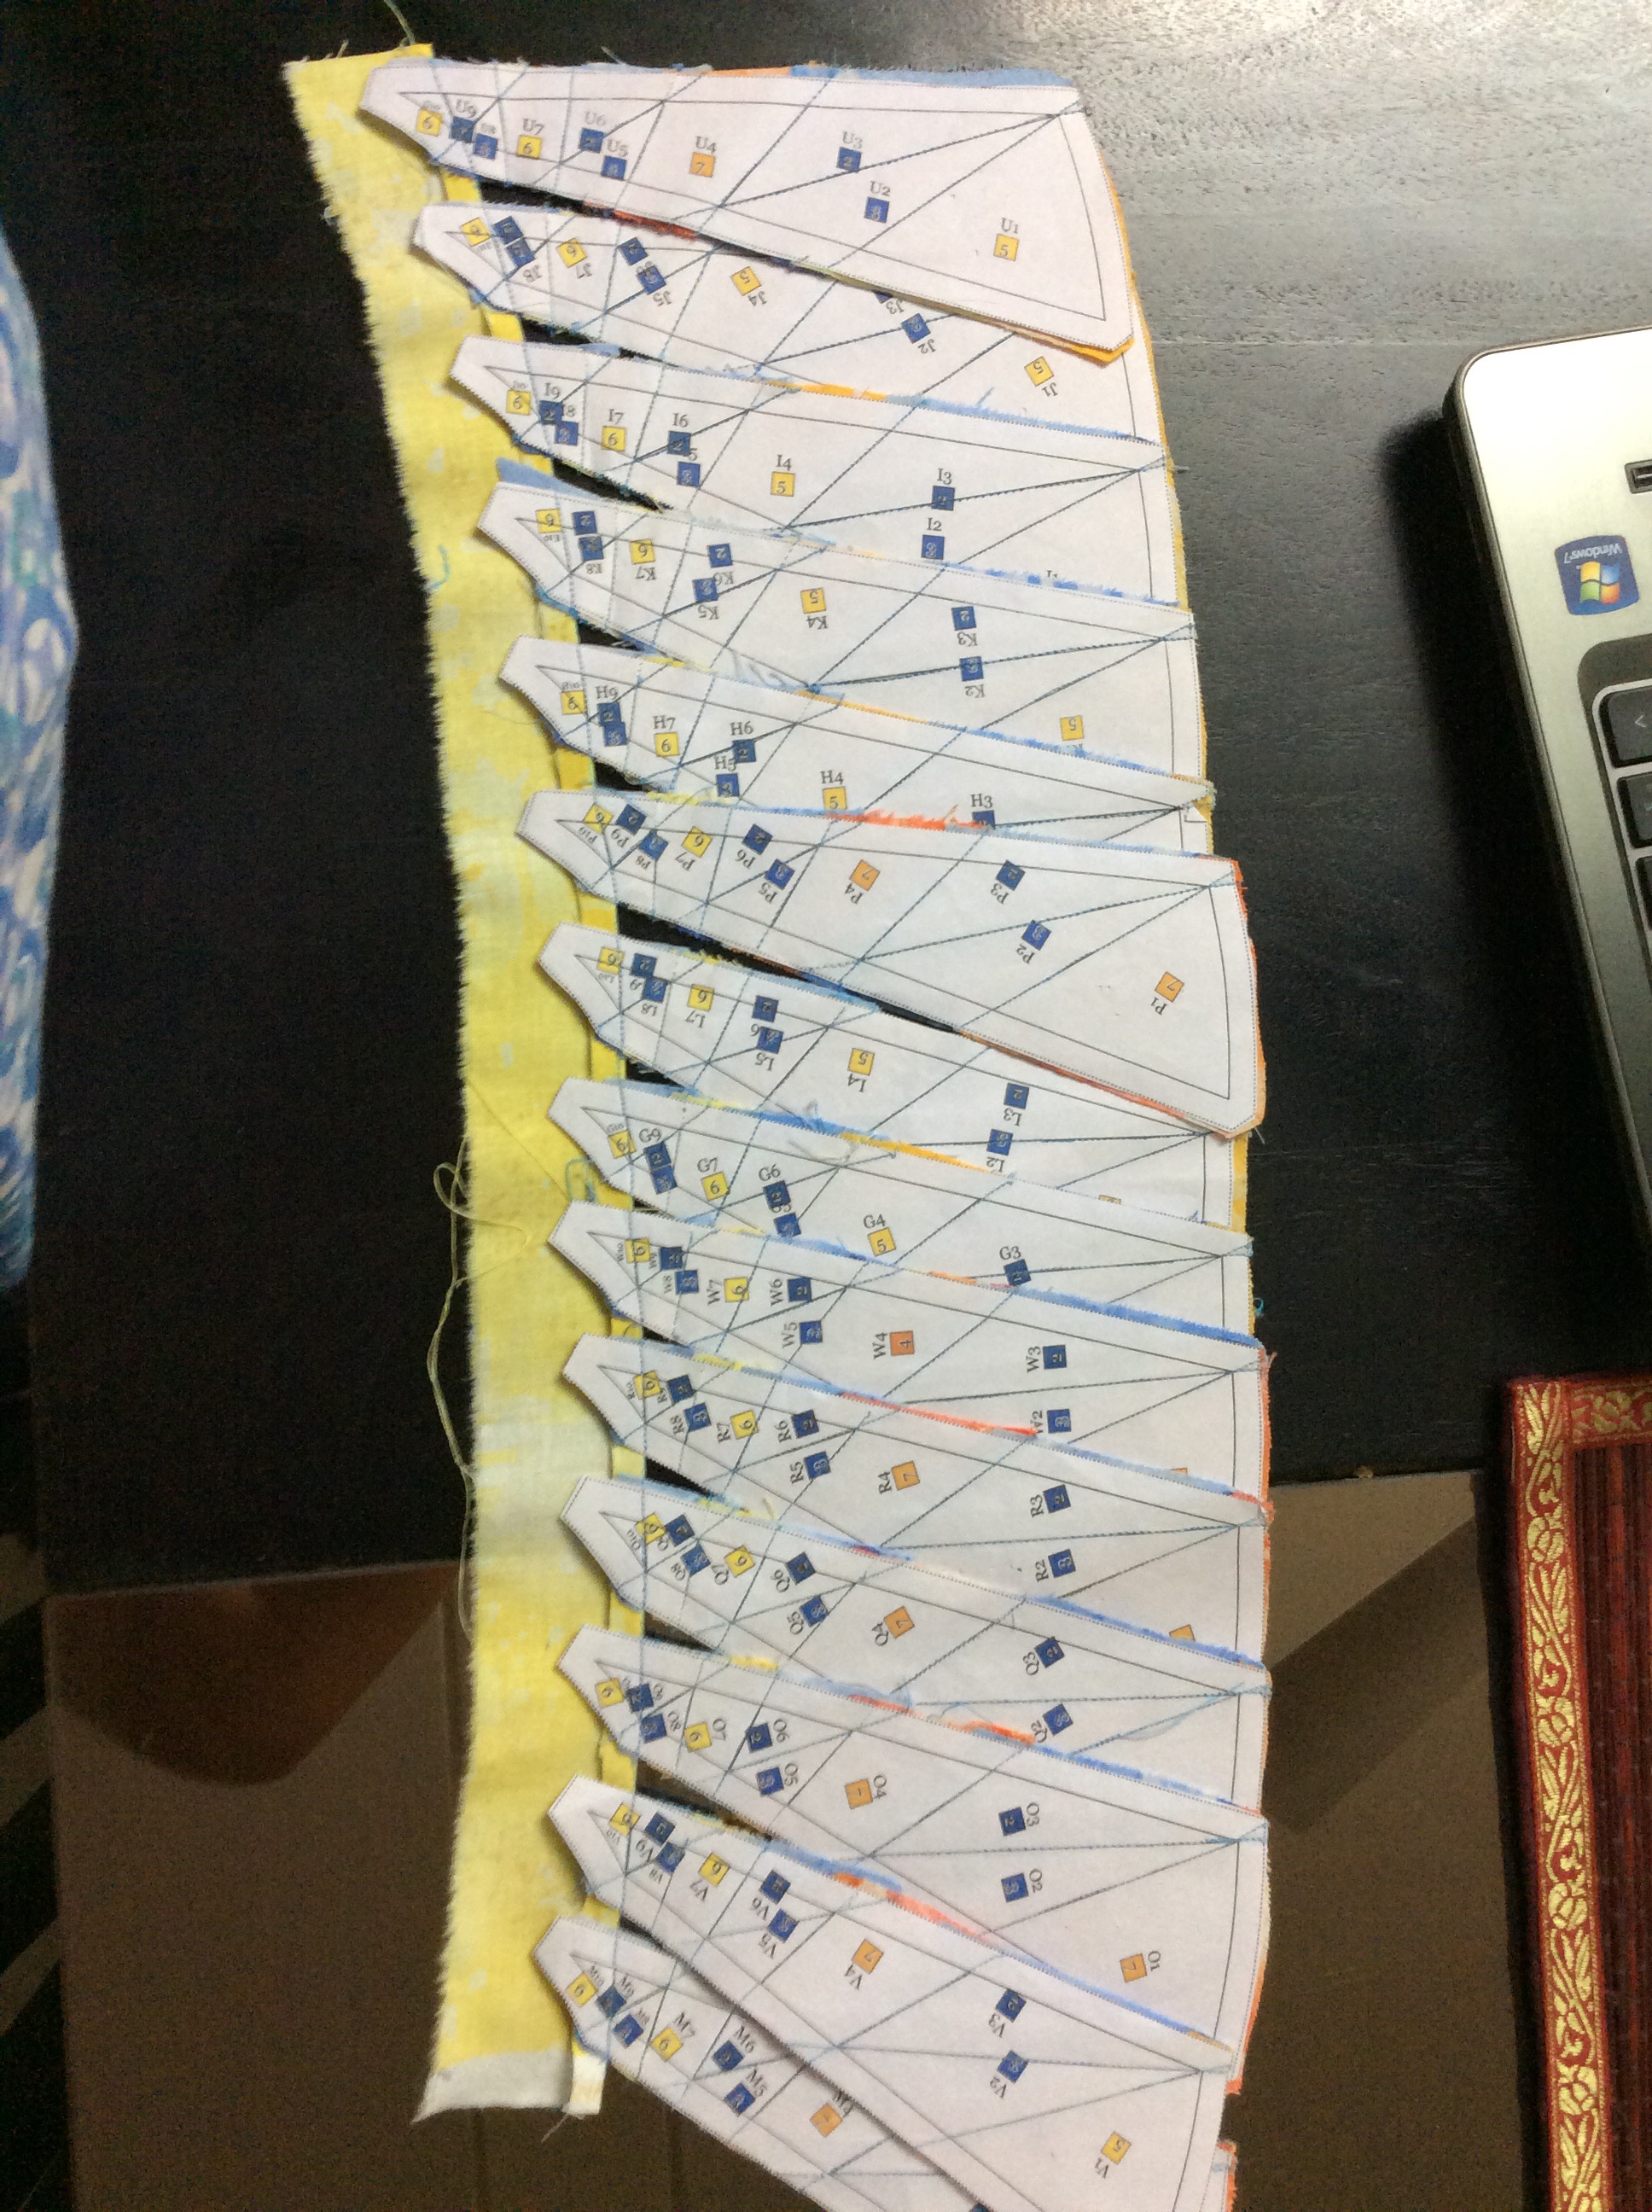
Am I excited and relieved at the same time, or what, to present the sixteenth and final block of the DreamcatcherRound the Year Quilt !?! This 24-spoke Mariner’s Compass is foundation paper pieced and is, like the other blocks of this Block of the Month quilt, drafted as a 15″ (finished) circle set in an 18″ (finished) square. I learnt to draft this block from a workshop by Adina Sullivan, “Mastering the Maddening Mariner” in “Quiltskills – Workshops from The Quilters’ Guild Australia” (published by The Patchwork Place, 1998). Adina has the most fabulous quilts based on the Mariner’s Compass and I had been gathering the courage to attempt these since the last six years or so, when I bought this book. You may recall that Southward Bound was also drafted using the method taught by Adina. She uses the English paper piecing method to construct her blocks, mine is completely machine pieced!
Please note that the downloadable patterns with paper piecing templates and instruction files for the Dreamcatcher Round the Year quilt blocks are being migrated to my store MadsPatch and will not be available for download for free from 15th November 2020 onwards.
I used Quilt Assistant, a great free quilt design software for designing the block. The pattern instructions and paper piecing templates can be downloaded in PDF format from the links at the end of this post.
Fabric Requirement
Fabric Code for Mariner24
This block uses 2 shades of blue and 4 contrasting colours in the yellow-gold-light orange spectrum for the Compass, set in a third shade of blue for the background.
Trivia – This block contains 269 pieces! But don’t worry, we will be working with strips, so that you need not worry about cutting dozens of pieces.
Fabric Code
Colour
Fabric Required
Cutting Instructions
1
Pale Blue
19″ square*
2
Medium Blue
6″ WOF
Cut 3 strips WOF 2″ wide
2 squares 4.5″
Cut along both diagonals to get 8 QSTs
3
Deep Blue
6″ WOF
Cut 3 strips WOF 2″ wide
4
Deep Orange
3″ x 30″
5
Gold
3″ x 30″
6
Yellow
3.25″ x 30″
Cut into strips 2″ x 30″
1.25″ x 30″
7
Light Orange
3″ x 24″
*I have given a template for joining the background by piecing, but for this block I suggest appliqueing the compass on a square.
Do remember to spray starch and press your fabric before cutting it. I do not have access to spray starch, so I make my own by adding two capfuls of the locally available liquid fabric stiffener (sold by the name of Revive) to 100ml of water in a spray bottle.
Your best friend when piecing – spray starch!
Printing Instructions
Print the Templates File at 100% / actual size in portrait mode. Cut out the templates. I suggest you ignore the background template AG( in two parts), as we will be appliqueing the compass on a background square. It may prove useful for marking the circle on the background fabric.
Print the Instructions File, which includes the Fabric Requirement chart and Master Template, and keep at hand for piecing and assembly.
Step by Step Piecing Instructions
If you are attempting a block from this quilt for the first time, or even if you have not foundation paper pieced for a while, you may like to see this blogpost for decoding the paper piecing patterns for this BOM and this one, which reminds you of certain do’s and don’ts for paper piecing these blocks. If you are new to paper piecing itself, there are several great tutes online on the subject!
Outer Ring
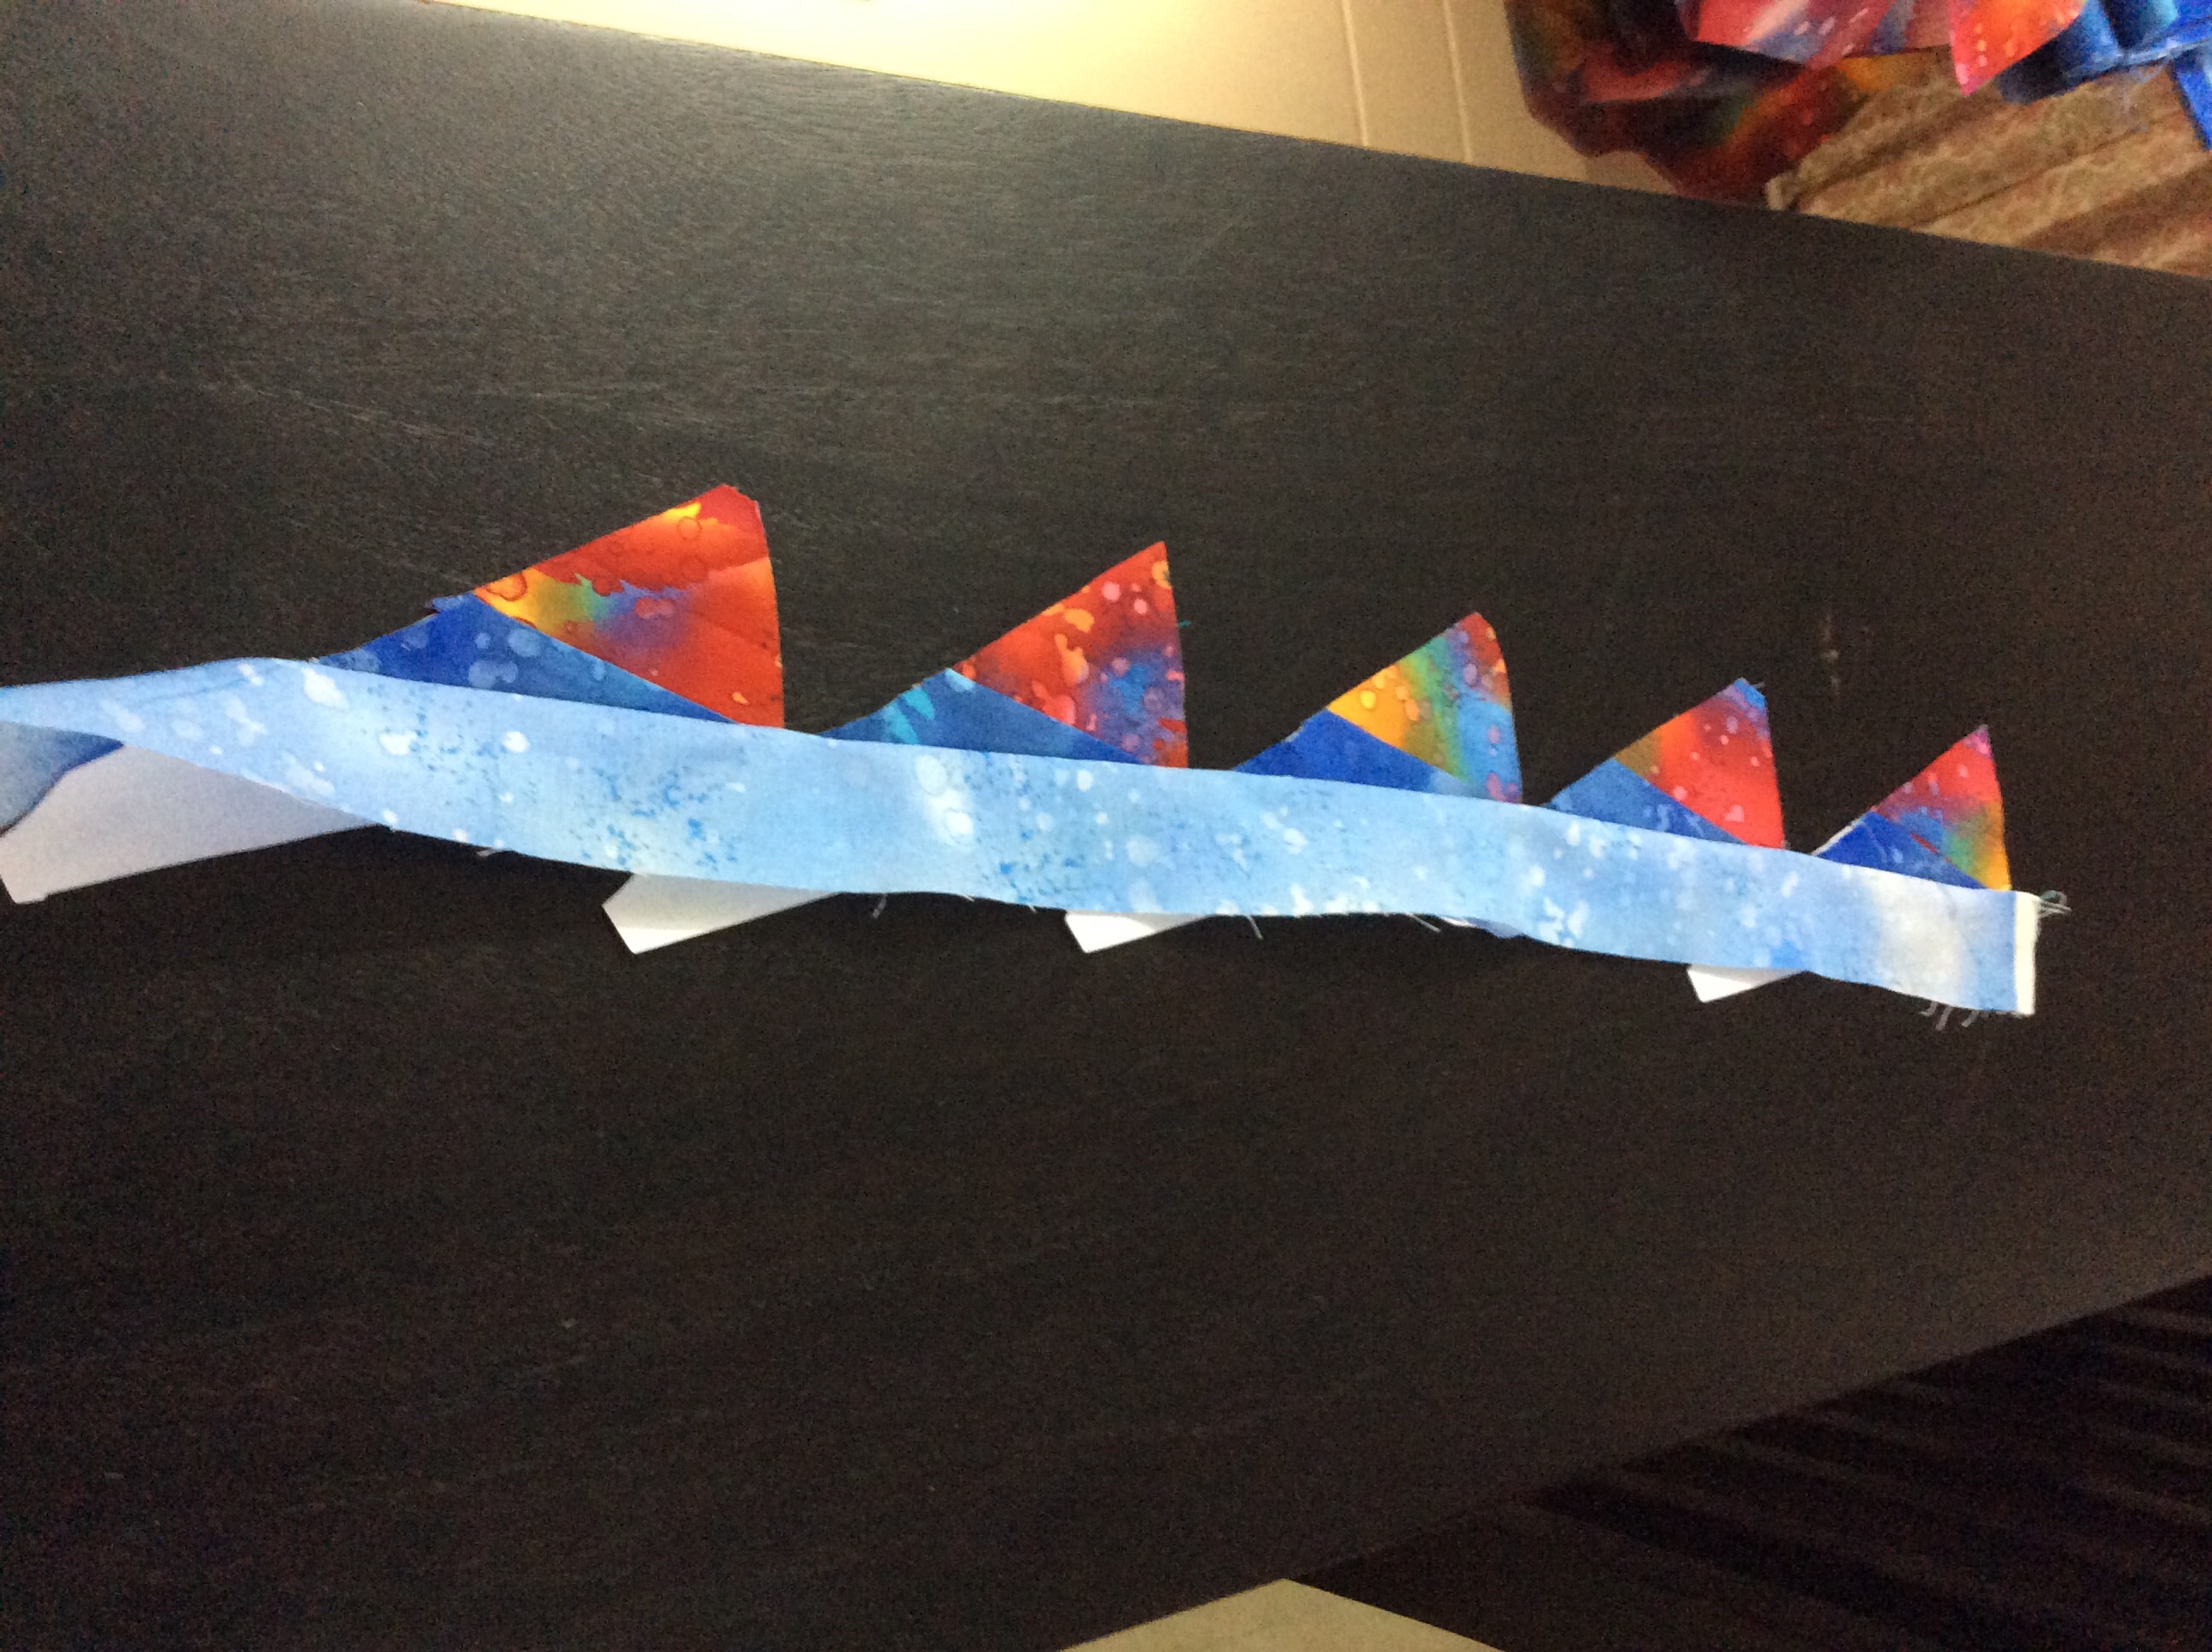
First we piece the spokes of the outer ring (Templates A to X), using (majorly) the chain strip piecing method, that we have used for several earlier blocks. To avoid confusion and efficient use of fabric, the following order of piecing is suggested. We start with templates A to F and fabric strips which will come at piece#1 and piece#2 ( Fabric Codes#4 and #3 respectively). The following photos will explain how we chain piece the templates to the strip pair.
Align the edges of strips for A1 (Fabric#4 and Fabric #3) and place the template A ready for the first seam.
Template B will be aligned just below template A, leaving some space in between the two.
This shows Templates A to F … first set of seams done and strip for piece#2 pressed open.
Cut to separate the templates…
Trim the excess fabric up to paper template. Preserve the trimmings!
Fold back the paper template on seam line and trim the seam to 1/4″
Now fold the paper template at seam line between piece#2 and piece#3. Trim the fabric (Strip#2) 1/4″ beyond this seam line.
How templates A to F will look after the first two pieces are in place…
…All these trimmings will be used…
We are now ready to add the strip which will come in at Piece#3 (Fabric Code#2).
Chain piece the templates to strip for piece #3 and press open before cutting apart.
Trim the seam allowance to 1/4″ and the fabric on piece#3 to 1/4″ beyond seam line between piece#3 and piece#4
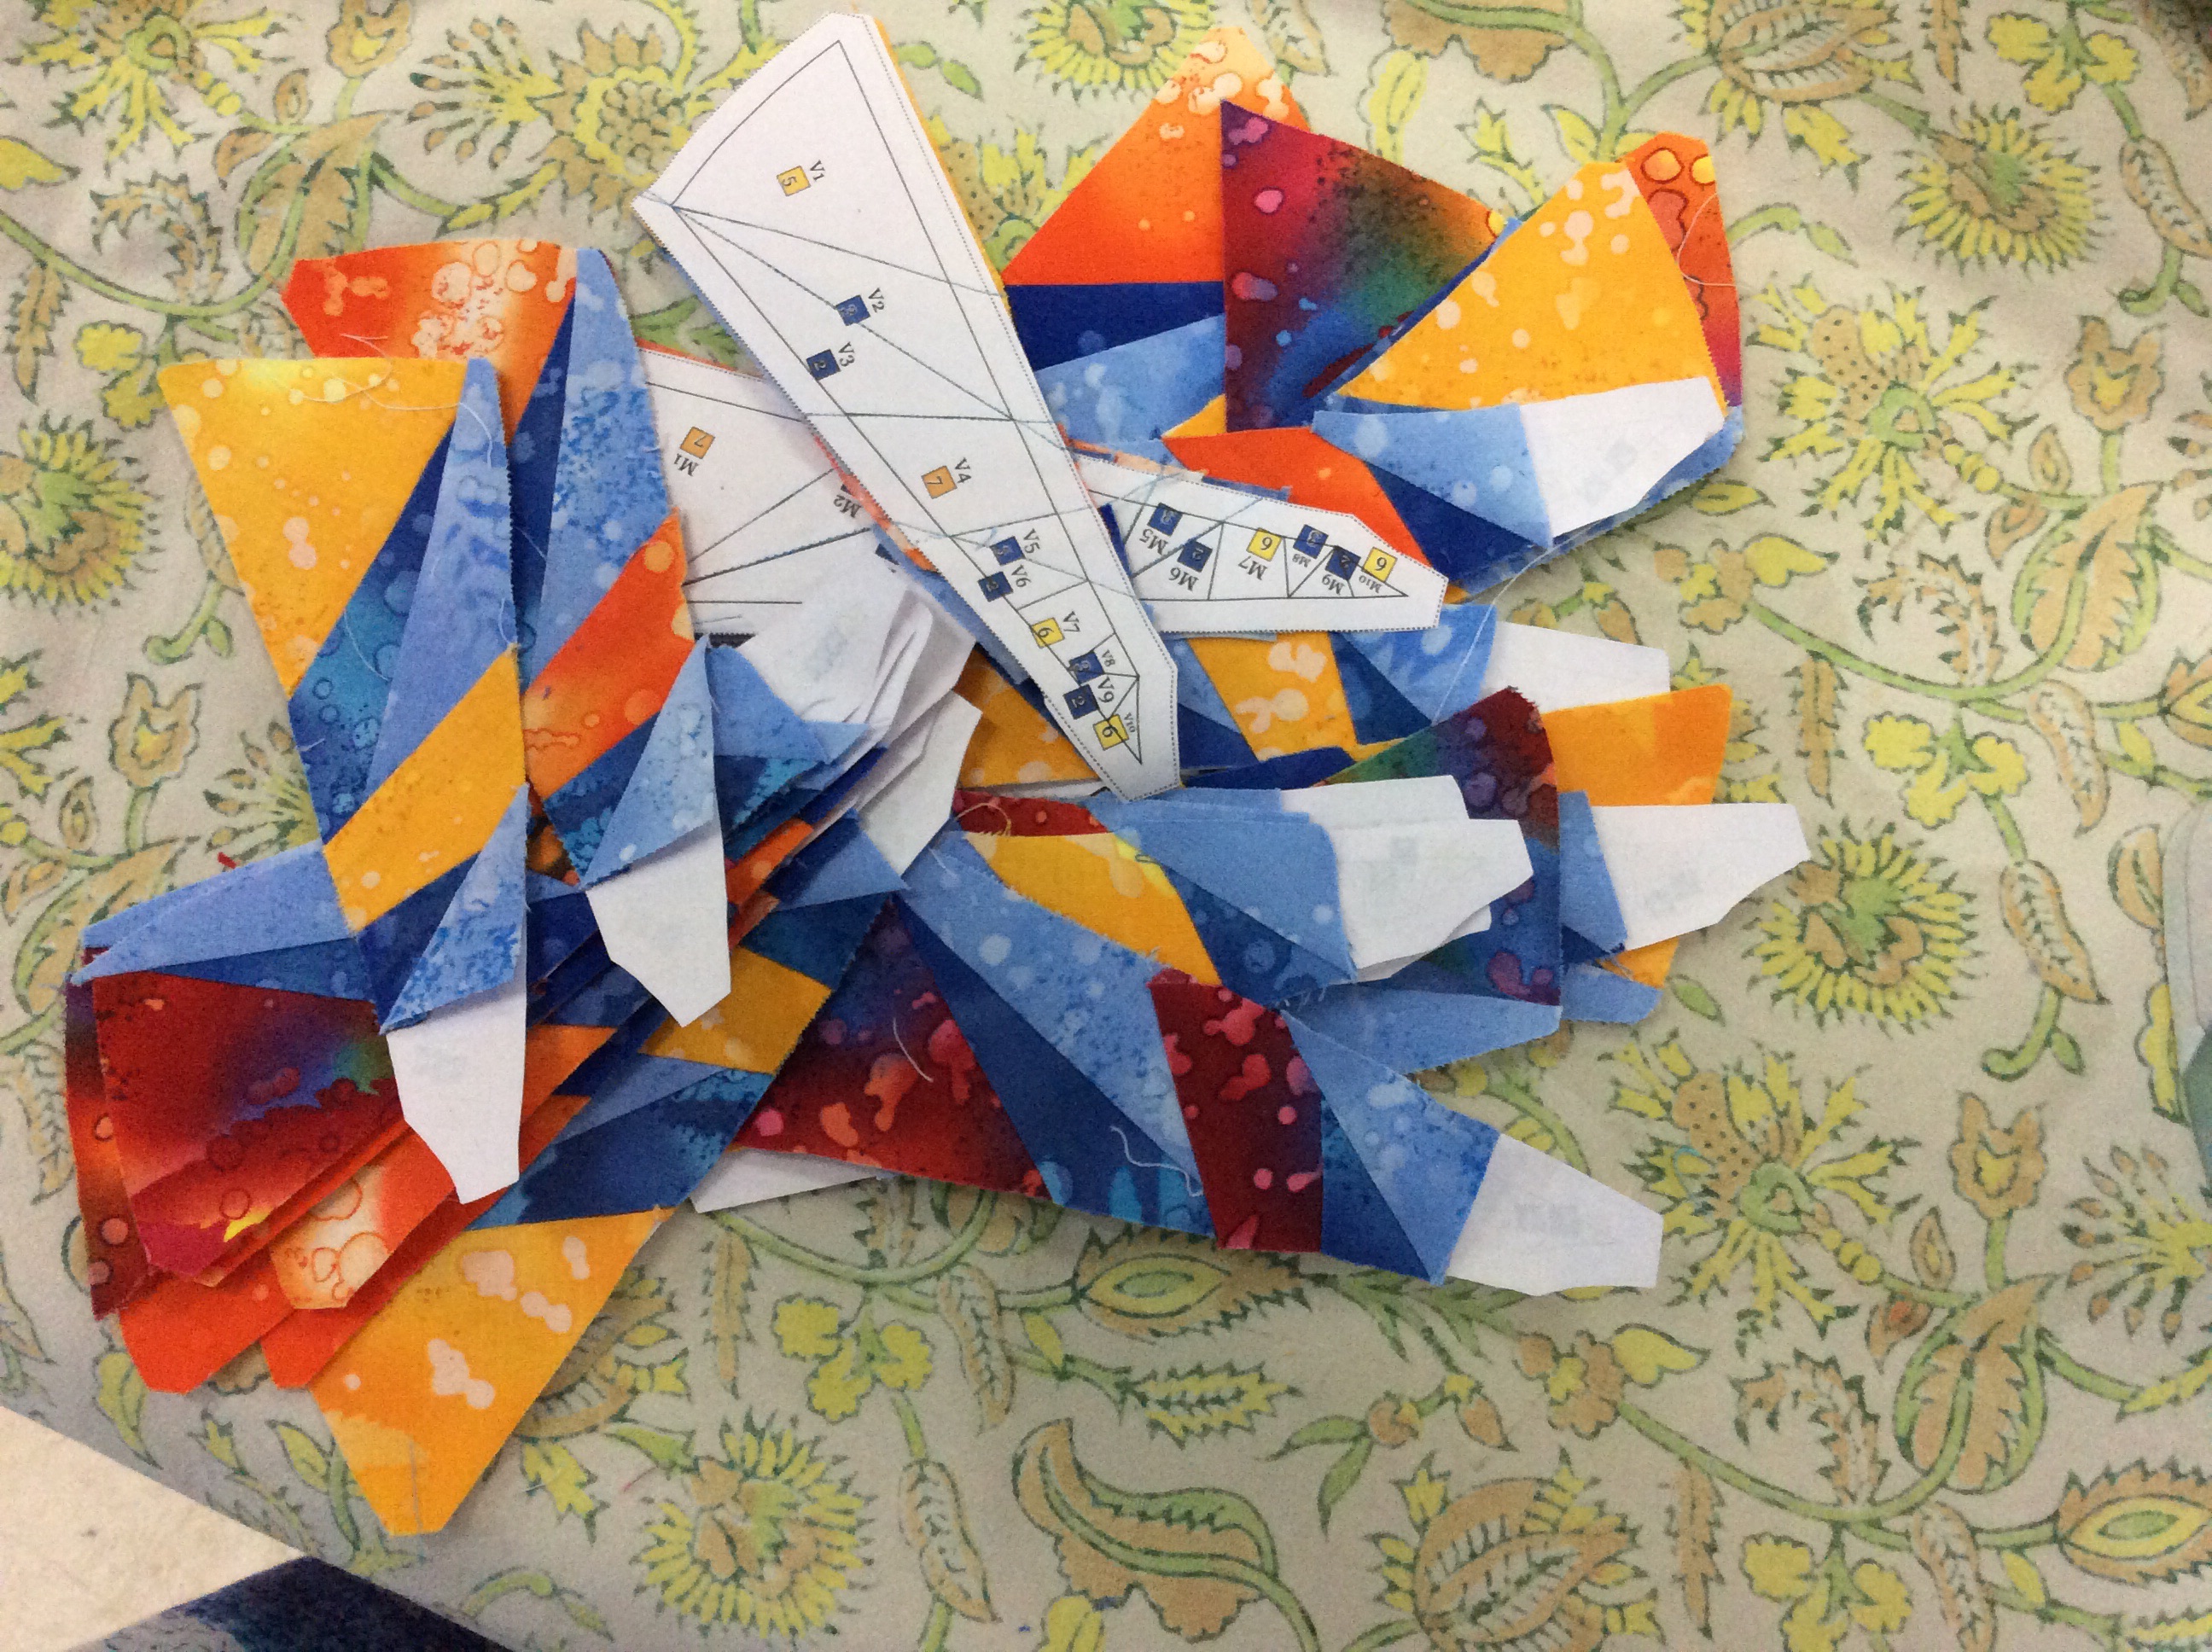
We are ready to add piece #4, for which we can use the trimmings from before! Similarly, piece templates G to L up to piece#4, i.e G1 to G4, H1 to H4…L1 to L4. Piece templates M to R up to piece#4, i.e M1 to M4, N1 to N4…R1 to R4.Piece templates S and T up to piece#4 Piece templates U and V up to piece#4 Piece templates W and X up to piece#4 Now, all our templates for the outer ring our pieced up to Piece#4.
Once we have reached this stage, order of piecing is not important. We are ready to add Piece#5 to all these templates, for which we can use the trimmings from Piece#2. Similarly, trimmings from piece#3 can be used for piece#6. This upcoming pic shows the spoke templates pieced till piece#6.
Templates A to X pieced up to Piece#6…
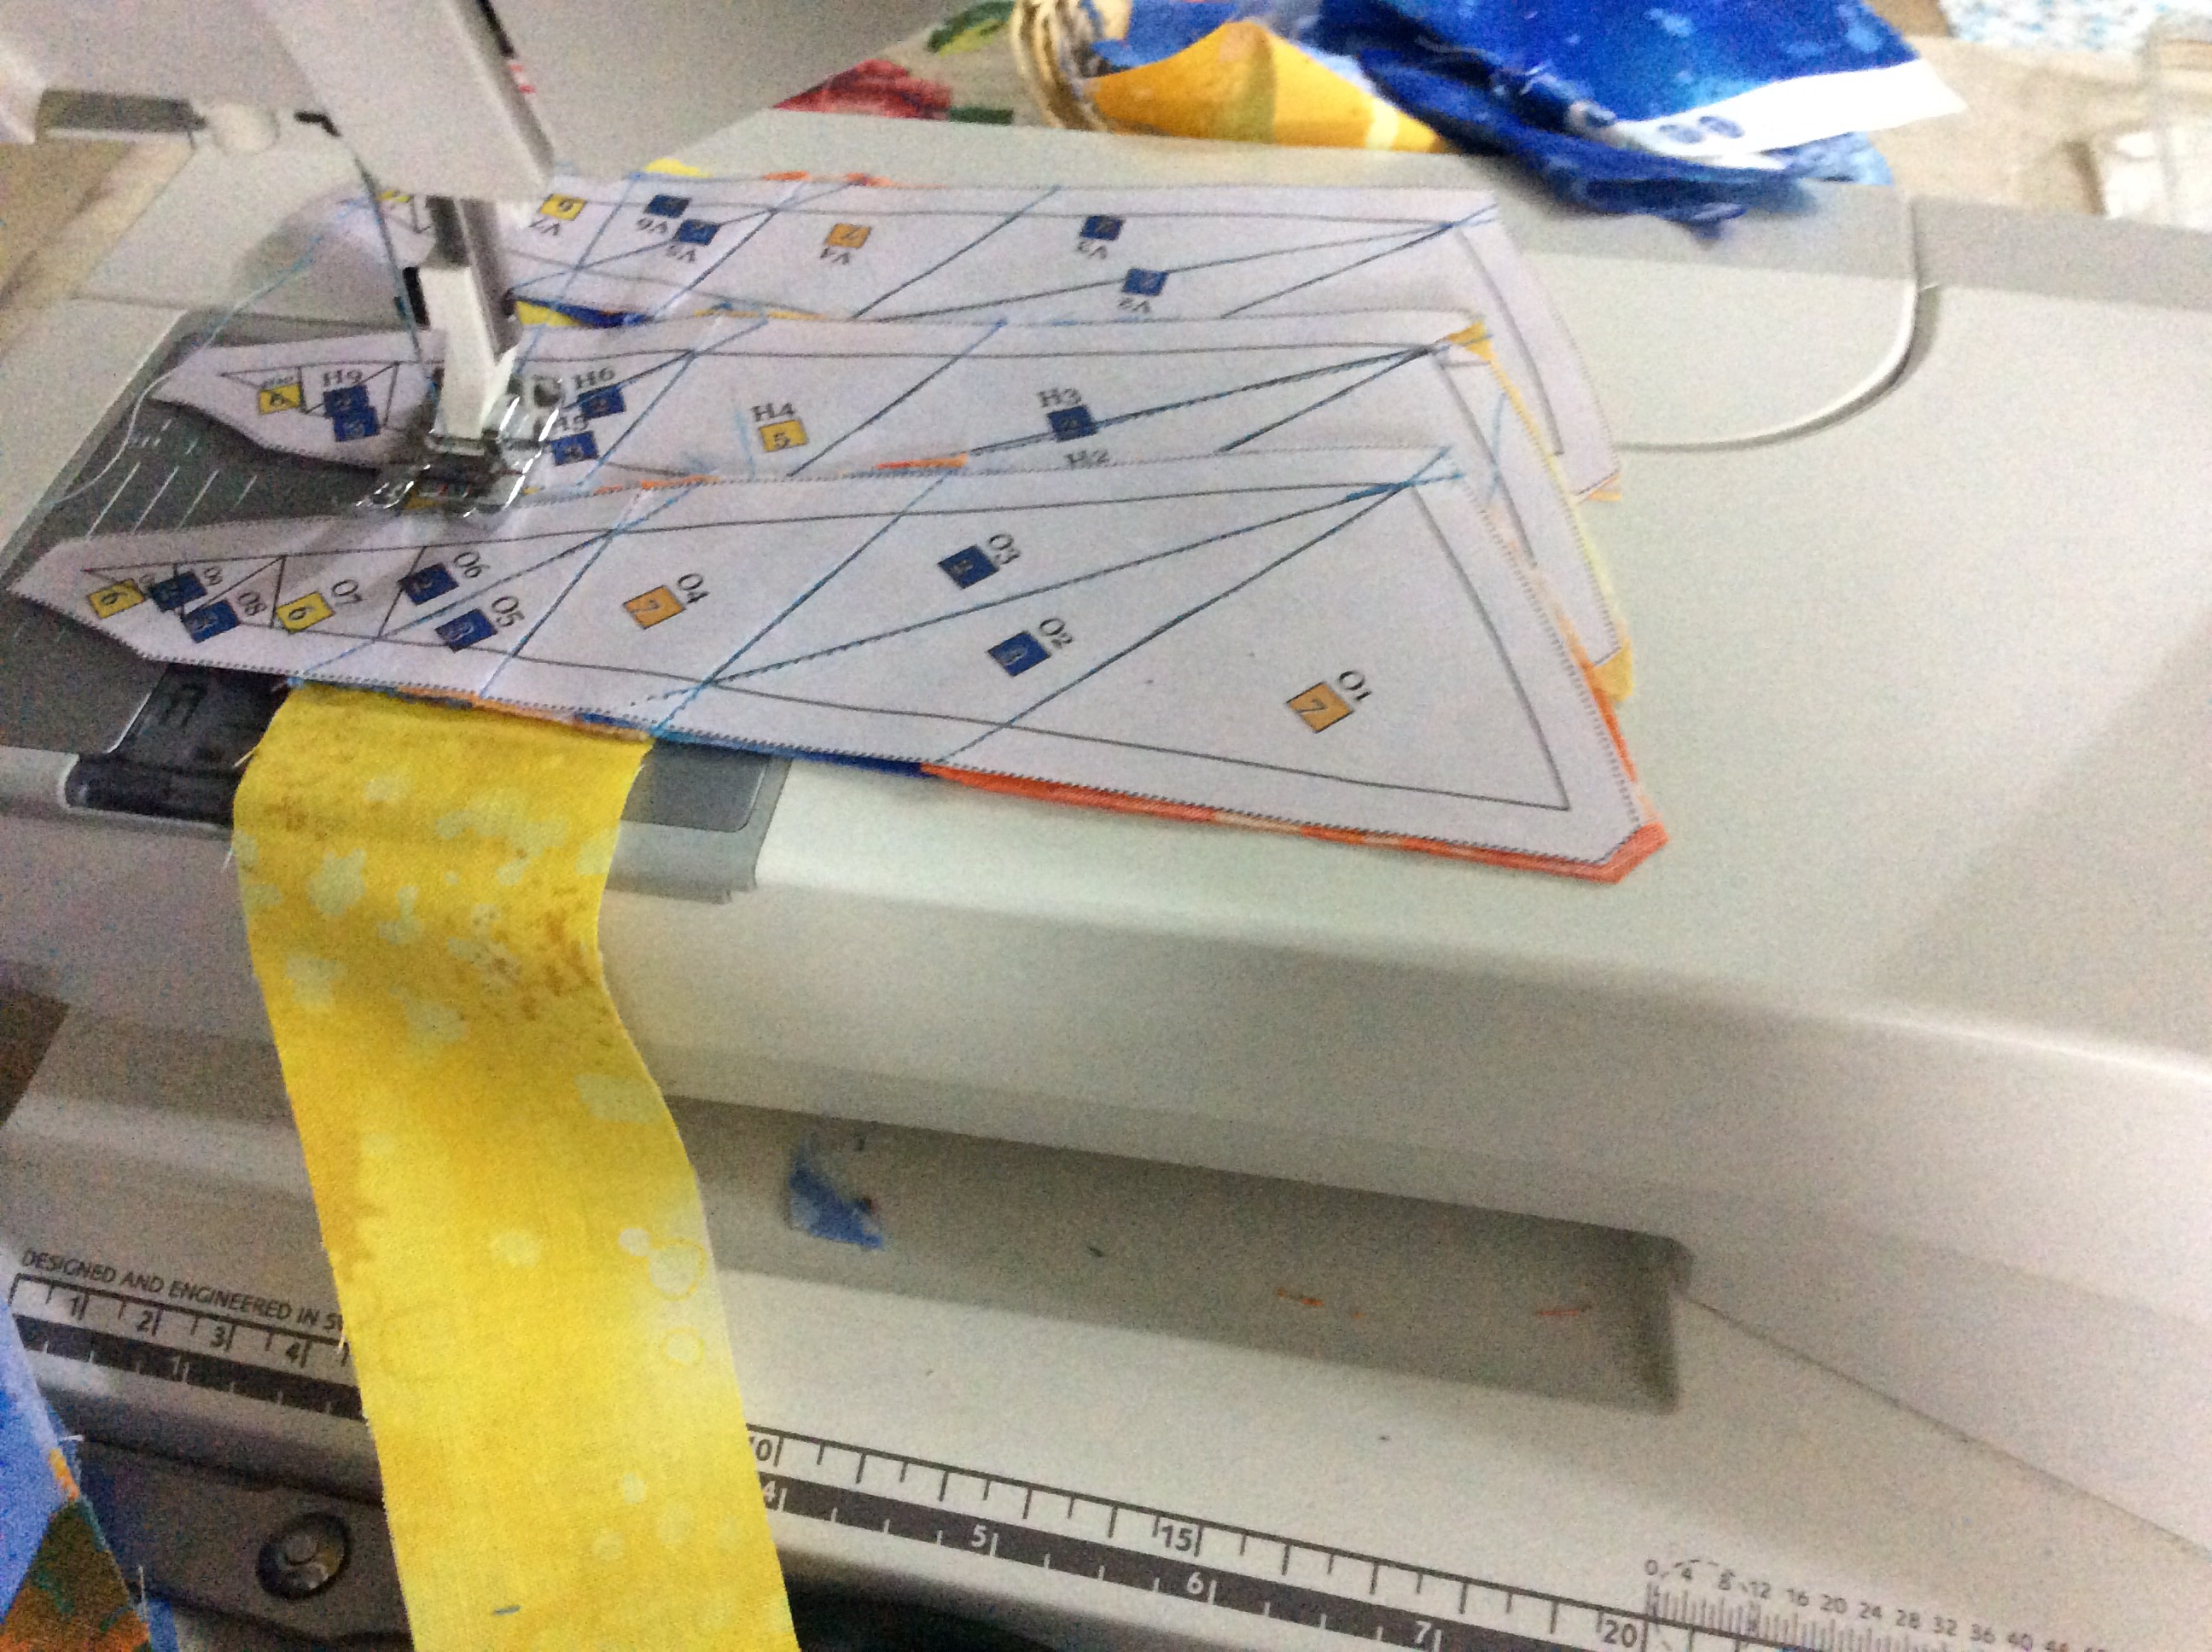
Here comes the strip which will occupy space at piece#7.
Piece#7 coming up.
You will see that the broader portion of the templates are overlapping. The important thing is to maintain about 1/2″ distance between the seam you are sewing on one template and the next. Time for a break and a little bit of fun! ALWAYS, remember to press open the strip you have sewn before cutting apart the templates. Also trim the seams, and the fabric just sewn to 1/4″ inch or so, beyond the upcoming seam line. I used scraps for pieces #8, 9 and 10, where I could. When I ran out of scraps, I used strips. Here is the final strip coming up!
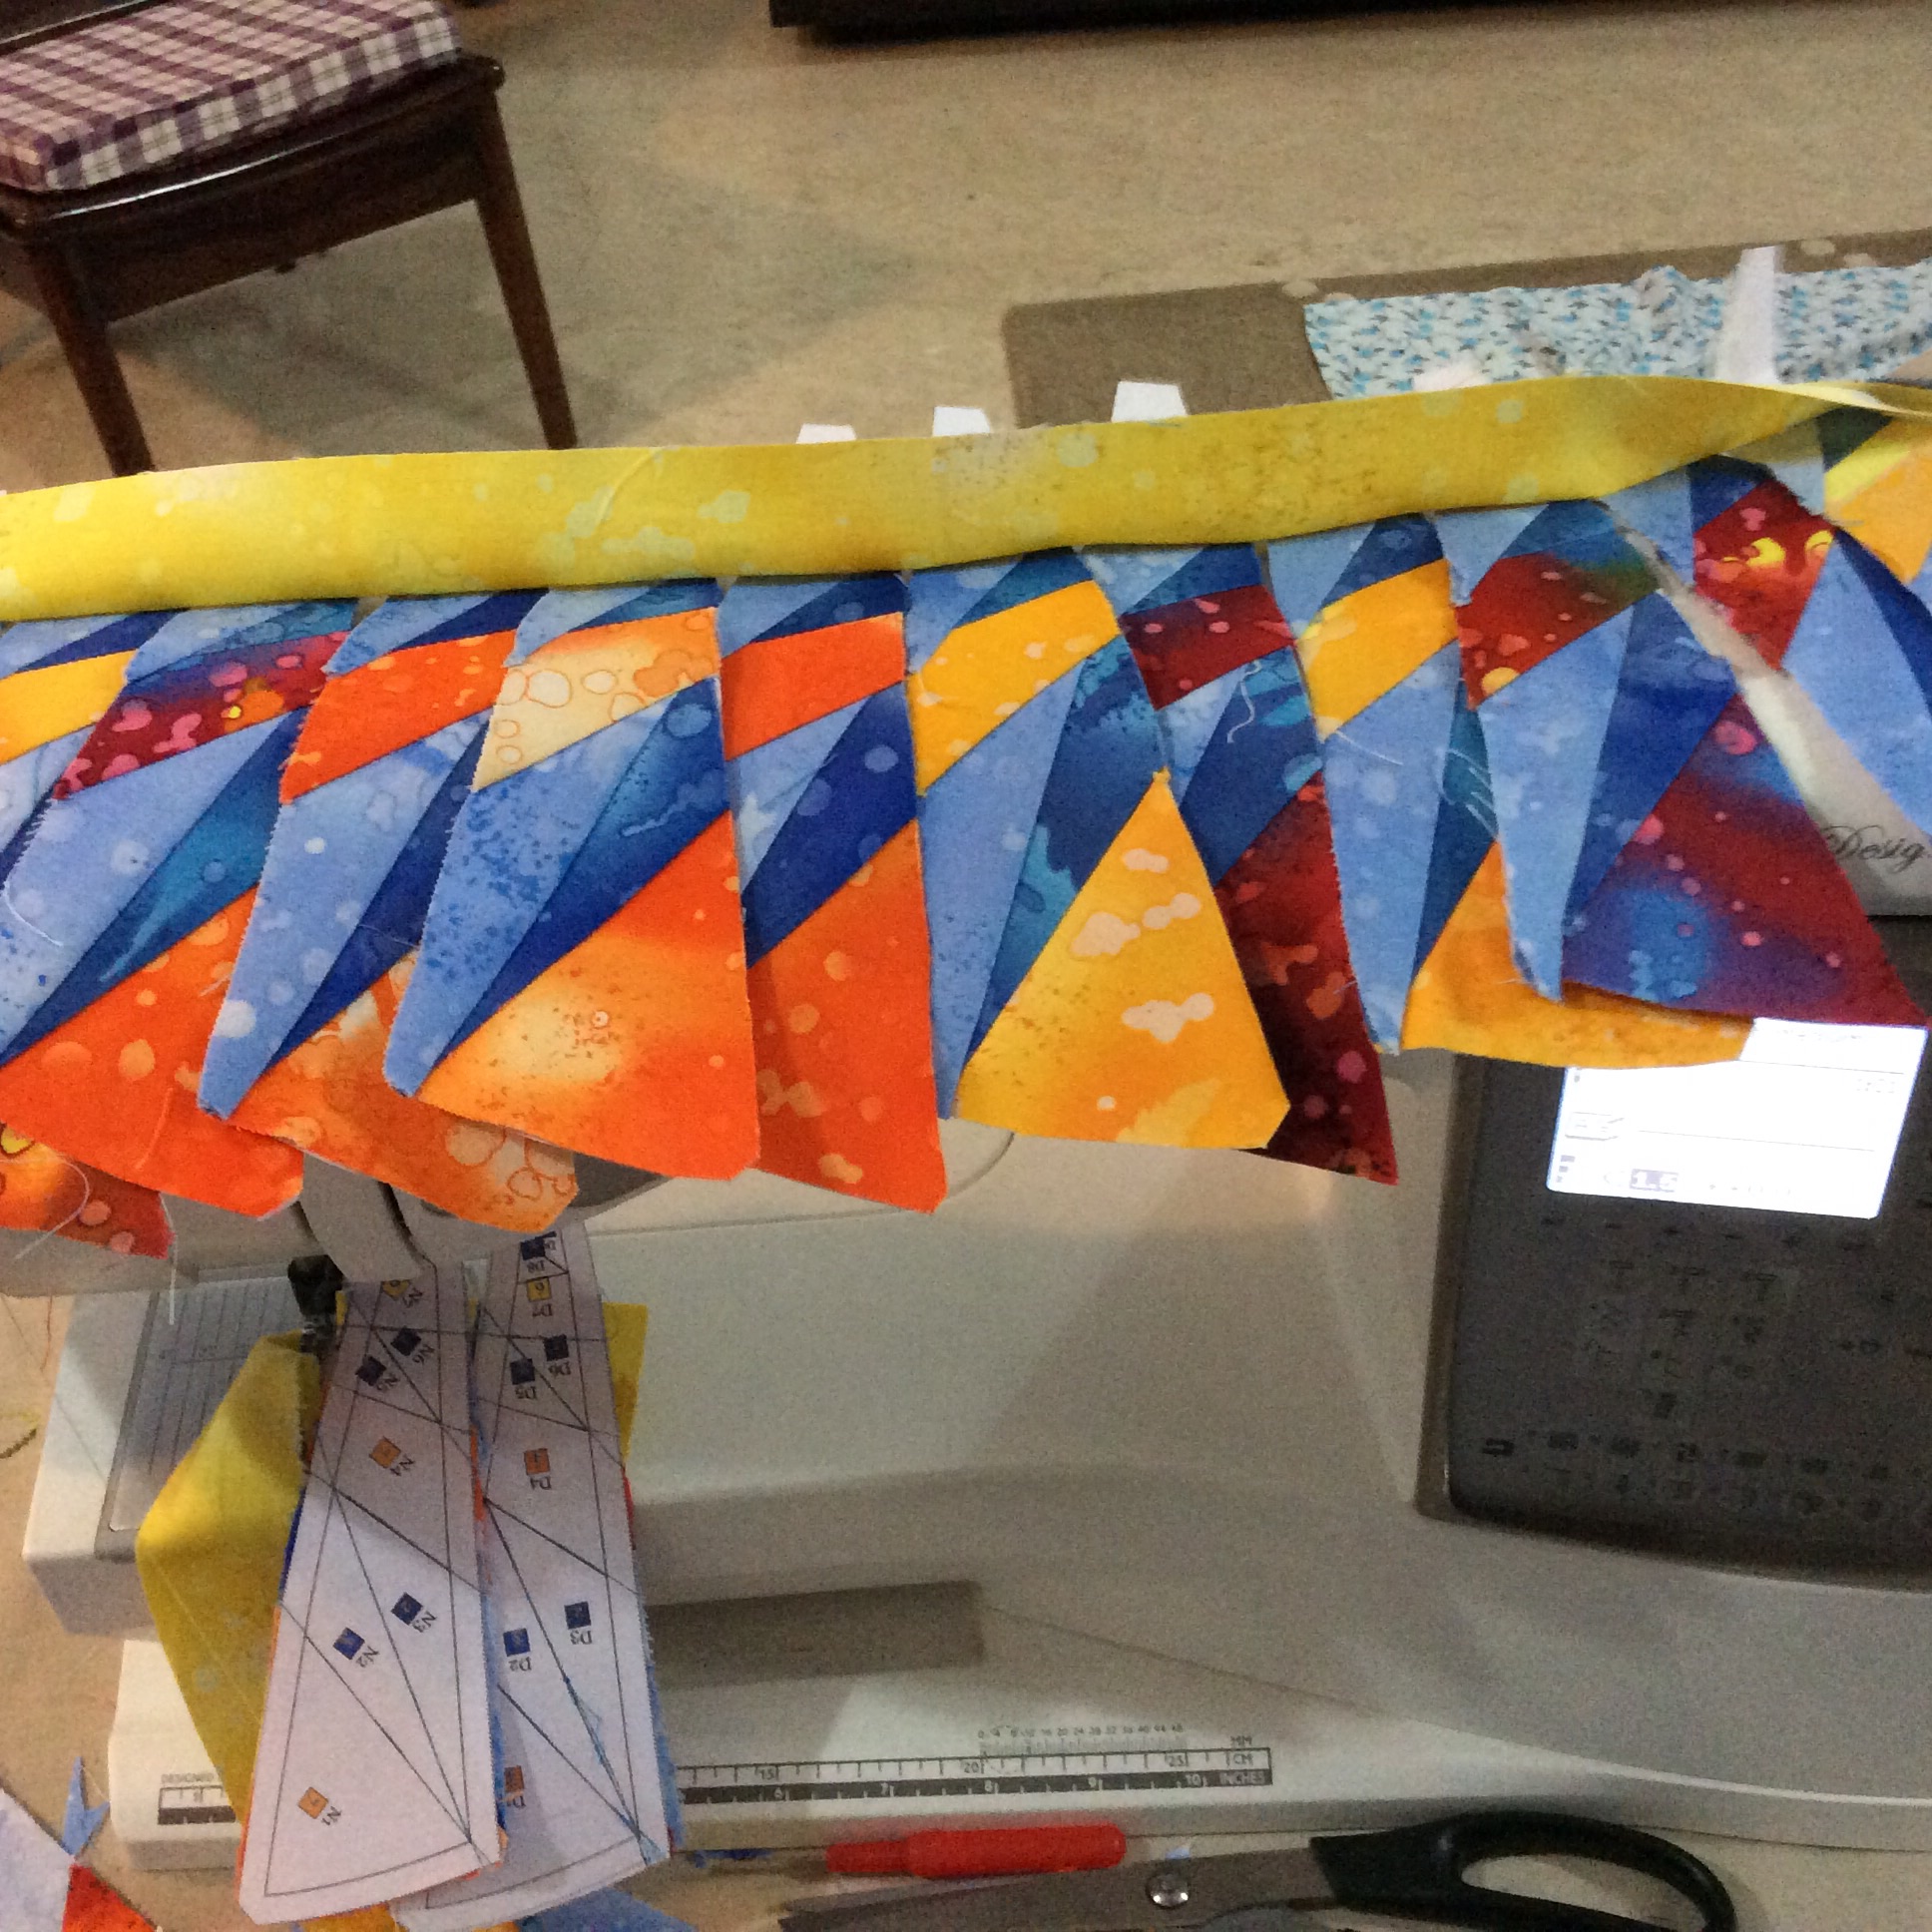
Final strip sewn and pressed open, ready to be trimmed!
Trim and put them aside, ready for assembly.
Inner Circle Compass
To piece the inner circle compass, piece as follows: Piece Y, Z, AA and AB. Piece AC, AD, AE and AF Use QSTs from Fabric#2 at piece#1 in all these templates.
The inner circle templates pieced. ( I have added an additional 1/4″ beyond the outer trim line, as I am going to try out something new for joining this to the ring.)
Assembly Instructions
Use the Master Template given in the Instructions File as a guide for assembly.
Outer Ring
I suggest you make piles of the templates as follows: A-B-C ; D-E-F; G-H-I; J-K-L; M-N-O and P-Q-R. Put aside S-T-U-V-W-X
Templates in piles…
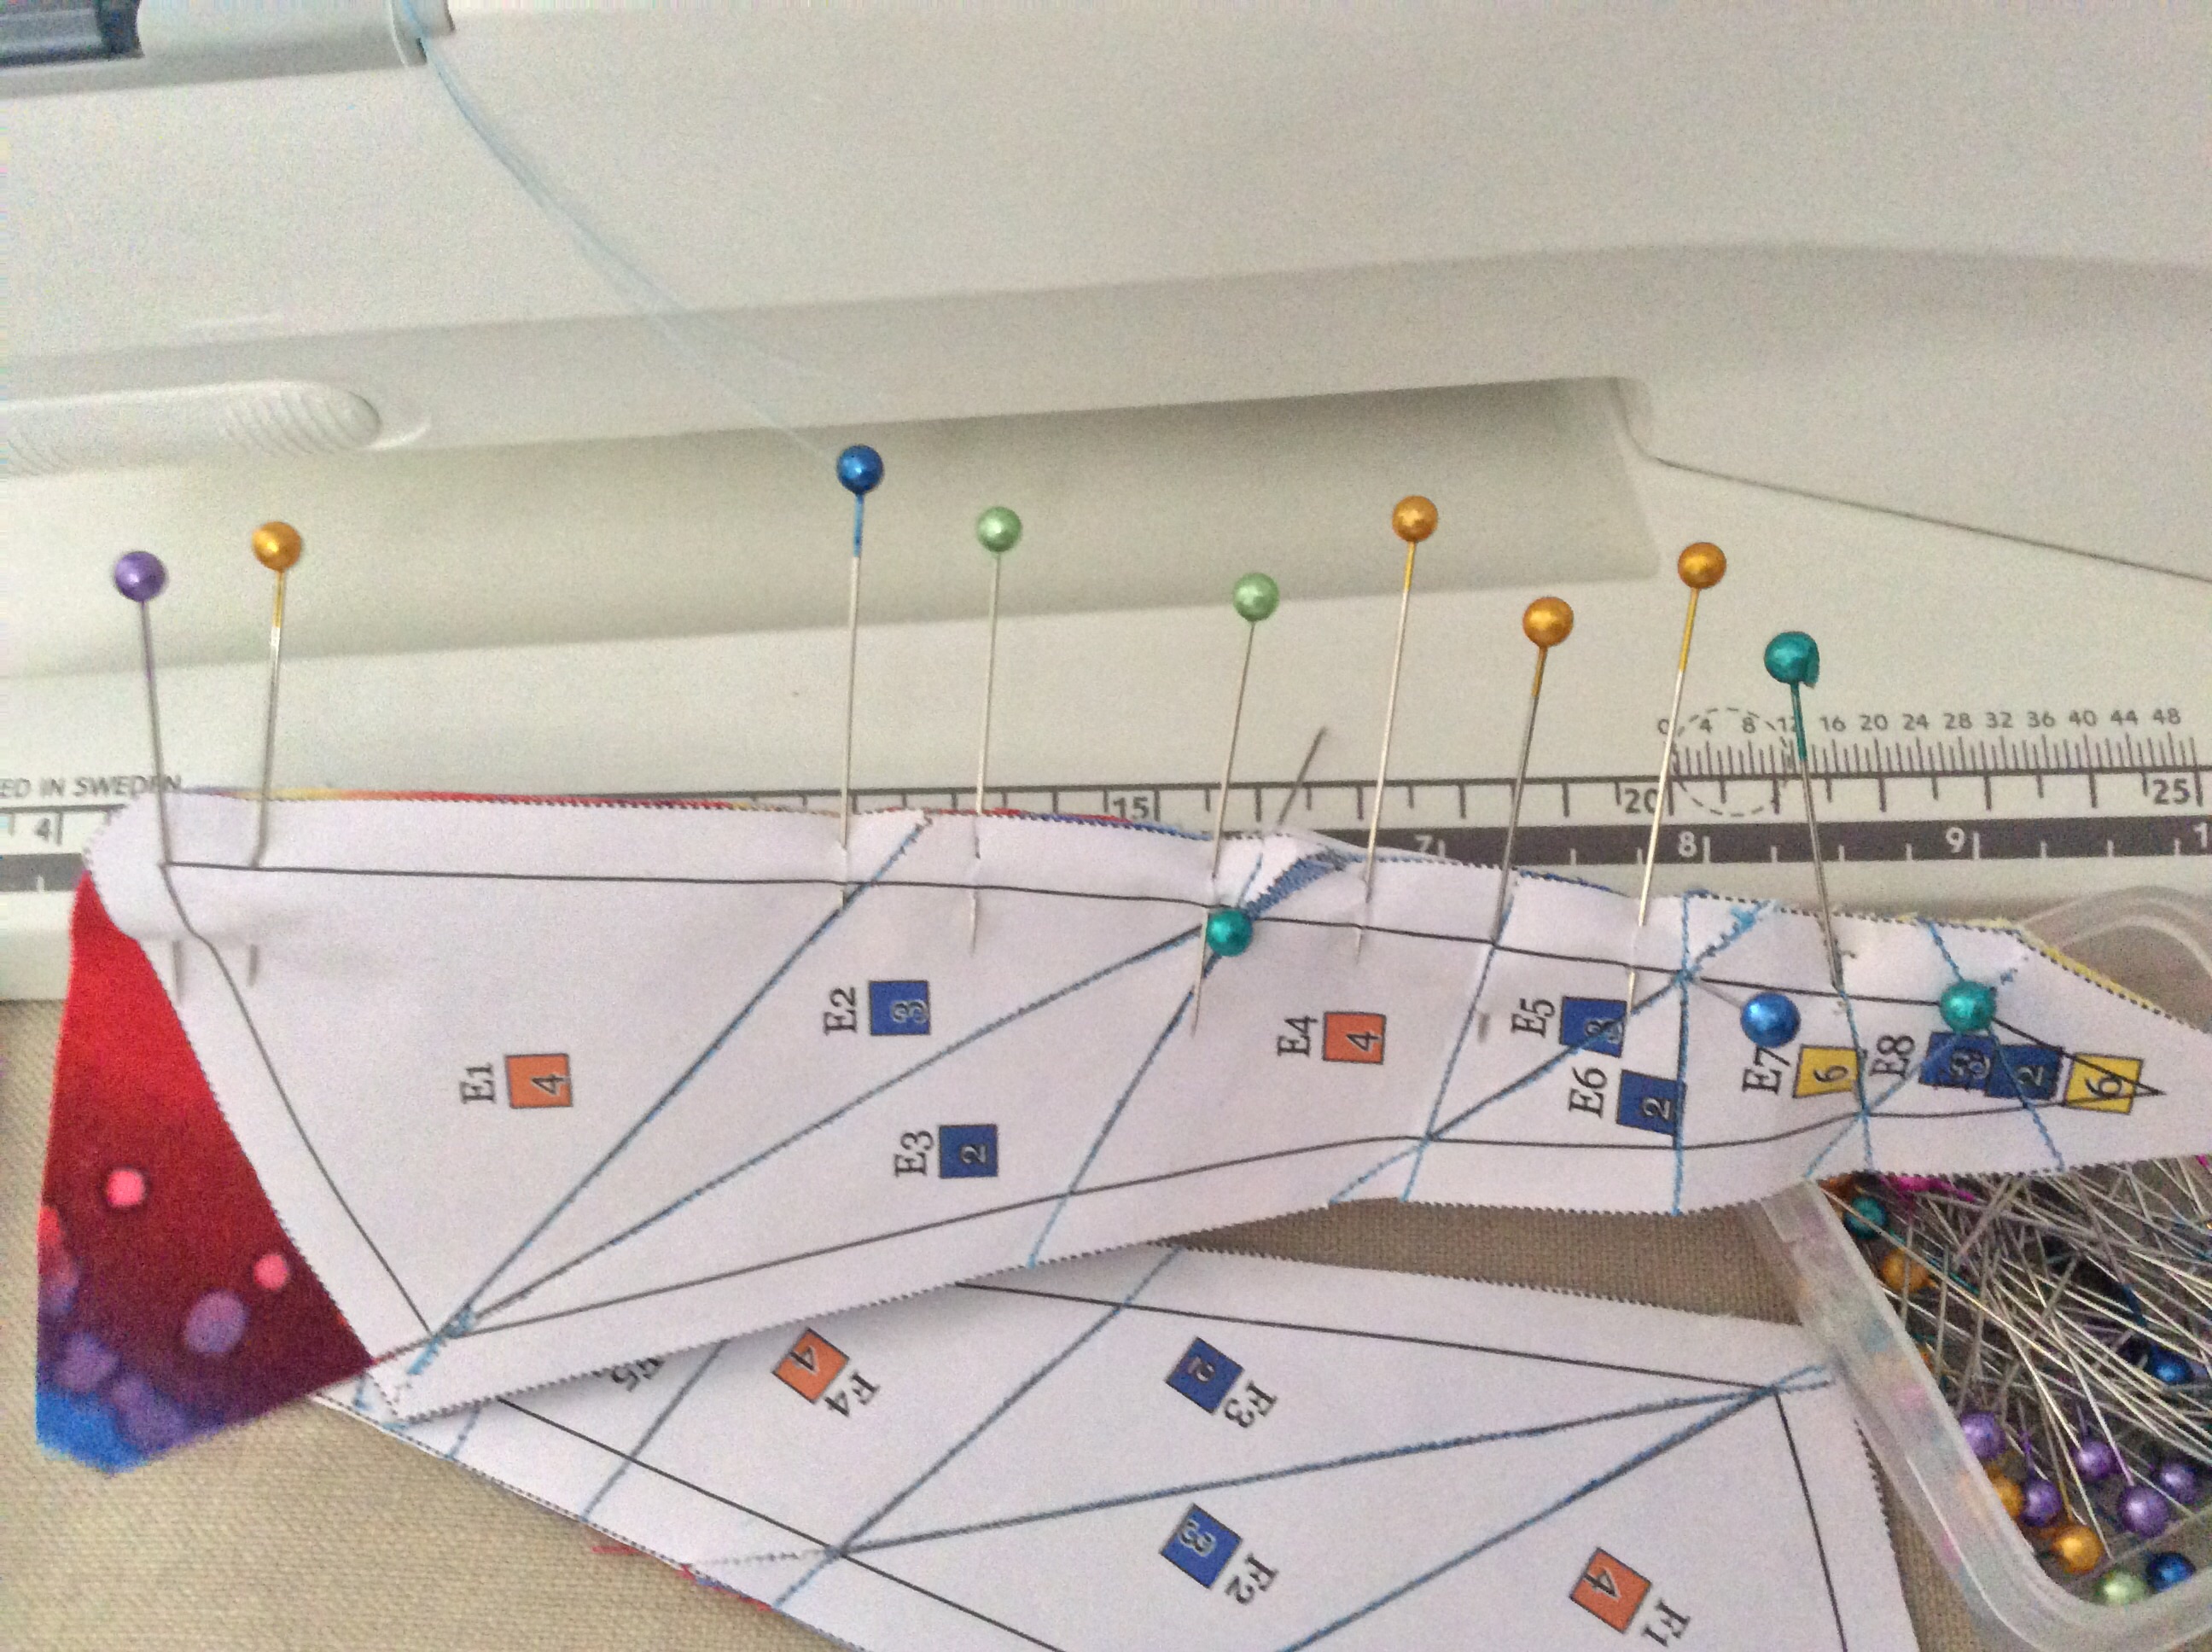
To join the templates, pin them first at the outer, broader edge. I like to insert vertical pins, matching the seams, before pinning on the seam line.
Vertical pins where seams will meet.
Horizontal pins on seam line; the vertical pins are now being removed.
This results in perfectly matched seams and corners!
Perfecto!
And so we sew the piles as follows ABC, DEF, GHI, JKL, MNO, PQR. Now bring on the pile S-T..X and add these, following the master template.
Work with the Master Template! Do not let the mirror image confuse you.
So you have 6 sets of partly assembled templates as follows: ABCS, DEFT, GHIU, JKLV, MNOX and PQRW. Remove the paper from the seams. You may like to press the seams open; I like to press them in one direction; all of them then must be pressed either clockwise or anti-clockwise. I also removed the paper from the inner templates, leaving it intact only at the circumference and inner edge. Now sew these together.
The ‘ring’ from the back…
… and from the front!
Inner Circle Assembly
Assemble the inner circle in quarters ……then in halves. Again, I like to press the seams in one direction. and finally the full circle. I stitch first from one edge to the centre and reverse. Break thread, and stitch from the other edge to the centre. I then rip open a bit of the crossover seam at the centre to give the seams a ‘twirl’.
Final Assembly
I have not assembled the final block as of now. But this is how I suggest it be done: Join the ring to the square using your favourite method. Finally, appliqué the centre circle. Another look at the block and what inspired it.
The Inspiration and the Block!
I hope you will love making this block! I assure you the result is well worth the effort. Take it easy, enjoy every seam and then savour all the oohs and aahs your work receives! I have also, more or less, finalised the layout I am going to use for these blocks. I shall share it with you soon.
This is where you download the instructions and templates for the block. You would need Adobe Reader ( download for free online) to be able to read these PDF files.
1.BLOCK16 MARINER24 Instructions
2.BLOCK16 MARINER24 Paper Piecing Templates
Please note that the downloadable patterns with paper piecing templates and instruction files for the Dreamcatcher Round the Year quilt blocks are being migrated to my store MadsPatch and will not be available for download for free from 15th November 2020 onwards.
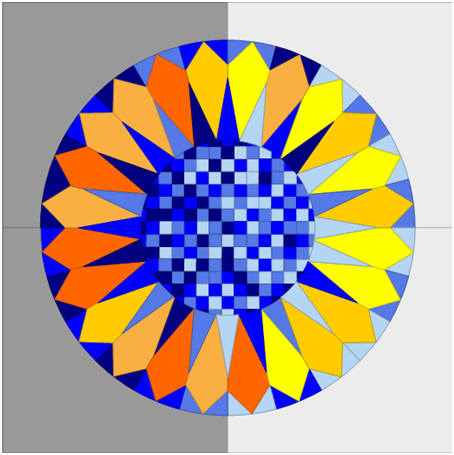
I started designing Block Fourteen as a tribute to the Dear Jane quilt. I experimented with a number of the Dear Jane triangular blocks, placing them revolving around a centre point to make a circle. This design came about when I was playing (on the free Quilt Assistant software ) with the block where flying geese fly outwards. I immediately fell in love with it! It does have a hypnotic quality to it, like a Mandala you can meditate upon. Also, if you take each of those wedges and subtract the outer level, the design remains the same. So, I have been trying ( in vain) to convince the few mathematicians whom I know, that this pattern a fractal! As a concession to them, I call this the (Almost) Fractal Mandala.
And so, I present to you, Block 14 of the Round the Year Block of the Month Quilt, the (Almost) Fractal Mandala!
Much to my chagrin, I discovered after I had made the block, that a similar block ( I do not know the name) already exists! I am still very proud of it, because I discovered my Mount Everest on my own, and climbed it too! So there!
Block 14 ( Almost) Fractal Mandala, Round the Year Quilt
The block, like all other blocks of the BOM quilt, is designed as a 15″ circle inset in an 18.5″ ( unfinished) square. It is a deceptively easy block to piece, hence not too many photos accompany this post.
The templates and instructions can be downloaded from the links at the end of this post. You can find the links to patterns for all the other blocks of this quilt on the Dreamcatcher Round the Year Quilt Page ( click on the link above).
The brilliant Tina Katwal, one of the pioneer quilters from India, took out time from her busy schedule to test this block and you have to thank her, that you do not struggle with stingy fabric requirements!
Fabric Requirement
The Dusk colourway uses 4 shades of blue and 4 fabrics in a contrasting yellow to orange range. I suggest you use use solids or very small prints combined with solids to best highlight the design element of the block. I have used Fossil Fern by Benartex for mine.
Fabric Code Block 14 Almost Fractal Mandala
This is a great block for using any scraps/ strips of various sizes and shapes left over from the previous blocks. Nevertheless, I have tried to give some kind of estimate of the fabric requirement.
Please spray starch and press all your fabric before cutting!
Fabric Colour
Code
Fabric needed
Orange
4
2.5″ x 32″
Gold
5
4″ x 19″
Light Orange
6
3.5″ x 14″
Yellow
7
3.5″ x18″
Light Blue
1
4.5″ square 20″ x 12.5″ strip
Medium Blue
2
3″ WOF strip +
strips 8″ -10″of various widths 1.75 to 2.5″
Deepest Blue
3
3″ WOF strip strips 8-10″ of various widths 1.75 to 2.5″
Medium-Deep Blue
8
4.5″ square
Cutting Instructions
I suggest you label your fabric so that you do not get confused as you cut so many strips. An easy way to do this is sticking a piece of freezer paper with the code on it on the strip!
For ease in piecing, you can cut and sort your fabric template wise as follows:
Fabric Code
ABCD
EFGH
IJKL
MNOP
QRST
UVWX
4 Orange
For diamonds 2 strips 2.5″ x 16″
5 Gold
4 HSTs 3.5″
For diamonds 2 strips 2″ x 12″
6 Light Orange
4 HSTs 3.5″
4 HSTs 3.5″
7 Yellow
4 HSTs 3.5″
2 strips 1.75″ x 11″ for diamonds
1 Light blue
4QSTs from 4.5″ square
20″ x 12.5″
2 Medium blue
3″ x 19″
4HSTs 3″
4HSTs 3″ 4HSTs 2.5″
4HSTs 2.0″ 4HSTs 1.75″
4QSTs 3″
3 Deepest blue
3″ x 19″
4 HSTs 3″
4HSTs 3″ 4HSTs 2.5″
4HSTs 2.0″ 4HSTs 1.75″
4QSTs 3″
8 Medium to deep blue
4QSTs from 4.5″ square
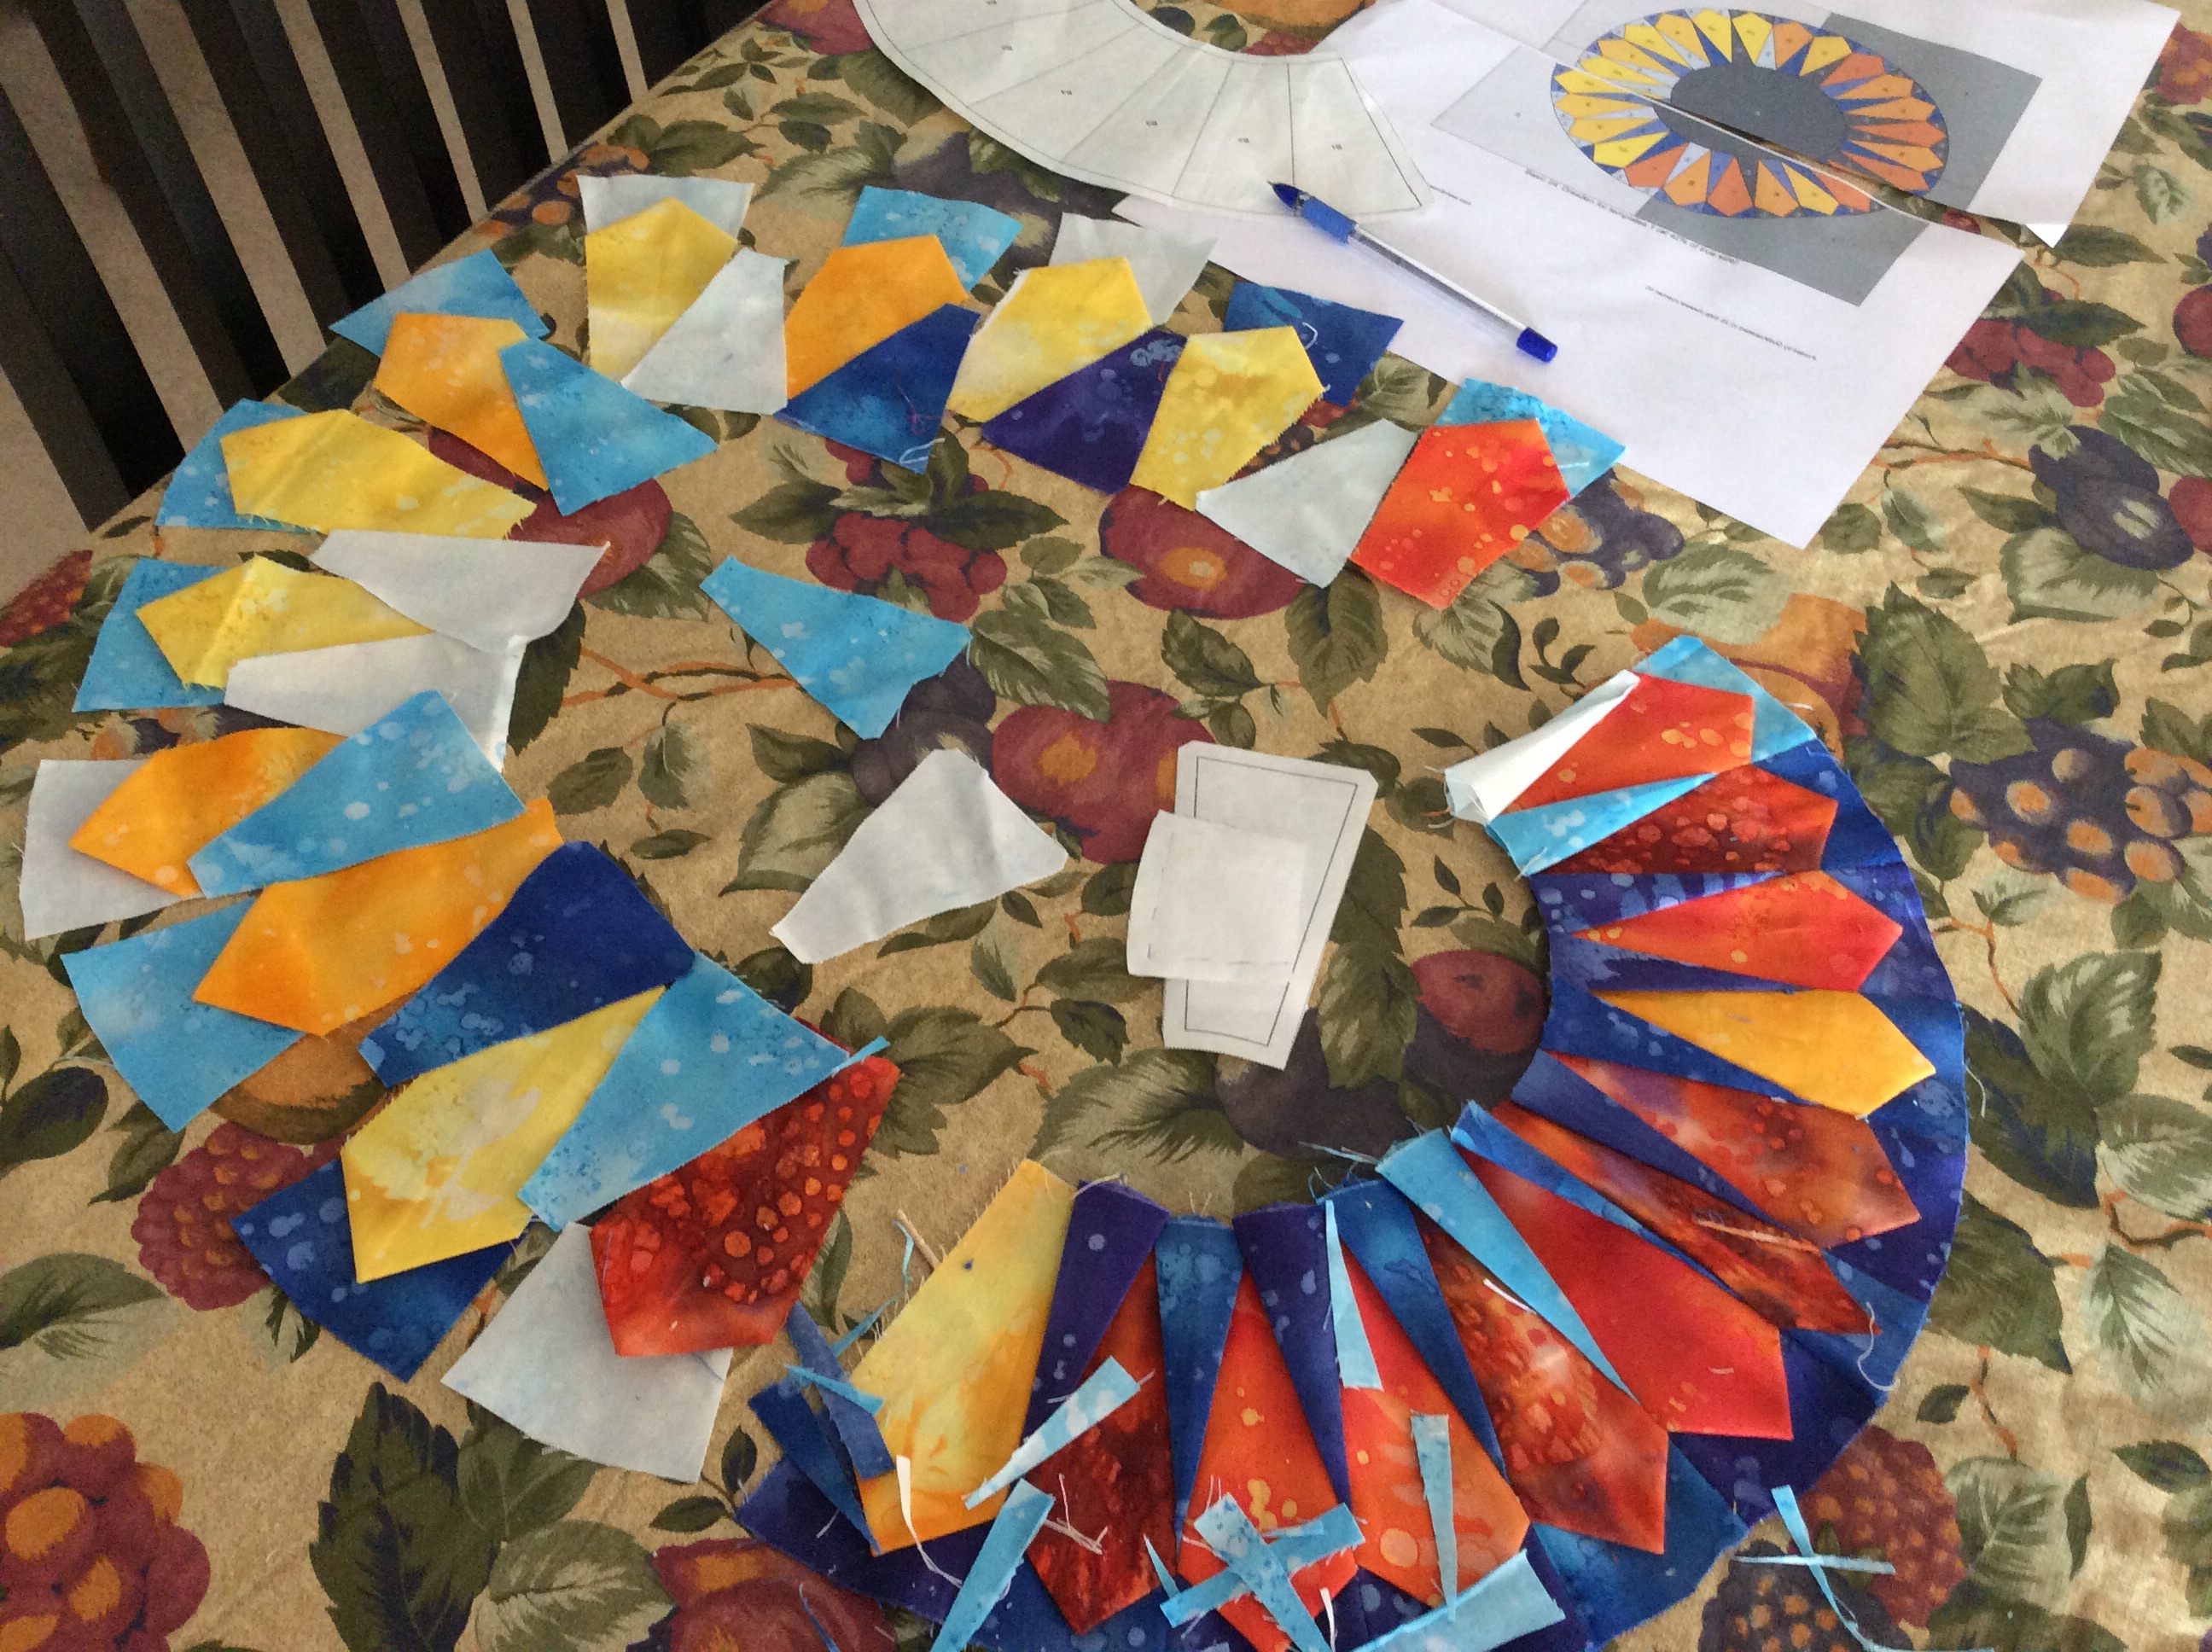
While I pieced with strips, I thought it would have made life much simpler had I cut the diamonds earlier. Note that the two sets of diamonds on each template face opposite directions, hence the 2 strips in the cutting instructions for the diamonds. Here is my fabric for the block, all cut and sorted.
Fabric cut and sorted out
Templates
1. Print the templates with your printer settings at 100% (or actual size).
2. Templates A to H are given in two parts each, with instructions to glue them. You could also piece these separately and then join at the centre seams. I have done that for the first two sets of templates, ABCD and EFGH.
3. Glue together the two parts of background Template U on the edge indicated. Use this to cut 4 identical pieces for U, V, W and X and put aside.
Piecing Instructions
I suggest piecing alphabetically,that is first on the larger templates at circle edge. You can use scraps from the larger pieces on the smaller templates inside! Piece in the following order:
– A, B, C and D
– E, F, G and H
– I, J, K and L
– M, N, O and P
– Q, R, S and T
Templates A, B, C and D had been printed on freezer paper, without gluing on the centre line as indicated In the templates. Cutting the wedges became as simple as this…
You could also use ordinary paper printed templates…
All I had to do was to add the triangles on the wedges. (If you have glued your templates A,B, C and D between pieces #3 and #4, plese do not get confused by these photos!)
You can glue the two halves of the templates togeteher and piece them in one go!
E, F, G and H were (each) also pieced in halves without gluing in the centre, and sewn together on the centre later, just before assembly.
E, F, G and H pieced in halves…you can glue the templates at centre between piece# 3 and #4 and piece these as single units!
For the rest of the templates, I pieced with strips, like I said, placing the strips perpendicular to each other as I went along.
Place the strip for the diiamond at right angles to the previous strip and sew on seam line
Covering the diamond…
A triangular piece comes in next, note, in the upcoming photo, that the blue strip was placed straight along the template for this seam between piece #3 and #4. This is followed by another diamond strip at right angles to the template. Use the other diamond strip for this!
Note the blue strip for piece#4 is placed straight along template. The diamond yellow is again at right angles
After that diamond, there is only one more blue triangle to add and we are done!
Similarly, piece all the templates, I to P. Once you get the hang of it, it comes up really fast!
I did not take too many pics, but here are a couple of photos of the centre templates Q, R, S and T being pieced!
Templates Q, R, S and T ready for chain piecing…
…and done, except for the corners! Fast work!
The scraps from the previous templates come in useful for the corners of the centre templates!
Assembly Instructions
Use the Master Template (mirror image) as a guide to assembly. The Instructions file also contains a coloured mirror image guide.
I removed the paper before assembly.
The Master Template is a mirror image! Left is right and right is left!
Assemble the block in quadrants. But before you begin, lay them all together to see if all is in order, and of course, to admire!
I love this! Piecing finished in one evening!
( First, I sewed the respective template halves A to H. If you glued your templates before piecing you will not need to do this. )
I am ready for assembly now! I joined the outermost two templates A to E; B to F; C to G and D to H, and put them aside. (as I did not want to risk the wedges on the A, B, C and D templates getting misshapen.)
The rest of the templates, I joined from centre outwards. ( All templates at each ‘level’ are similar so it really does not matter whether you pick up M or N to join to Q, R, S or T!)
Here is the finished circle, from the back. Note that seams on adjoining quadrants are pressed in opposite directions, so that they interlock.
As far as possible, press adjoining seams in opposite directions to interlock them when sewing … ensures sharper corners!
5. Done ! Now join the background. You can join the individual quadrants to the background pieces U, V, W and X and then join the 4 squares together to form the 18.5″ square.
I am not joining any of the circles to the background till all of them are done.
We begin putting the quilt top together in May, after the final sixteenth block comes up on 1st May.
Block 15 will be posted only on 16th April 2015 as I am travelling and am otherwise busy, so you have plenty of time to catch up, if you began late or are straggling behind on the blocks.
Meanwhile, do put in a comment if you like this block and are doing this quilt… and make my day! Please write in if you have a problem with the instructions, or if you discover a better way of piecing my blocks.
I would also love to see your blocks posted on my Facebook page Patchwork of My Life.
Okay, so we are all done here, except for one important thing, the block pattern and instructions! You need Adobe Acrobat on your computer ( available for free download) to be able to view these files.
1.Block 14 Fractal Mandala Instructions
2.Block 14 Fractal Mandala Templates
Please note that the downloadable patterns with paper piecing templates and instruction files for the Dreamcatcher Round the Year quilt blocks are being migrated to my store MadsPatch and will not be available for download for free from 15th November 2020 onwards.
The Blue Aster is Block 11 of the Dreamcatcher Round the Year Quilt. The 15″ pieced circle is inset in an 18″ ( finished) square.
The foundation paper pieced block is very quick to piece. The centre introduces inset or y seams for the first time in this BOM. The block was tested for me by the lovely Anuradha Ramesh, who also tested the Sapphire Fire block!
If you want the patterns of the previous ten blocks of this quilt, you can find all the links on my MadsPatch Ecwid Store. The Templates and Instructions for this block can be downloaded in printable pdf format from the links at the end of this post.
In the Dusk colourway, the block uses 4 shades of blue for the petals besides some small scraps of yellows and oranges.
Fabric Coding for Blue Aster
Fabric
For Petals
For Centre ( pieces# 3 & 4on I to L)
For Edges
Light Blue
1
2.25″ x 7.5″ ( 8 pieces)
Medium Light Blue
2
2.25″x 6.5″ ( 8 pieces)
Medium Dark Blue
3
2.5″x 7.5″ ( 4 pieces)
Deep Blue
4
2.5″x 6.5″ ( 4 pieces)
Deep Orange
5
1.75″ x 5″
1.75″ x 2.5″ ( 8 pieces)
Light Orange
7
1.75″ x 5″
1.75″ x 2.5″ ( 8 pieces)
Gold
8
1.75″ x 5″
1.75″ x 2.5″ ( 8 pieces)
Yellow
6
1.75″ x 5″
1.75″ x 2.5″ ( 8 pieces)
Printing Instructions
Print the Templates File with your printer settings at 100% or actual size in portrait mode.
Print and keep a copy of the Instructions File for ready reference.
Cut out the paper piecing templates.
Piecing and Assembly Instructions
1. Follow the step by step Instructions for best utilization of your fabric to piece templates A to H.
2. Piece templates I to L
The Master Template is a mirror image – the paper pieced block from the printed paper side!
3. Follow the Master template to join the templates as follows:
Join A to B; Join C to D; Join E to F; Join G to H. You can press seams open to reduce bulk. (I originally did, but then sewed a couple of them to one side with the next seam. I think I will never be able to sew with seams pressed open!)
We now encounter inset ot `y’ seams at the next step. You may refer to the step by step instructions if you are uncertain how to proceed.
Begin at the pointed end of the wedges, leaving ¼” for insetting seam to join AB to I at A1 ; join CD to J At C1, join EF to K at E1 and join GH to L at G1.
Now match the seams at the centre and join IAB to JCD.
Similarly, join KEF to LGH.
Finally join the two halves to make your full flower.
Applique the circle to an 18.5″ background square to complete your full block 11, Blue Aster. I recommend taking a larger square and trimming it to size.
For general tips on paper piecing for the blocks in this BOM, you can look at this post I published some time back.
It is a good idea to pin when handling large or unwieldy fabric pieces!
Pin the Fabric#1 strips on the templates I, J, K and L and keep aside.
You may have noticed that we cut only 4 pieces of the medium and dark blue fabric, whereas they are used in 8 places each! One thing I hate about paper piecing is the amount of fabric one wastes. So, this is how I found a way out, without complicating the cutting instructions!
We `prepare’ templates A to H for piecing.
Pin the rectangular piece of Fabric#3 on piece A1, C1, E1 and G1, aligning one long edge of the fabric ¼” beyond seamline between piece#1 and #3 on the template(s).
Pin for 1/4″ seam, letting the excess fabric hang out
Trim the excess fabric piece.
The excess fabric is trimmed away …
Pin the excess pieces of fabric at piece#1 on templates B, D, F and H.
… and used on the other 4 templates!
Fold the template at seam line between pieces # 1 and #2 on all the templates A to H and trim the fabric beyond the seam line towards circular edge (adding ¼” seam allowance).
I have discovered that trimming to the seam allowance BEFORE piecing makes life easier!
We are ready to start piecing templates A to H. Remember the wrong side of the fabric should touch the paper. Also, travel ¼” beyond the seam line when piecing.
Initially, I used strips of the yellow- orange fabrics to piece the small wedge to the `petals’, but later concluded that piecing with the 1.75″ x 2.5″ rectangles was more efficient and facilitated chain piecing. I am not giving a picture so that I can avoid confusion!
Chain piece all templates A to H up to piece #4.
Add the fifth piece only to templates A , C, E and G, aligning one edge of the fabric as we did for piece #1.
Now fold back the paper on the incoming seam line like in the picture below. Do not worry about the paper getting torn at the seam.
Using one rectangle to piece two long triangles!
Trim, allowing for a ¼” seam.
Don’t throw away that trimming!
This excess fabric piece will be used for piece#5 on templates B,D, F and H.
Use it here!
Add piece#6 on all the templates A to H. With this, templates B, D, F and H are pieced and can be kept aside. Proceed to finish piecing templates A, C , E and G; and I to J.
When piecing I to J templates: first sew the respective 1.75″ x 5″ strip at piece #3 on each of the templates. Trim off and keep the excess fabric piece for sewing at place#4 on the other templates as required.
TThis block is perhaps the quickest to cut and piece!
Assembly Instructions
Flip the pieced templates to the printed side and arrange the templates using the Master Template as a guide.
Pin templates A to B; C to D; E to F and G to H, taking care to ensure you have the right edges together…
Ensure you have the correct edges together!
…and sew. I pressed open the seams ( temporarily, as the final picture will confirm!), but you could also press them downwards, towards the edge.
Remove the excess paper from the seams.
It has been easy so far. Now comes some not-so-simple sewing!
We are ready to join AB to I, CD to J, Ef to K and GH to L.
Pin the edges on the alignment markers. Begin the seam, sewing from centre to edge, on the seam line, leaving the ¼” seam allowance at the top unstitched.
This is how it looks from the other side…
At the end of this, you will have 4 joined templates, IAB, JCD, KEF and LGH. We are ready to join these in pairs.
Again we begin sewing at the centre. If your centre looks good, the rest of the block looks good too!
Start sewing from the corner of the centre and stop short of the end by ¼” , just where the `petals’ begin.
Now align the `petals’ and sew downthe straight edges out to the circumference.
You can start this seam from the corner, including the 1/4″ shown left unstitched in this picture. I went back and sewed that bit afterwards.
One half is ready!
There actually no points to match, so everything falls in place neatly!
Similarly join the other pair KEF to LGH.
Now to join the two halves…again we begin at the centre, matching the centre seams, and leaving ¼” at both ends.
Again, begin at the centre…this is the only time you have to match points!
We are down the last two seams!
… the final seams are down the petals to the circle edge.
Turn it around!
Press the seams.
Flip over and admire your Blue Aster.
Applique your circle to a 19″ square. Trim to 18.5″ square.
You can click on the links below to purchase the pdf pattern for this simple block designed by me ( if anyone else has also had the same idea, my apologies for claiming it – as far as I know, it is an original!) .
We are already halfway through in this Block of the Month quilt!?! This Spiked Dresden is the eighth of the sixteen blocks that will make up the Round the Year Quilt. The block is 18″ square with a 15″ inset circle, like the other blocks of this quilt,
When I was designing this quilt, I wanted to include all the blocks that I loved, but was too lazy to make a whole quilt with. One on that list was this Spiked Dresden that I encountered on pinterest. When drafting the block for the quilt, I modified it a bit, including the wedges on which the blade points rest. I also thought this was a great block to introduce you to foundation paper piecing with freezer paper. You can also piece it with regular foundation paper and even without a foundation paper piecing template. Complicated as it looks, this particular Dresden needs only as many seams as a regular Dresden! The blade, the spike and the wedge are all attached in one go. Those of you who are still apprehensive of attempting these blocks – this really is a piece of cake! This block was tested by fellow Desi Quilter Caroline Nagar and she had a lot of useful suggestions, which I have tried to incorporate here! Thanks, Caroline!
The downloadable Template files ( two this time) and the Instructions File can be found at the end of this post. So here we go!
Fabric requirement ( For Orange petalled Dresden)
Fabric
Blades
Spikes
Outer Ring
Centre
Background**
#1 Dark grey
11” x 13”
#2 Light Grey
11” x 13”
#4,5,6,7 Blues
4” x 10” each
2” X 17” each
8” square
#8,9,10,11 Yellow, gold, light orange, deep orange
5” x 18” each
**For background – Use 11” x 25” if using single fabric.
You could also use a 19.5” square ( will be trimmed to 18.5″ after appliquéing circle).
Cut all fabric strips from width of fabric.
Step by Step Instructions
Templates and Printing
Print the Instructions file.
Print the two templates files at 100% or actual size in portrait mode on A4 size freezer paper.
For printing on freezer paper, refer to this link.
Template File 1 :
For the Template A Circle, please add an additional ¼” seam allowance to make total of ½” seam allowance.
For the Template B (Pieced Dresden quadrant), cut exactly to size. Use a scale and score lines on the printed lines on the semi circular template with a paper knife or any sharp edged object, to get sharp creases at each seam. I used my trusted friend Jack (the Ripper) for this. Take care so that you do not tear the paper. Sobana of thequiltbug.blogspot.com recently used the freezer paper method for piecing the Dresdens in her quilt. She recommends needle punching the seam lines – I am quite happy with creases!
Important! We piece this Dresden using the freezer paper technique. If freezer paper is not available, regular foundation paper piecing may be done, in which case, you would need to print/trace the Template B to get 4 copies of it.
Template C (background) glue the two parts of the template on edge as indicated. You need four fabric pieces using this template.
Template File 2 –
Contains the templates D ( blade/ petal), E (spike) and F (outer ring piece).
Cutting Instructions
We cut:
6 petals/ blades from each of 4 fabric strips (5”x 18”) using Template D= Total 24
6 spikes from each of 4 fabric strips (4”x 10”) using Template E = Total 24
6 outer ring pieces (wedges at base of petal point ) from each of 4 fabric strips ( 2” x 17” ) using Template F= Total 24
Placing the freezer paper template to cut fabric…
I cut 4 layers of fabric using the rotary cutter. I pressed the freezer paper template to the top layer and cut the fabric so…
Cutting through four layers of fabric – 6 times to get 24 spikes
You could iron the freezer paper templates D, E, F (for the petal/ blade, spike and outer ring piece) on card / stiff paper and cut it out to make sturdier, reusable templates.
Glue or iron the template to thisk card paper.
Cut out the template accurately.
Or you could use template plastic to trace and make stencils!
For the Spikes
Use template E and cut like you did the petals. Press the pieces into half lengthwise, right side outside.
For the inner circle
A reminder! Cut a circle from the 8” square – use template A, add an additional ¼” allowance all around – the template gives only ¼” allowance and cut circle.
Template A – remember you need a 1/2″ seam allowance instead of the 1/4″ given here!
Background.
11” x 25” if using single fabric.
You could also use a 19.5” square ( will be trimmed to 18.5after appliquéing circle).
Fold the petals lengthwise, right side inside and sew ¼” seam along the top edge.
Fold into halfway and sew 1/4″ seam to form the pointed blade.
Remember to lock your stitch when you begin and end each seam, if your machine gives you the option, or you may end up with what happened here.
Unlocking equals unravelling!
If your machine does not have the locking option, reduce the stitch length. I do not recommend a back-stitch, as it adds bulk.
Reduce stitch length to prevent unravelling.
2. You can chain stitch all the petals at one go!
I chain stitched the blades/ petals…
…and garlanded my old Singer (circa 1935) with it!
Clip apart the blades. Trim the seam to about 1/6” and clip the `pointy’ corner.
Clip seam and point to reduce bulk and turn inside out
Turn inside out. Use a toothpick or even your embroidery scissors to get a nice point.
Use a toothpick to get a nice, neat `point’!
5. Now comes the last step in getting the blades ready for piecing. Press them to ‘centre the point’. Lightly crease the blade on the vertical centre line as shown and align the centre seam line with it. Press ( not iron). A bit of spray starch does great here.
Align the `point’ with the centre line.
Preparing the Spikes
Fold the spikes along the central vertical `spine’, right side outside, aligning the longer edges. I do not recommend using your iron, you do not want a crease down the centre.
Piecing with Freezer Paper Template B
Arrange all the petals, spikes and wedges in a circle for an auditioning. I am sorry I forgot to take a picture of this stage!
Mirror Image of the block to aid in freezer paper piecing.
Any kind of foundation paper piecing can be confusing, as the final picture is a mirror image of what you began piecing with! I had this mirror image of my block to help me along the way!
Decide on a starting point, label the Blade#1, and start piecing anti-clockwise, if you are looking at the mirror image.
2. Now use the freezer paper template ( also used earlier) to piece the Dresden quarters. I find that using a template takes out the guesswork from piecing a Dresden – I needed sometimes 21 and at other times only 18 petals for a 20-petal Dresden, when I did not use paper piecing. The block lies flat and neat with this technique!
3. Place the fabric pieces in this order on B1 section of the piecing template. First – Template E #1 right side up at outer edge of template. Press down to freezer paper.
Press wedge piece #1 on outer edge of B1. I have used a rectangle – you will be using Template F to get the pieces
Second – Blade #1 right side up, aligned at inner edge of template. The blade point should be about ¼” inside the edge of paper, at the final seam line.
Press on to freezer paper.
Press Blade#1 on place on B1
Third– Spike#1. Aligned at inner edge of template. The spike will stick out beyond the paper edge by about a ¼”. Pin to hold in place temporarily.
Spike #1 in place on B1. The upper edge of the spike `sticks out’ beyond the paper edge about 1/4″
Fourth – Blade #2 face down, aligned over blade#1. Repin as shown.
Blade #2 comes next, wrong side up. You can see the blue spike sticking out from under the blade on the top.
Fifth – Wedge #2 comes face down, aligned over wedge #1.
Wedge #2 , wrong side up, aligned on Wedge#1 makes the fifth piece to line up on B1.
Pin to hold everything in place. Fold away the freezer paper at crease ( seam line beteen B1 and B2) line, turn over.
Repin from this side, if you like. You will have ¼” seam allowance visible beyond the paper.
Sew in 1/4″ seam allowance visible beyond folded freezer paper template.
Sew just along the edge of the paper, taking care not to stitch over the paper. Trim the seam to ¼”.
Trim the seam to 1/4″ (No, the fabric did not change colour – it is a different piece!)
.Peel away the freezer paper and press open the seam.
You would not be able to press open the seam if piecing with regular foundation paper; this is one of the advantages of freezer paper piecing that I love!
Peel away freezer paper and press open seam.
Now press the pieced portion back on to the freezer paper. Press the spike open, so that it is centred between the two blades as below.
We are now ready to add the next pieces.
Note: If not using freezer paper, just sew on seam line on printed side of paper, as usual (without creasing, folding away the template.)
4. Place Spike #2 in place – it has to stick out beyond edge of paper!
Pin spike#2 in place on Blade#2
… Follow with blade #3 aligned with blade #2. Pin in place…
Blade #3 aligned on top of Blade #2, right sides together.
…and finally wedge #3. Flip around and sew.
Sew along paper edge as for the first two blades.
Again trim and press open seam. Press down on freezer paper.
5. Join the next three pieces – Spike #3, Blade#4 and wedge #4.
6. Join 2 more sets, till Spike #5, Blade#6 and wedge #6.
Blades# 1 to 6 pieced and ready. Note there are only 5 spikes. Label nd put aside Spike#6.
7. Press and trim all sides to size, before you remove the freezer paper Template B totally.
8. Pin a post it note on Spike #6 with its name, and set it aside!
So one quadrant is pieced!
9. Now , we are ready to piece the 2nd quadrant. Proceed as for Quadrant 1. Before removing the freezer paper, sew Spike #6 in place between Quadrant 1 and Quadrant2, to get a semi circular ring. Put aside Spike #12
The freezer paper template is reusable. But if you are piecing with regular printer paper, you need fresh templates for each of the other three quadrants.
Halfway stage in piecing the Dresden. Note the two spikes set aside ( in centre). They will join quadrants 3-4 and 4-1 respectively.
10. Similarly piece Quadrants 3 and attach Spike# 12 between Seme-circle1-2 and Quadrant 3..
11. Finally piece Quadrant #4 and add spike #24 between the last blade (#24) and Blade#1 from the first quadrant to complete your ring!
Assembly
Applique the ring to your background.
Finally add the centre circle in place. The simplest way to do this is: Machine tack ( largest stitch setting) about 1/8 to 1/6” inside edge of the fabric circle, leaving a long length of thread on either side. Trim your template B to the seam line and iron it to the centre of the fabric. Now pull the thread to gather the fabric nicely over the paper circle. You have a perfect 7” circle. Pin in place over the centre of your block and appliqué by hand or machine. Trim away the background fabric behind the centre, and remove the freezer paper.
Here are the downloadable .pdf files with the instructions and templates. You need Adobe Reader (available for free online) on your computer, to be able to view these files.
1. Instructions Spiked Dresden Block08 of the Round the Year Quilt
2. Template File 1 Spiked Dresden Block08 of the Round the Year Quilt
3. Template File 2 Spiked Dresden Block08 of the Round the Year Quilt
You can access the links to the other blocks from this quilt here.
Please note that the downloadable patterns with paper piecing templates and instruction files for the Dreamcatcher Round the Year quilt blocks are being migrated to my store MadsPatch and will not be available for download for free from 15th November 2020 onwards.


You must be logged in to post a comment.