Of Roses and Octagons

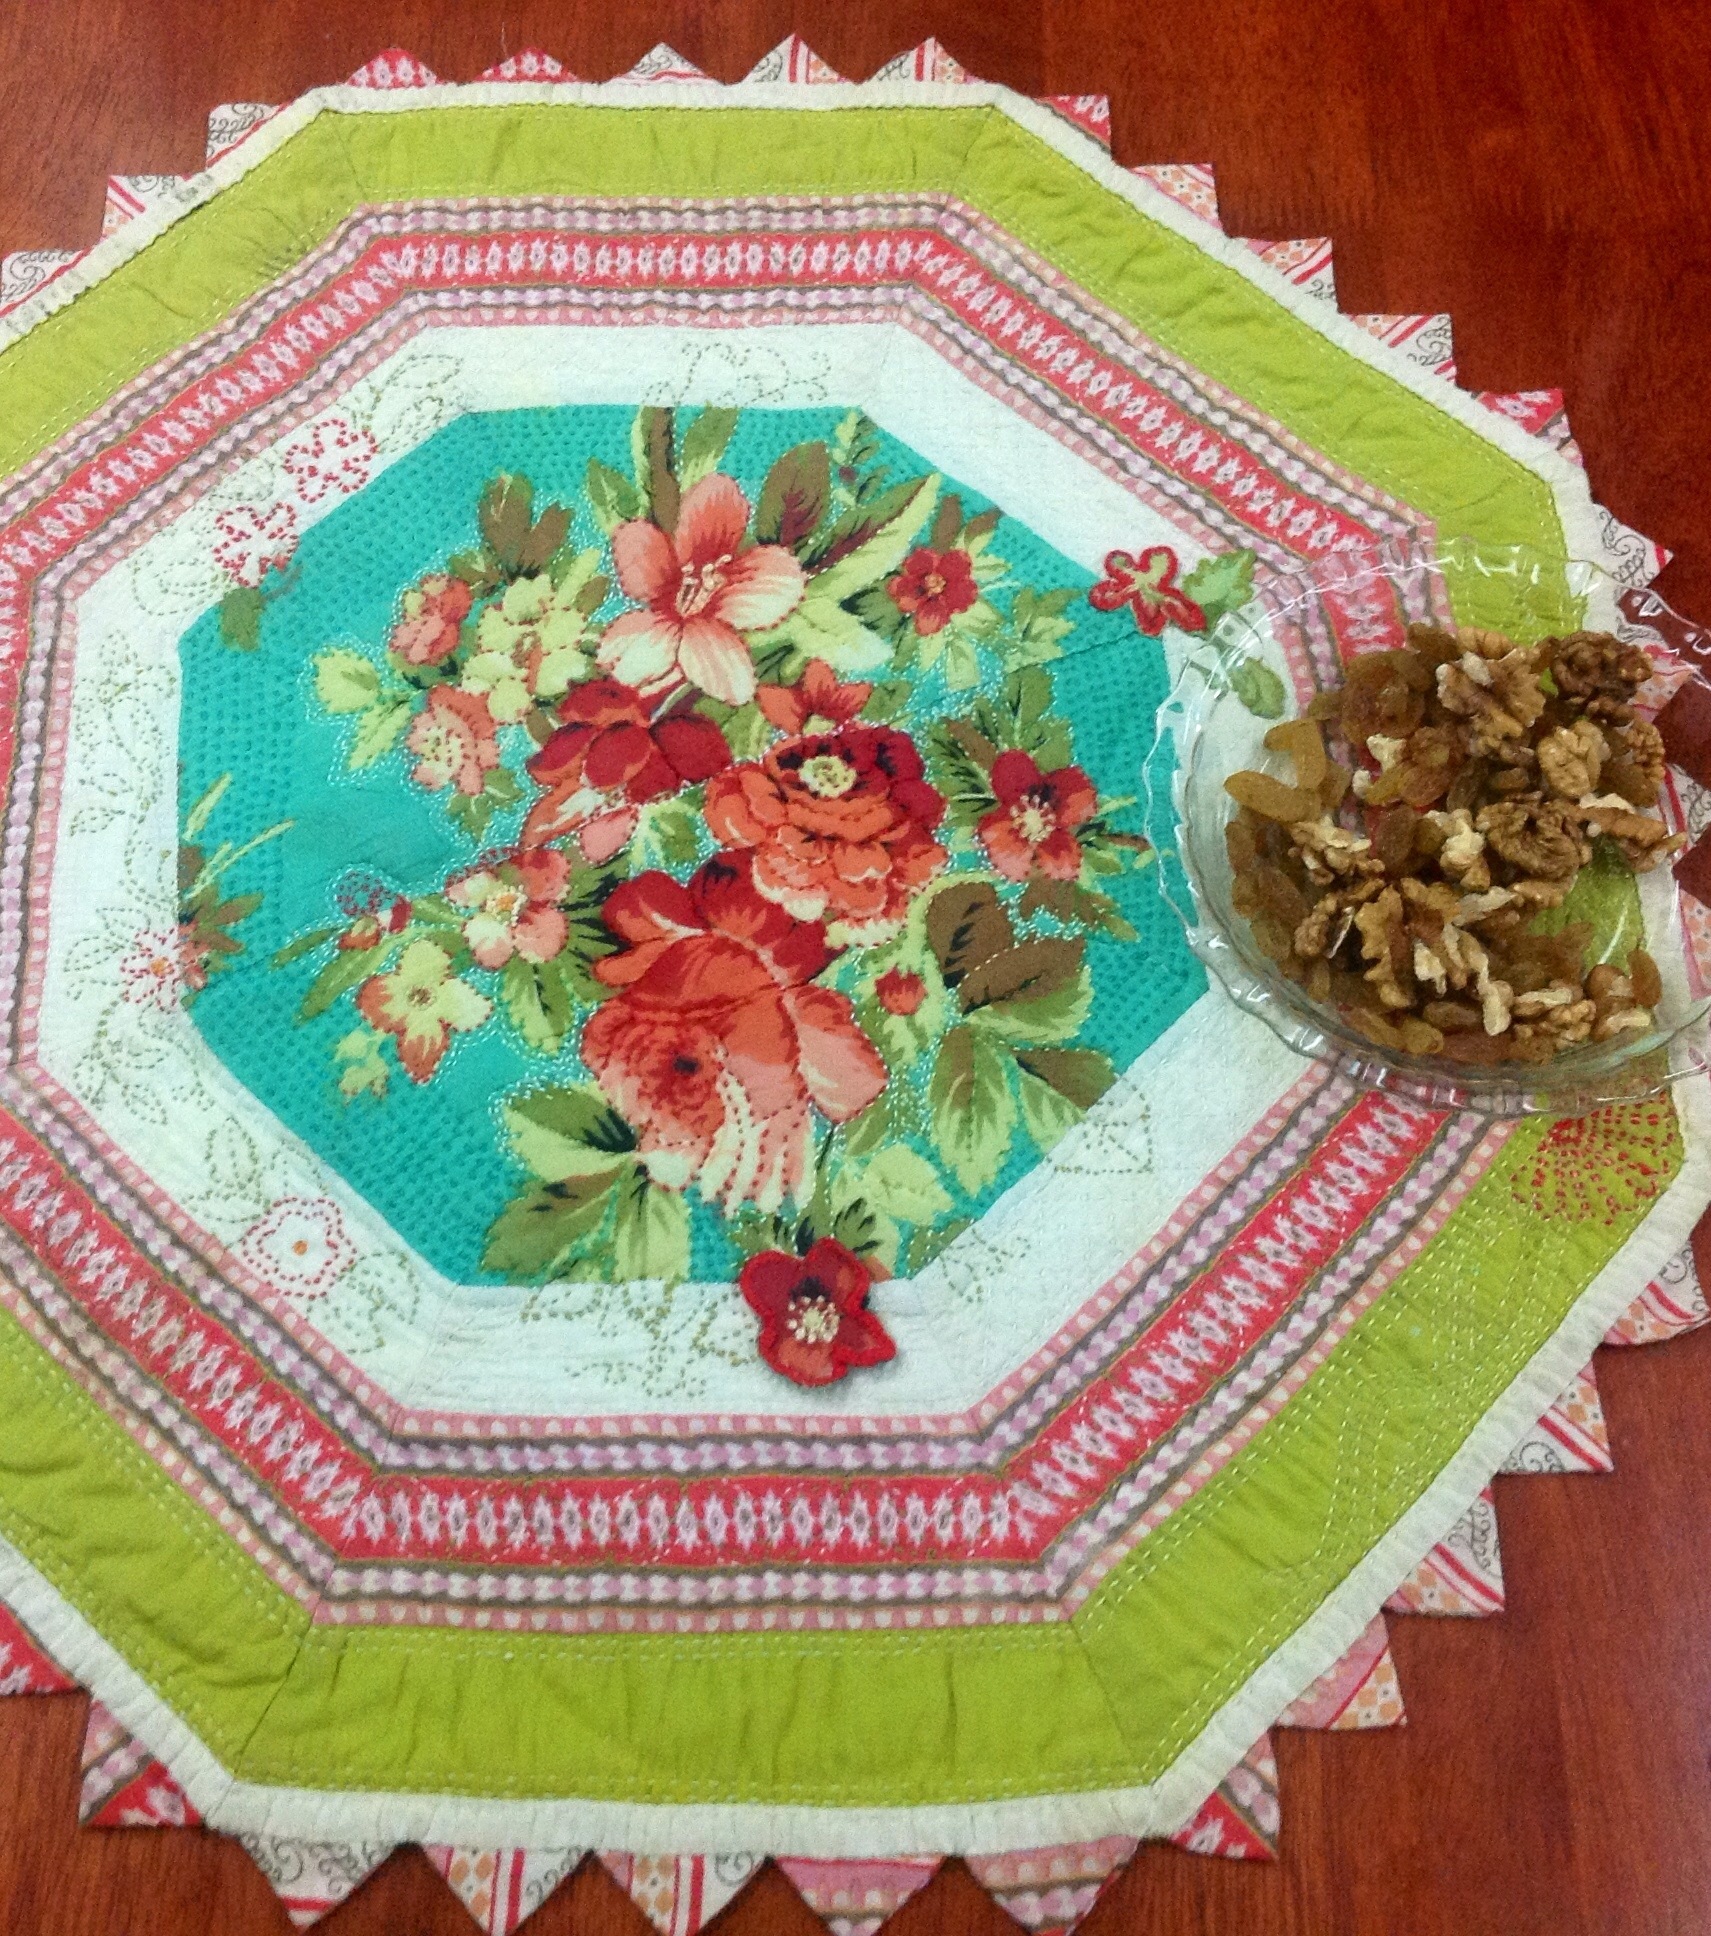
I am sharing today a small quilt made by me almost 3 years ago! I had no idea then what a wealth of information was available on the net, so much of this was trial and error.

20140129-202929.jpg
It is just about 15″ across. The roses are two pieces of muslin left over from another project which is, sadly, still a UFO ( unfinished object for the uninitiated!). The pink was fabric from an old salwar which was no longer wearable. The white and green muslins came from my stash.
I remember a lot of Maths went into calculating the length of the strips at each stage and angles at the edges. And then to make accurate 67.5 degree angles on the strips using a small protractor was going to be even tougher! I was further handicapped by the fact that I had only so much of the centre focus fabric so could not play around with the size too much.
What I finally did was to make 8 strip sets, somewhat larger than needed. I cut the octagon on flannel from a newspaper template, then marked the ‘spokes’ on the flannel. Using that as a guide, I stitched on the strip sets directly on the flannel. Wasn’t easy to ensure accurate points! But I am quite happy with the result 🙂

20140129-205040.jpg
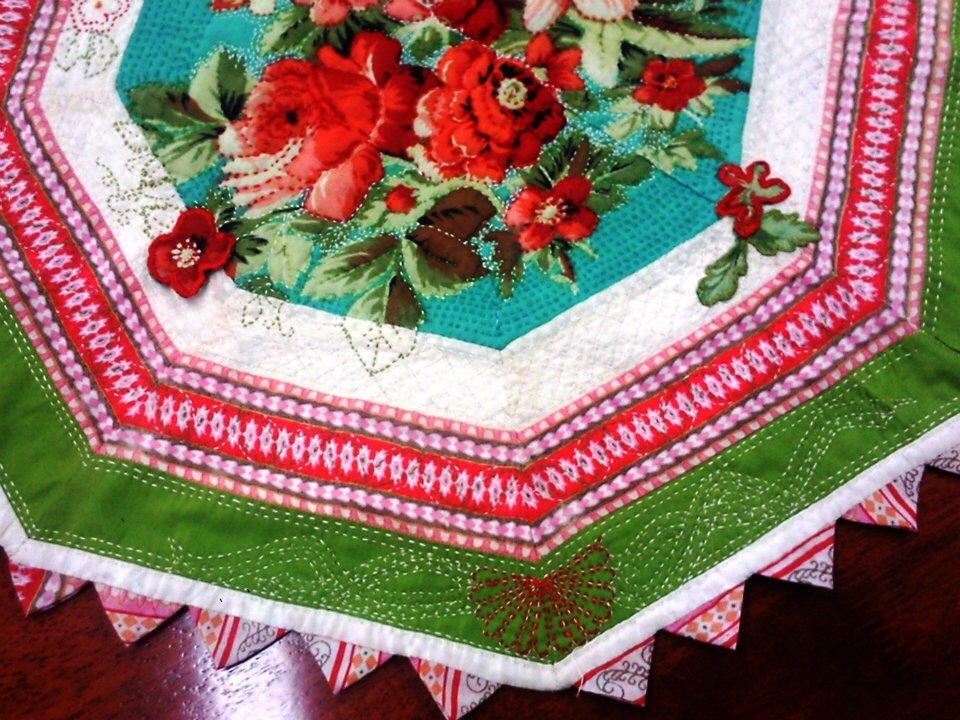
Once the strips were all in place, I did the hand quilting. I had had the foresight to add a layer of poly fibre under the flower panel, so I could get a trapunto look to the roses.

20140129-210406.jpg
I had great fun quilting this – I particularly love the trellis on the white strip! By the time I reached the outermost strip, I was so exhausted that I decorated only one of the corners!

20140129-205523.jpg
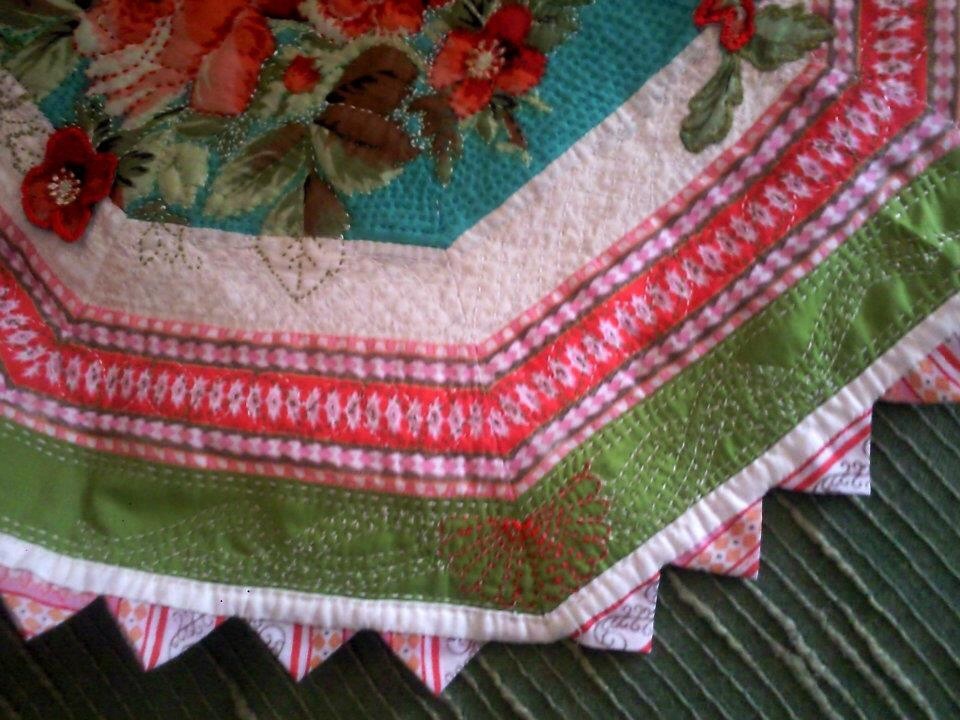
But the quilt looked unfinished, so I thought I would add the prairie points which I had seen in a quilting book! But how on earth was I going to bind it?!? And then there was the back to be taken care of too, as I did not care much for the white flannel. I solved the problem by inserting the prairie points between the quilted front and backing fabric and attaching two separate bindings – one for the front and other for the back.
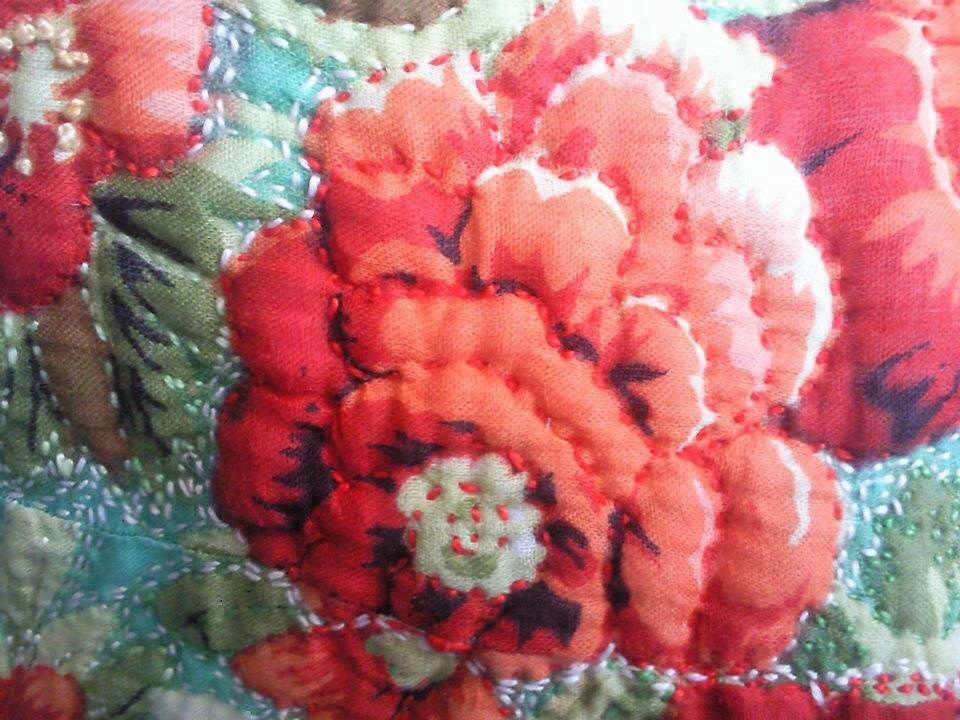
All that was left now was to add a few flowers and leaves to give a three dimensional effect to the little quilt. I used a double layer of the fabric to secure the petal and leaf edges. Surprisingly, these have withstood several washings!
The quilt is much faded today, but much loved still…

20140129-222129.jpg

A Special Quilt of Hope

20131121-153341.jpg

This is a very special quilt, perhaps the closest to my heart! I started making it in February this year, as a Valentine’s Day challenge entry for my facebook quilting group, Desi Quilters. I had just managed to get the pieces ready for English paper piecing, when my daughter fell seriously ill.

20131121-152157.jpg
She was hospitalized for 2 months, when there was someone very special who gave us faith she and we would come out of it, stronger than before.
“Cruel harsh winter
Ablaze with flowers of hope.
Summer’s in my heart.”
The unfinished pieces lay there forlorn and rolled up, to emerge in September, for yet another group challenge, ‘Flowers’. Finally completed, here it is.

Small Quilted wall hanging 25" X13" English Paper pieced clamshells, appliqued, machine free motion quilted. Flannel batting
Flowers of Hope – Small Quilted wall hanging

This piece is also special, because it is the first time I tried free motion quilting, quite successfully, I thought!

Back of Flowers of Hope  - Small Quilted wall hanging
Back of Quilt

(The use of the lighter brown in the bobbin case was not intentional – I just ran out of the darker thread  :-p)

20131121-153304.jpg
I added a few French knots to give some dimension to the flowering trees.

20131121-153320.jpg

Today we are faced with yet another situation where we need strength and hope, lots of it!
My faith continues to give me belief we shall overcome this too!
“…but winter always turns to spring. Never, from ancient times on, has anyone heard or seen of winter turning back to autumn. ” Nichiren Daishonin
And so,
बीहड़ उजाड़ मन.
गुलमोहर अमलतास बन
झूमी आस किरन…

Just takes 2 quilt top finished!

20130625-202655.jpg
The Just Takes 2 quilt top is done!
20130625-202710.jpg
The Just-Takes-2 quilt is designed by Gay from Sentimental Stitches and Brenda of Dear Jane. Head to justtakes2.com if you want to make your own quilt!

It finishes at 72″ X 90″ – it shall definitely need borders! And since I have run out of the grey printed background fabric, will have to make do with grey solid. Everything is going into cold storage now – I have a son getting married in exactly two months’ time 🙂
I must add a picture of what inspired the colours of my quilt – a sunset in the monsoons!

20130627-221614.jpg
An August evening in Jaipur with the monsoon clouds dispersing to reveal the setting sun …

The Hippie Happy Quilt

My Desi Quilter Challenge Quilt
Fused Text `Quilt’

Now it can be revealed!

My online quilting forum Desi Quilters’ monthly challenge for January was to come up with a quilted wall-hanging for my sewing place with text in it! And the entries were to be anonymous too – for the group.

I thought long and hard and hit upon hippie art, very popular when I was growing up! And I had the perfect fabric for it, with bright flowers and paisleys! The text had to be pieced according to the challenge rules, and what word better than `PIECE’ to piece? I love playing around with words, so the first part of the quilt was designed with a peace symbol! I used Elizabeth Hartman’s (of Oh,Fransson!) method to piece the text, using lightweight stabilizer – the pieces are ready at 1/2″.

Peace / Piece Block
Peace / Piece Block 10″X 17″

For the pieced ring border of the Peace symbol, I did something I thought was super clever! I’ll talk about that later! I quilted this block with a kind of paisley pattern in contrasting yellow and pink , using the walking foot. I quilted as I went (QAYG), as I had long wanted to try this method ! (Also, wanted the quilt to be be in an almost- ready position to be submitted at the deadline, in case I could not complete all the blocks 😉 !)

When we were teenagers, a favourite doodle was a name or slogan written in a circle in this `font’! ( We were all in love with Rhett Butler of Gone with the Wind, so our rough notebooks were full of imaginatively decorated doodles of `Rhett’ in circles and hearts!) So this bit of art was a must for my quilt! After much brainstorming, I hit on SEWL – a play on SOUL! (DH thinks the word-play is incomprehensible; I am quite proud of it, sew there!) So in went the `SEWL’ into a circle with rays radiating from it.

Soul / Sewl Block
Soul / Sewl Block 17″ X 17″

To construct the rays block, I used an 18″ square freezer paper. I marked the centre of the paper and drew drew three concentric circles, at 5″, 7″ and 9″ . A protractor was used to draw the rays – there are 24 rays in all, 15 degree angles. I pieced the block in halves, using the freezer paper technique, folding away each ray as I pieced it. I wish I had taken pictures 🙁

Now came the brilliant part (IMNSHO – where H stands for humble!) I cut out the smaller ring (5′ inner and 7″ outer radius) and used it to border my `PEACE’ symbol! This ring had to be raw edge appliqued.

The rays were ready to be used as the background on which I appliqued the SEWL circle, after turning in the edges. I fussy cut the highlighter fabric to decorate the block, using raw edge machine stitched applique. I quilted around this applique to highlight and raise it, but this was a disaster of sorts! It made the work look terribly untidy. 🙁

So I had PIECE and I had SEW, but wanted something more! After browsing through hippie slogans a hundred times, the brain wave struck…tranquility! So the final block was designed.

TranQUILTy block
Tranquility / Tranquilty block 27″ X 11″

For this block, I was inspired to attempt Chenille quilting, explained so beautifully by by the talented quilter Vani Roy in a Chenille Quilt Along on the Desi Quilters’ facebook forum. The block was designed as a long narrow horizontal panel below the other two blocks, to give a feeling of expansiveness. The oversized full moon linked up the three blocks. I also wanted to add a bodhhi tree, but TRANQUILTY is a huge (pseudo)word! I quilted the whole text, and fused the letters QUILT on it. I did minimum quilting on this block, because I did want it to look to busy. The wall hanging is now a perfect size for my sewing corner!

Wall quilt quilted with walking foot using QAYG method
Hippie Art Quilt – ready for my sewing Corner

Do feel free to make your own wall quilt inspired by my quilt! But I would love it if you would link back your quilt to me 🙂

A taste of honey for the Queen Bees…

Merry Christmas!
Merry Christmas!

… and some Christmas cheer!

What do you do as a quilter when you owe your Queen Bees something for their block parties? Try to sweeten up things a bit, right?

Queen Bee for Desi Quilters Bee Desi for September, Vidya had to wait till now for her block! For not killing me, she gets this little Scottie (whom she has named Patchy) to guard the felt  farm animals she is making for her grand-daughter.

Patchwork dog
Scottie for Vidya

I had the pattern from my first patchwork book “All About Patchwork” (published Marshall Cavendish Ltd., London 1973).

It is made with 1.5″ squares from a jelly roll, partly machined, partly hand sewed;  the ears and tail are paper pieced! It uses 92 squares – 30 for either side and 32 for the centre strip. I would highly recommend EPP if you decide to make this yourself. Sew the toy shapes first (remember to reverse the front and back!) and then  join the 32 square strip.

My only regret – wish I had used brighter fabric for it – it should probably look delightful in bright solids.

October Queen Brinda deserved something for not asking me even once for her block. Since she celebrates Christmas in a big way, I made her this little festive quilt which could be used as a mat.  Or she could use it as a wall quilt, if she added a sleeve.

Christmas Quilt for Brinda
Miniature Christmas Quilt

I was inspired by a mini-quilt I saw on flickr.com, but am sorry am unable to trace it now:-) Shall add the acknowledgement as soon as I find it again. The 4-patch blocks are 1.5″ square made by my easy/ quick 4-patch method, which I shall tell you about in another blog! The buntings are fused using Heat and Bond (red). A few buntings are 3-dimensional, made by adding fabric to the back and attaching them only on the top.   Brinda is a great hand quilter, so I wanted to add a bit by hand to it.  So I embroidered tiny motifs in gold thread. This was the first time I did  whole quilt by my new Brother, so it is not as neat as I would wish, but…

So, we come to November.

Scrappy, quilted cozy for small scissors - front
Quilted cozy for scissors

I made a block in prints instead of solids for Queen Nirmala.

Quilted, scrappy cozy for scissors - back
Back of scissors cozy

And made this little scissors cozy to make her feel a little better

(Psst…do you recognise the prints from Vidya’s Scottie? I used the one inch strip leftover from the jelly roll after cutting 1.5″ squares to make this 😉 )


For December, I was not late 🙂

But…the mess that I made of poor Elvira’s block is really nobody’s business. Besides cutting it wrong and sewing wrong pieces together, I had a lot of thread tension problems, which no amount of fiddling with the tension knob could sort. Adding to my woes, I could not find my 1/4″ seam! I would have made her another block, but I had no other black cotton thread and a friend told me it was not available in the market either. Perhaps Elvira, who sews so beautifully, will be able to tell me how to adjust my machine!

The only good thing was that I had a lot of  hsts – a by-product of Elvira’s flying geese, besides a few rectangles left over. I decided to put them together to make a mini quilt for Elvira. I do think it looks quite Amish, I wish I had the confidence to do some more quilting on it!

Amish style miniature quilt
Amish style miniature quilt. A little egg-cozy made by MIL poses with it !
Amish style mini quilt
Back of Elvira’s mini quilt – with my mother’s play tea-set from 1937!


So those were the gifts I really enjoyed making! Before I sign off, here is wishing you all a very Merry Christmas!

Christmas Quilt
Be Merry!