A Royal (Blue) Finish on a Grey Monsoon Day!

This is a first anniversary present for my son and daughter in law, both great fans of grey and royal blue.

Cambric print in royal blue for the backing and lime green for the binding

I made it with the blocks from my Block Party on Bee Desi, my virtual quilting bee from the Desi Quilters group.

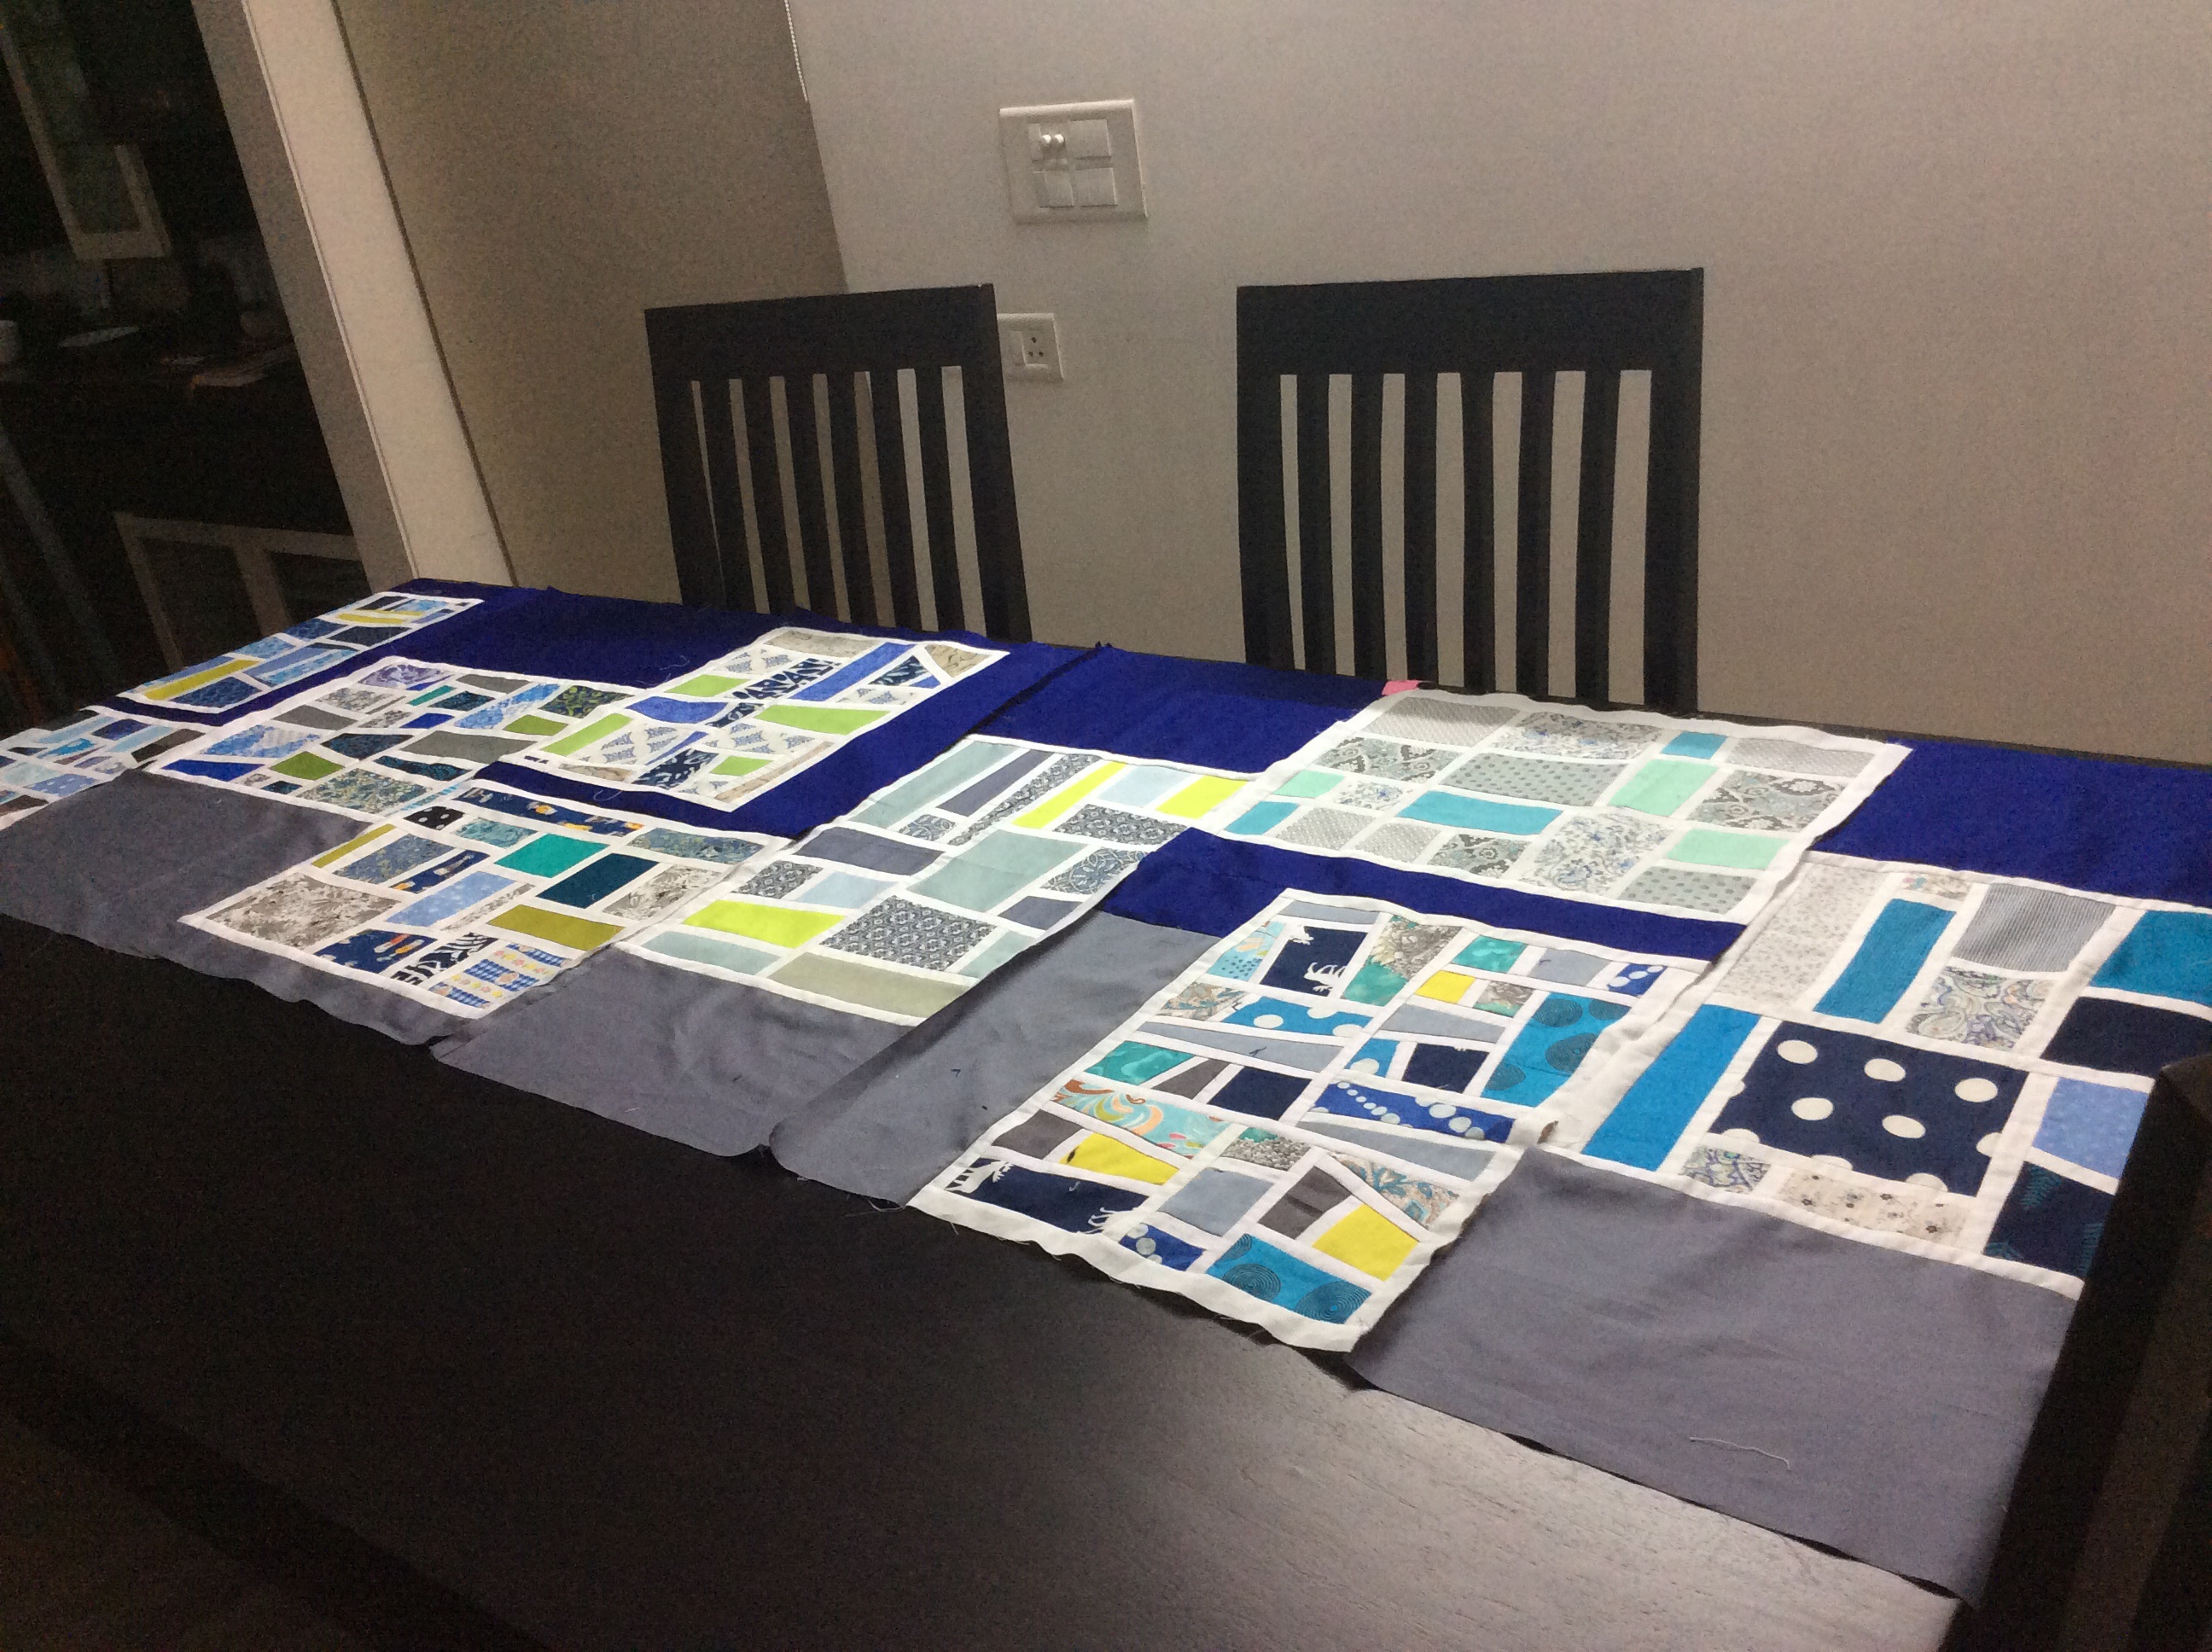
Before I show you the full quilt, I must show you the beautiful Mod Mosaic by Elizabeth Hartman  blocks made by the Desi Quilters!

Mod Mosaic by Elizabeth Hartman block
Tina’s block in muted grey, blue and aqua
Mod Mosaic Block by Elizabeth Hartman
Brinda’s Block with an ethnic Indian touch
Elizabeth Hartman Mod Mosaic Quilt block
Vidya’s stunning finish in navy and lime
Mod Mosaic quilt block by Elizabeth Hartman
Elvira’s ‘reindeer’ block
Mod Mosaic quilt block by Elizabeth Hartman
Veena’s stripes and polka dots…
Mod Mosaic quilt block by Elizabeth Hartman
Sandhya’s perfect finish
Mod Mosaic quilt block by Elizabeth Hartman
Nirmala’s lovely blues with a hint of lime
image
The champagne block! By Shalini

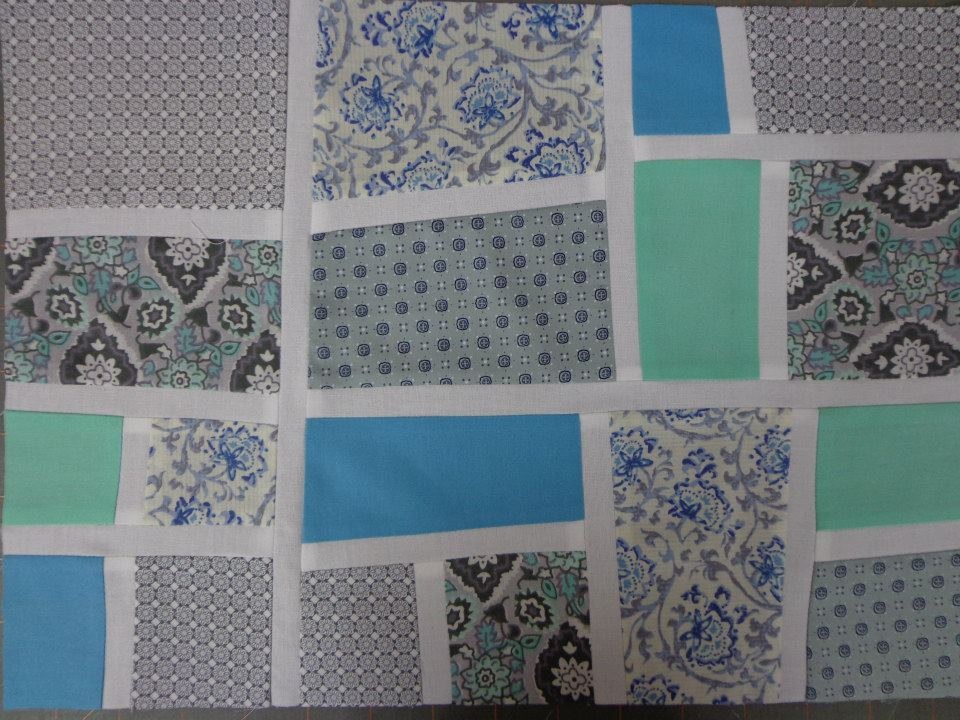
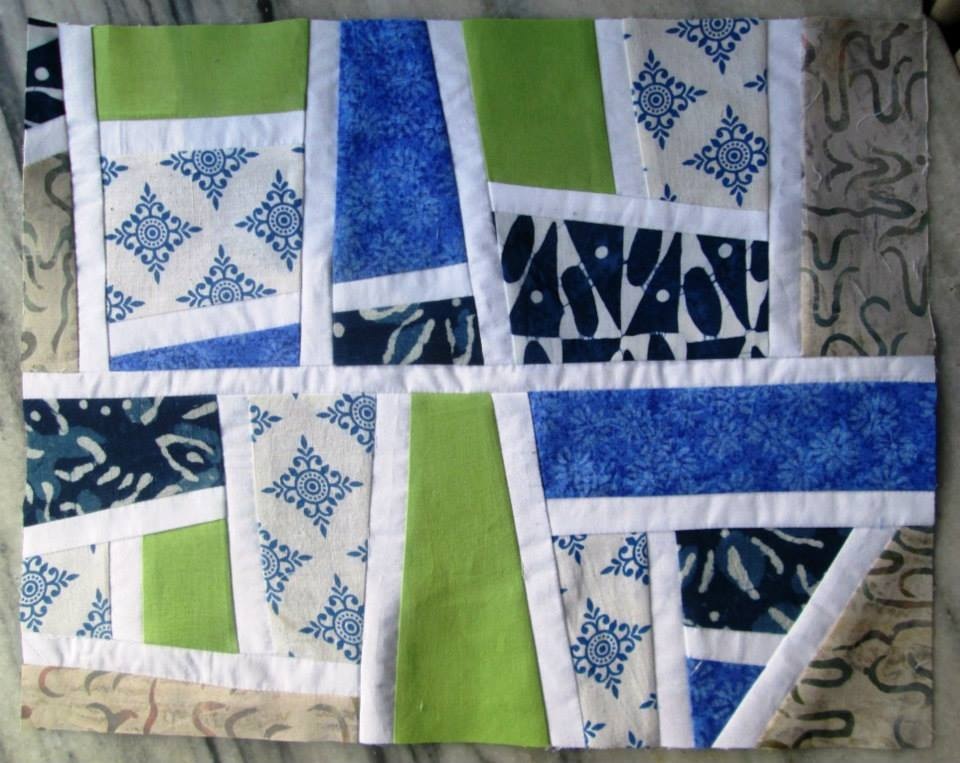
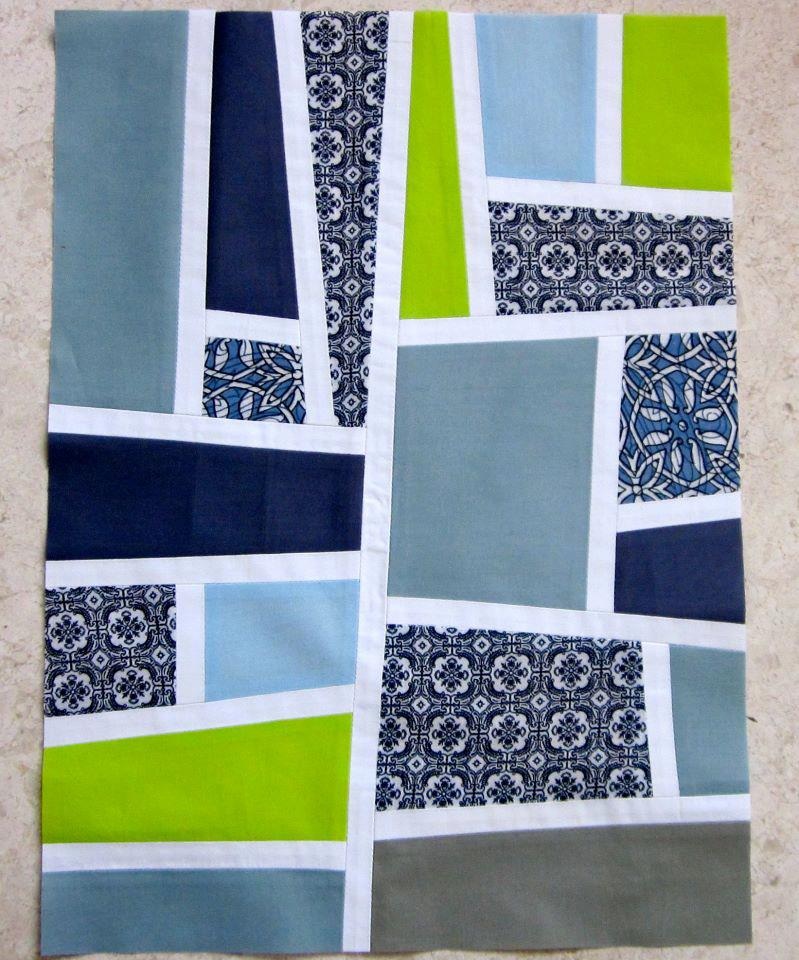
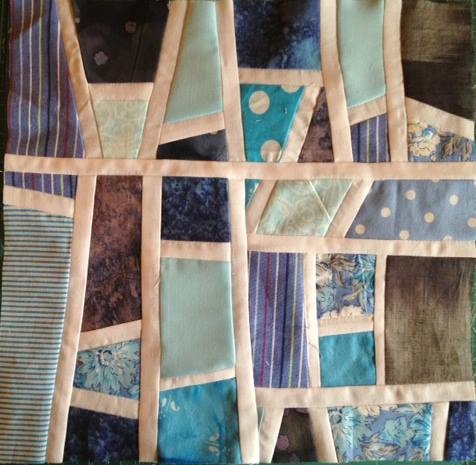
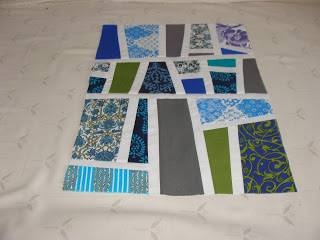
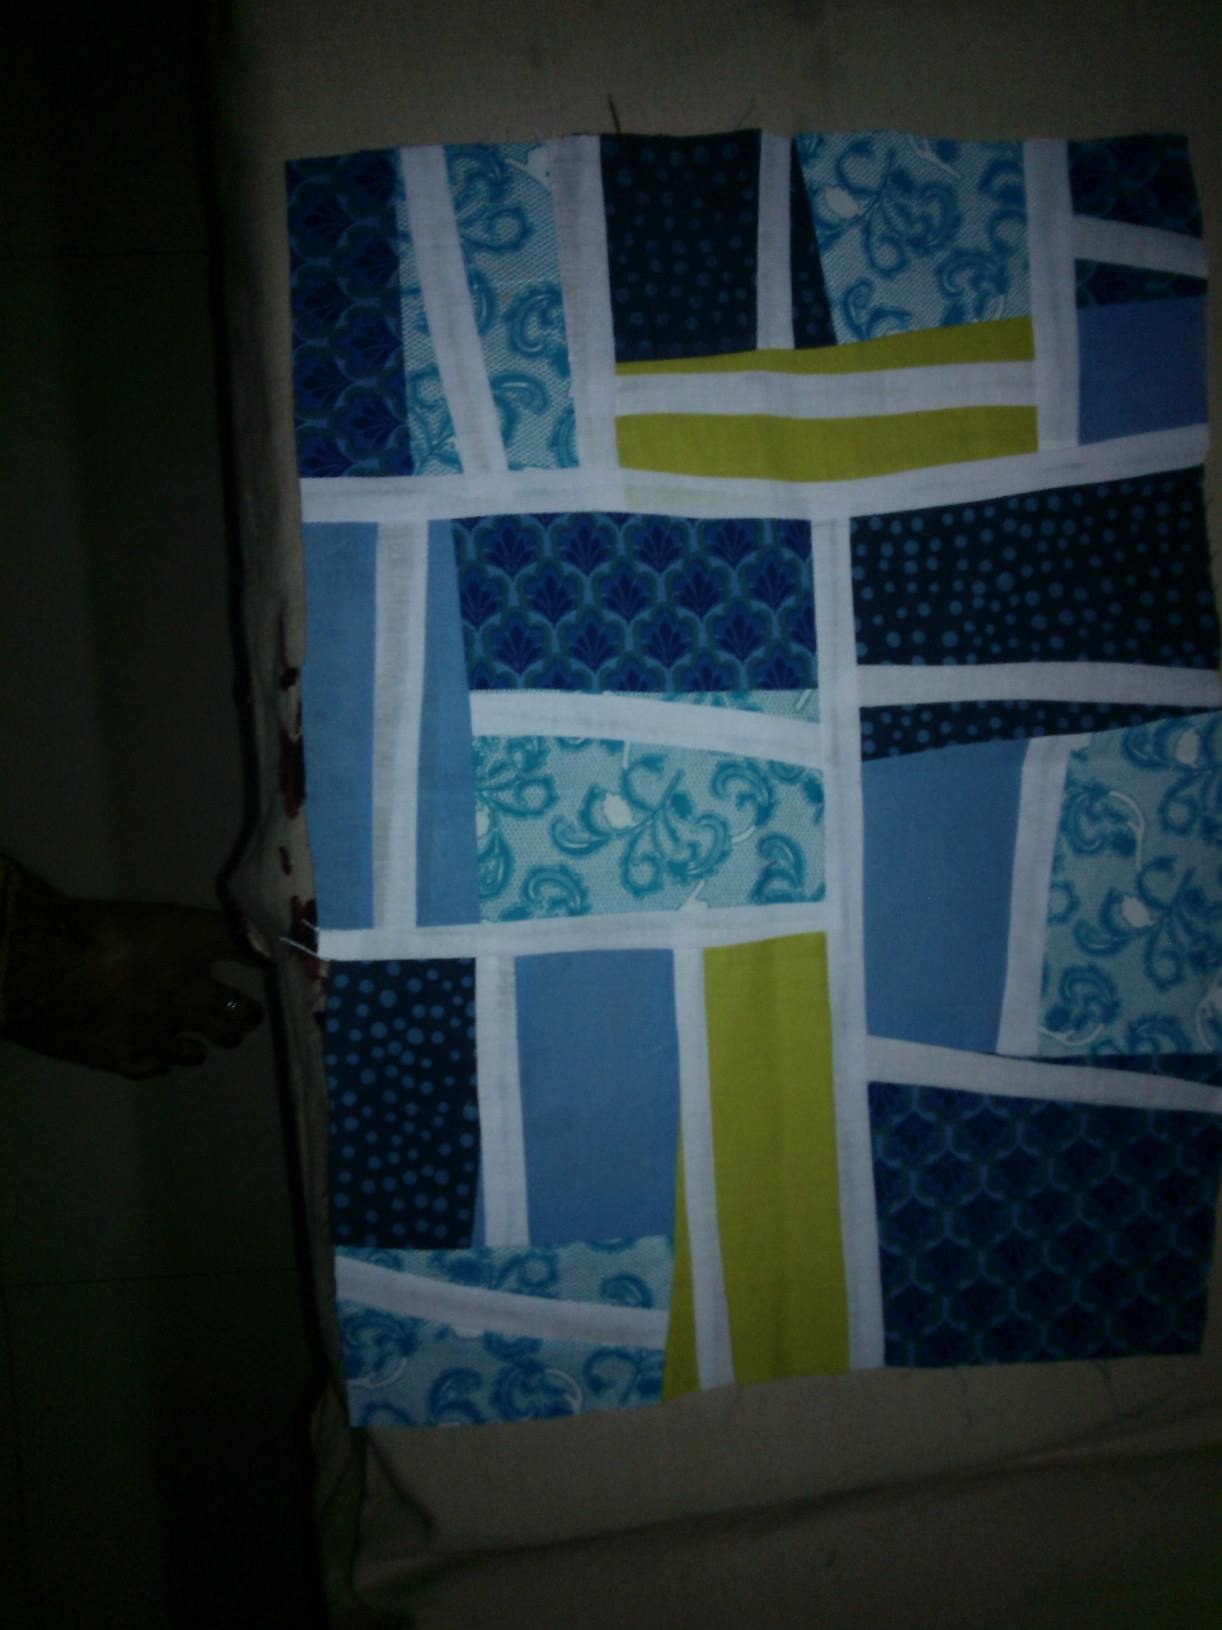
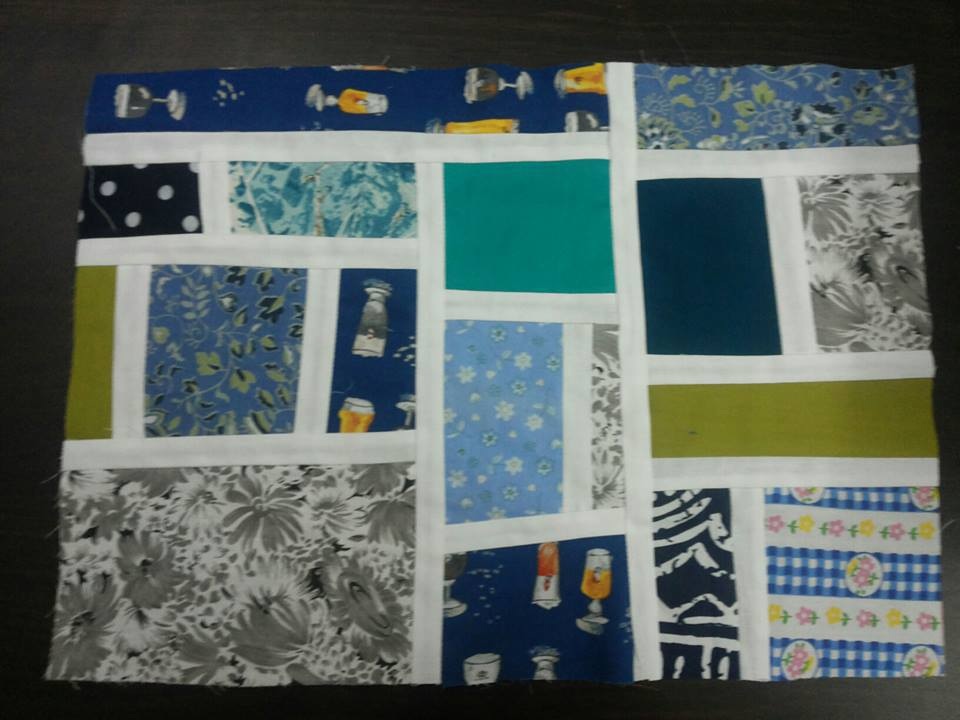
There is something so fascinating about bee blocks! My son had got engaged at the time these blocks were being sewn. How appropriate that they should go into a quilt for him and his wife on their anniversary! I thought about the difficult time our family was going through with my daughter critically ill, around the same time. Somewhere, the love and care that each quilter poured into each of these blocks reached out to me and my family… As for the blocks themselves, as I quilted them I wondered about the story behind  each print. I thought of a quilter generously cutting up some favourite new fabric to put into her block. Or were they scraps left over from a dress made for a daughter or a grand daughter? A much loved cushion? Or even a quilt? Who was using them now ? The child scraps, travelling miles away from their home to be made into a quilt which will now go all the way across the oceans to America…How very special bee blocks are!

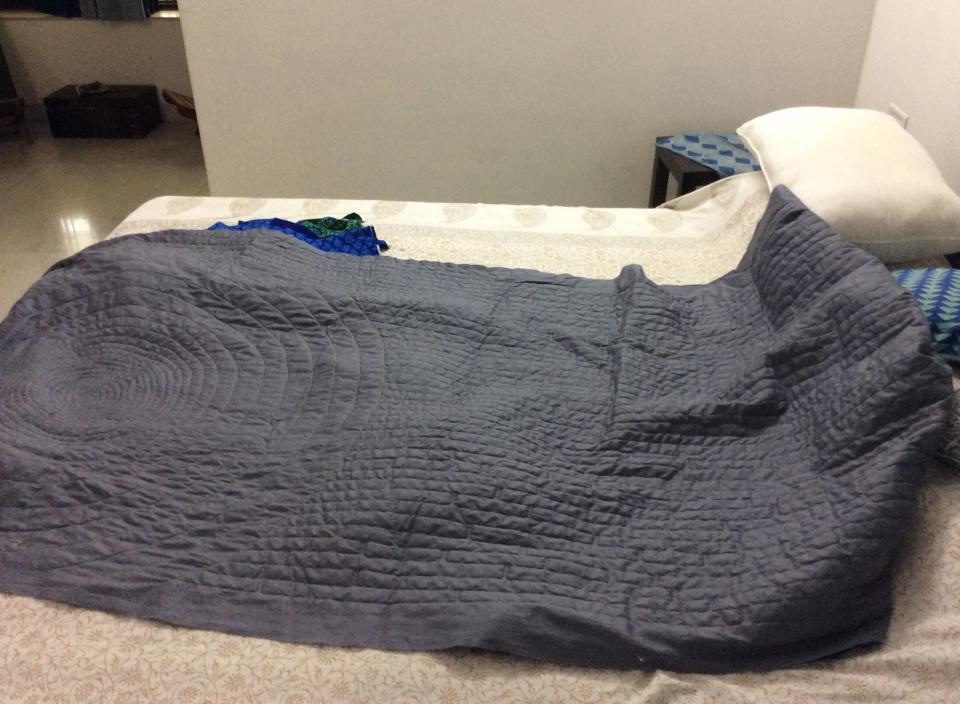
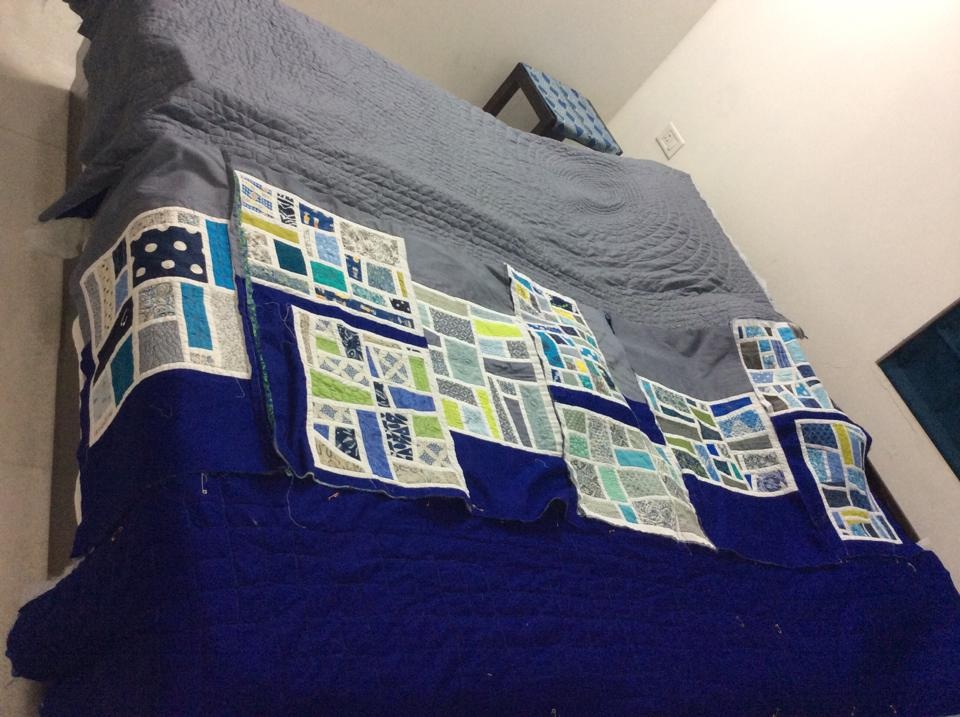
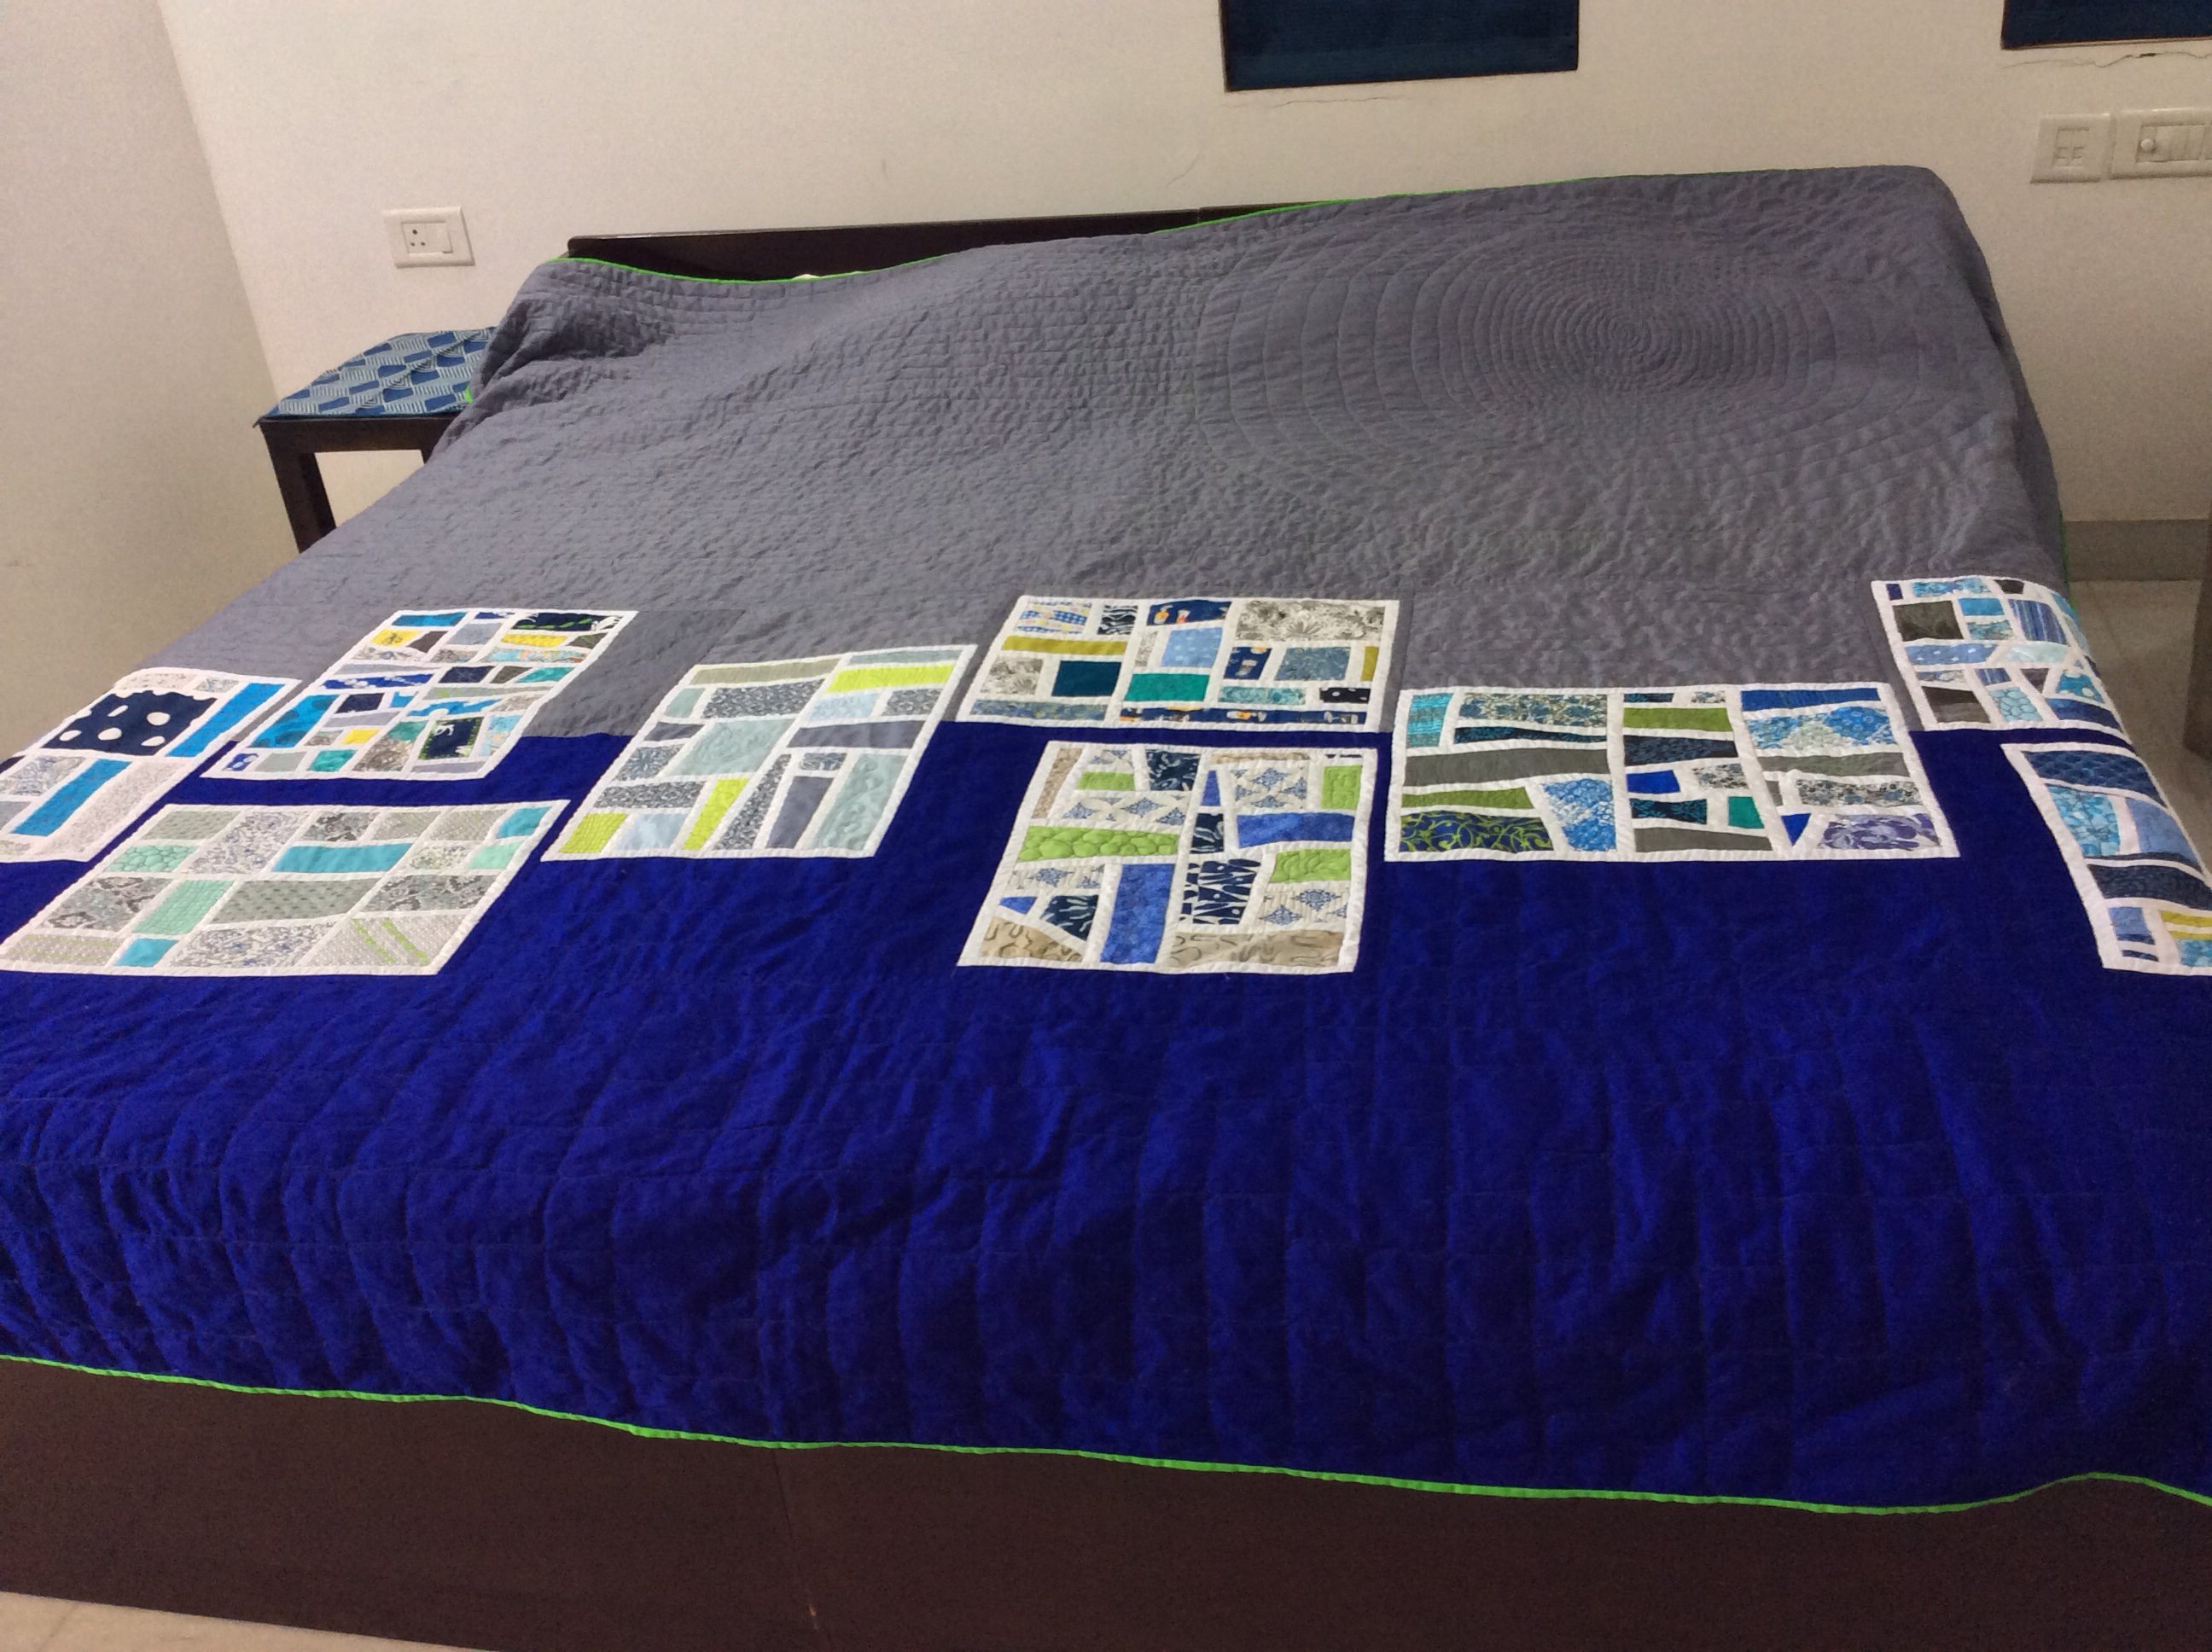
I had a total of 9 blocks, all of different sizes and putting them together to make a whole quilt was impossible. To cut a long story short, I decided to put the blocks together in a horizontal row of 30″ with grey above and royal blue below! Then began the calculations as I wanted a straight line across where blue met grey! I worked on the free quilt design software, QuiltAssistant  and came up with this!

9 Blocks arranged in a 30" row
9 Blocks arranged in a 30″ row

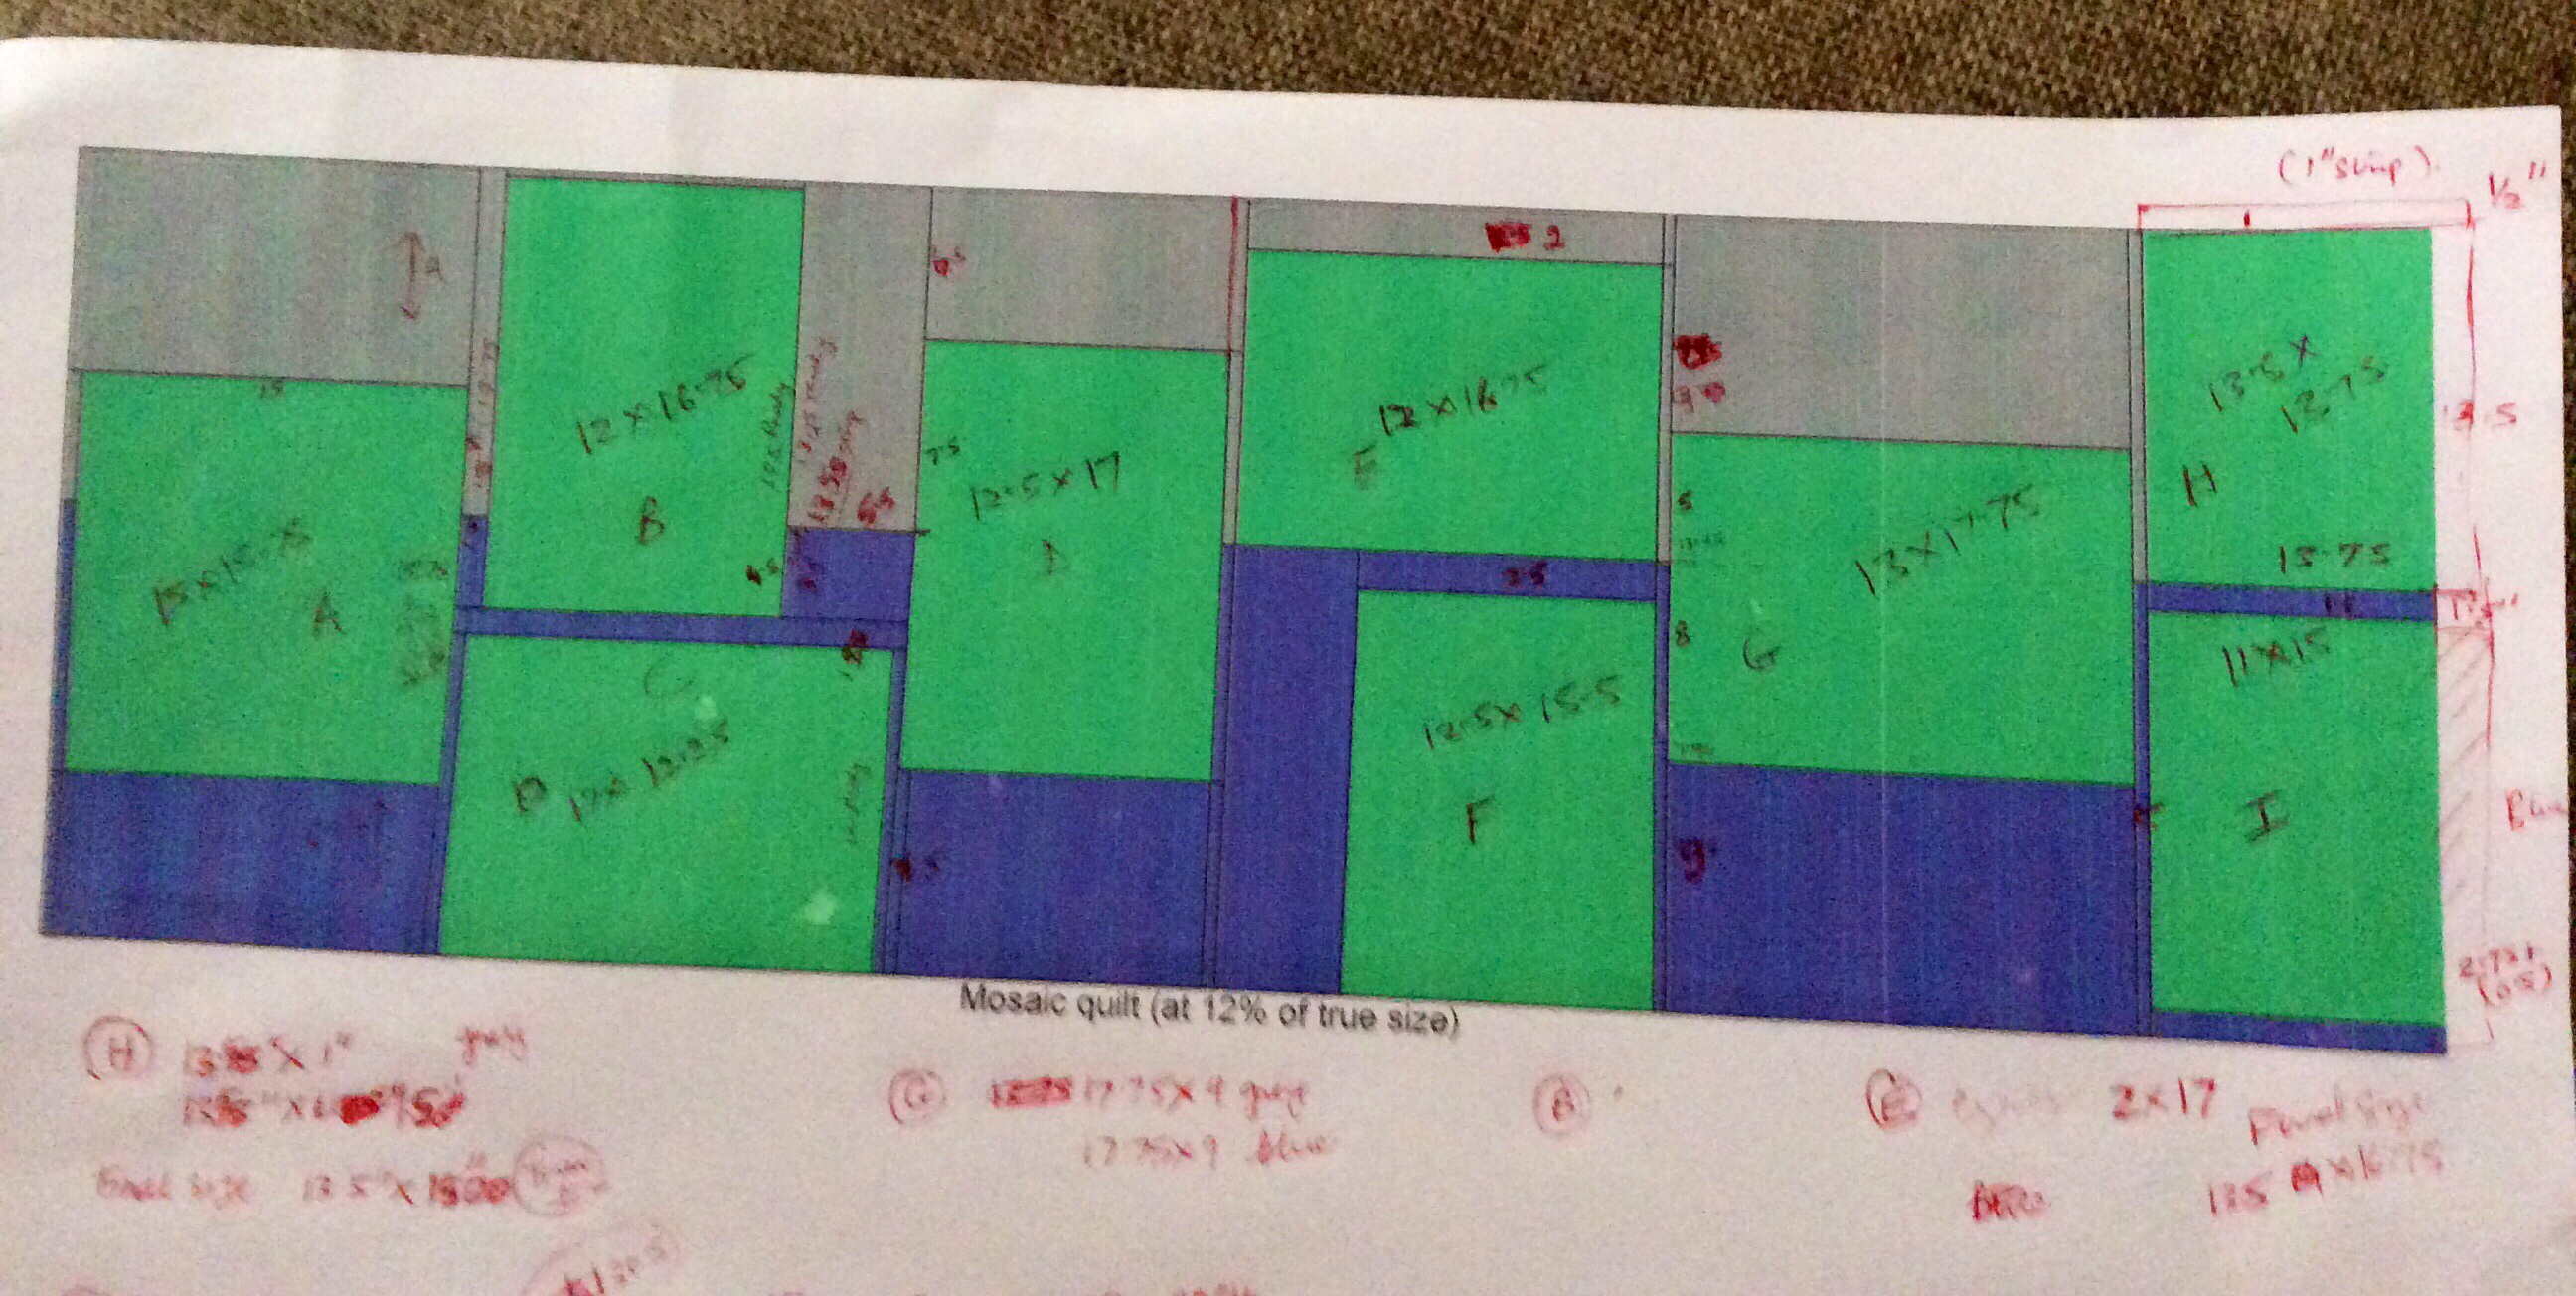
Each giant block was a different width and quilt as you go (qayg) seemed to be the only option for putting it together! I used a great tute at the Quilting Edge, but I hated the qayg! The quilt came together in 3 panels, finally.

I used a cambric print in royal blue for the backing, joining up the qayg blocks and panels with narrow strips of a blue and lime green fabric. The batting was a thin 120gsm polyfibre.

The 46″ wide grey was quilted with a giant spiral covering almost the width of the panel, in a variegated grey thread in the centre and lime green on the outer circles. The rest of the panel was majorly filled up with a boxy version of the “etch and sketch”” filler stitch by Leah Day, petering out into wavy lines ending in tiny spirals on the left edge. To do this, I drew lines 1″ apart on the top and worked on that. Here, the quilting was in lime green thread near the spiral and a dark grey matching the fabric in the rest.

The ‘windows’ in the Mod Mosaic blocks were filled with different designs from Leah Day’s 365 days free motion quilting project and a few motifs from Lori Kennedy’s The Inbox Jaunt!

For the royal blue, I used Leah Day’s ‘cubic ripples’ as an inspiration, but gave them more structure and developed it into a ‘Tetris’ game like pattern. I drew lines at 2″ apart vertically on the 16″ row and  quilted 2″ and 4″ squares and 2″x 4″ rectangles. This was a fun design, as I challenged myself not to stack up similar ’tiles’ in close proximity.

For the binding I chose a lime green to brighten up the drab grey which made up half the quilt. I cut the binding the wrong width – just 1.5″ but there was no way I was going to waste 400″ inches of binding. And I had already sewn half a side before it struck me what I was doing! So I decided to go ahead with it;  I do want to think the 1/4″ binding adds a touch of elegance to the quilt – so “not over the top”!

All the quilting was done on my Husqavarna Viking Topaz 20 with its inbuilt auto sensor system for fabric thickness. I had some problems initially when using the spring action fmq foot, but when I switched to the echo quilting foot, I soon got the hang of the right rhythm and everything went smoothly – like a dream!

So here are the pictures, I’ll shut up and let them do the talking…

Mod Mosaic blocks in a row - the rightmost is the ninth - made by Sandhya S!
Mod Mosaic blocks in a row – the rightmost is the ninth – made by Sandhya S!
A giant spiral 38" in  diameter to offset and soften the rectangular blocks. The lines were added to accentuate the horizontal panels.
A giant spiral 38″ in diameter to offset and soften the rectangular blocks. The lines were added to accentuate the horizontal panels.
Mod Mosaic block assembly
The quilted blocks being assembled through QAYG
Mod mosaic blocks by Elizabeth Hartman
A dash of lime to brighten up the proceedings
Quilting on the mod mosaic quilt
“Tetris” tiles quilted on the blue panel
The quilt is a square, may be used either way?
The quilt is a square - can be used this way too?
The spiral circle spacing gradually increases from 1/2″ on inner circles  to 2″ outside
Now to pack it up!
Now to pack it up!

Ready for packing? Not before one last look at it!

With blessings and love, from Ma!

Thank you, all you beautiful ladies, who made the blocks for this quilt!

The Hippie Happy Quilt

My Desi Quilter Challenge Quilt
Fused Text `Quilt’

Now it can be revealed!

My online quilting forum Desi Quilters’ monthly challenge for January was to come up with a quilted wall-hanging for my sewing place with text in it! And the entries were to be anonymous too – for the group.

I thought long and hard and hit upon hippie art, very popular when I was growing up! And I had the perfect fabric for it, with bright flowers and paisleys! The text had to be pieced according to the challenge rules, and what word better than `PIECE’ to piece? I love playing around with words, so the first part of the quilt was designed with a peace symbol! I used Elizabeth Hartman’s (of Oh,Fransson!) method to piece the text, using lightweight stabilizer – the pieces are ready at 1/2″.

Peace / Piece Block
Peace / Piece Block 10″X 17″

For the pieced ring border of the Peace symbol, I did something I thought was super clever! I’ll talk about that later! I quilted this block with a kind of paisley pattern in contrasting yellow and pink , using the walking foot. I quilted as I went (QAYG), as I had long wanted to try this method ! (Also, wanted the quilt to be be in an almost- ready position to be submitted at the deadline, in case I could not complete all the blocks 😉 !)

When we were teenagers, a favourite doodle was a name or slogan written in a circle in this `font’! ( We were all in love with Rhett Butler of Gone with the Wind, so our rough notebooks were full of imaginatively decorated doodles of `Rhett’ in circles and hearts!) So this bit of art was a must for my quilt! After much brainstorming, I hit on SEWL – a play on SOUL! (DH thinks the word-play is incomprehensible; I am quite proud of it, sew there!) So in went the `SEWL’ into a circle with rays radiating from it.

Soul / Sewl Block
Soul / Sewl Block 17″ X 17″

To construct the rays block, I used an 18″ square freezer paper. I marked the centre of the paper and drew drew three concentric circles, at 5″, 7″ and 9″ . A protractor was used to draw the rays – there are 24 rays in all, 15 degree angles. I pieced the block in halves, using the freezer paper technique, folding away each ray as I pieced it. I wish I had taken pictures 🙁

Now came the brilliant part (IMNSHO – where H stands for humble!) I cut out the smaller ring (5′ inner and 7″ outer radius) and used it to border my `PEACE’ symbol! This ring had to be raw edge appliqued.

The rays were ready to be used as the background on which I appliqued the SEWL circle, after turning in the edges. I fussy cut the highlighter fabric to decorate the block, using raw edge machine stitched applique. I quilted around this applique to highlight and raise it, but this was a disaster of sorts! It made the work look terribly untidy. 🙁

So I had PIECE and I had SEW, but wanted something more! After browsing through hippie slogans a hundred times, the brain wave struck…tranquility! So the final block was designed.

TranQUILTy block
Tranquility / Tranquilty block 27″ X 11″

For this block, I was inspired to attempt Chenille quilting, explained so beautifully by by the talented quilter Vani Roy in a Chenille Quilt Along on the Desi Quilters’ facebook forum. The block was designed as a long narrow horizontal panel below the other two blocks, to give a feeling of expansiveness. The oversized full moon linked up the three blocks. I also wanted to add a bodhhi tree, but TRANQUILTY is a huge (pseudo)word! I quilted the whole text, and fused the letters QUILT on it. I did minimum quilting on this block, because I did want it to look to busy. The wall hanging is now a perfect size for my sewing corner!

Wall quilt quilted with walking foot using QAYG method
Hippie Art Quilt – ready for my sewing Corner

Do feel free to make your own wall quilt inspired by my quilt! But I would love it if you would link back your quilt to me 🙂

I am Queen Bee!

Yes, this month I am Queen Bee for the Desi Quilter Bee Desi! My block is here

I do love Elizabeth Hartman’s Mod Mosaic Block!
She has mentioned that for quilting bees, I just need to provide a link to her block tute, should not enclose PDF files etc.
The colours are to be blues, greys majorly, (with a dash of lime green or torquoise if someone does not have enough scraps) and with white sashing.
The size could be 11 to 15″.
The link is here http://www.ohfransson.com/files/mod-mosaic-quilt-blocks.pdf

And guess what?!? The first block has already arrived! It is the most delicious block ever 🙂

DQ Vidya was leaving for the USA and was eager to finish the block before she went!

Vidya's block for my bee
Look at those seams!
Vidya's block for my bee
A perfect block! Exactly what I wantedyou

Now, a question! Which is the right side?


I am eagerly waiting for the other blocks to arrive :-)d


Post Script –  You can see the other blocks and completed quilt here!

I’d like to be, under the sea…

In an Octopus’s Garden…in the shade!

Appliqued Octopus
Machine appliqued Octopus

I made this quilt for a challenge with my quilting group Desi Quilters, for which one had to make a quilt using strips. I had always wanted to make a Convergence Quilt and I had the perfect print for it!

For making Convergence quilts, a great resource is the book Ricky Tim’s Convergence Quilt  available on Amazon.com. I found a great tutorial on Rafael’s Mum’s blogspot ” Adventures in Quilting and Sailing., and set out to work on my four fabrics. For those of you too lazy to go look up that blog , for a wall hanging / baby quilt about 40″ X 40″, you need two or more  fabrics, though generally one uses 4 fabrics, like I did. So, the recipe is:

4 fat quarters of nicely contrasting fabric.  It works best when the main fabric is a large diffused (all over ) print or batik with strongly contrasting colours.

1 yard 40- 44″ wide fabric for the border

1.5 yards of 40-44″ fabric for backing

48″ X 48″ batting ( I used an old woollen shawl :-))

So here  are my four fabrics ( remembered to take a picture only after I had already started working on it)

Convergence quilt fabric
Trying out arrangements for the quilt fabric

And here is the how the  top would look once finished… I added a 1/4″ inner border to frame the strips, before adding a wide 7.5″ border (cut at 8″) on the outside.

Quilt top finished
Quilt top

I quite love it! As I was sewing it, a song kept playing in my head – no points for guessing which!

We would be warm,

Under the storm,

In our little hideaway

Beneath the waves…

So I had to get my Octopus. After browsing through hundreds of octopus images, I zeroed onto these two, that I absolutely adored:

Debra Harry’s Octopus Quilt  and a quilt on The Calico Cat’s blogspot.

I decided to base my Octopus on Debra Harry’s Octopus.  For the fabric I turned to a Fossil Fern charms pack  gifted to me by a wonderful friend Chumkie, from my Desi Quilters group.

I needed a range of shades in the same colour. Brighter for the tentacles in the foreground, and darker in the tentacles to the back. Also, the underside of the tentacles had to be a much lighter shade. It was like painting with fabric!

These are the various colour combinations I thought of –

Purples
I do not like purples and thought it would be good to get rid of them here 😉
Pink Fossil ferns
Pinks? Too predictable!
Earthy browns? too dull…

( A good idea is to lay out your fabrics together and take a picture. You get a much better idea of what ‘clicks’ and what does not!

Once the decision for the fabric was made, I sketched the Octopus on newspaper and cut it out, placed it on the quilt to see how it looked. Too small! So I sketched a bigger one and that seemed just right. Sorry, I did not take pics of this stage either.

I then drew a grid on freezer paper – showing where the Octopus would be placed vis-a-vis the strips. You see, I wanted  a few of the tentacles to come from behind the strips.  [Secret – I had only charm squares to work with, so I could not have too long a piece anywhere 😉 ]

I the sketched my Octopus on the grid, freehand, as you can see!

Octopus sketch
Octopus sketched on freezer paper marked with quilt grid

Note that the image is the reverse (mirror image) of how it shall appear on the quilt. The top line is the upper border – I wanted a tentacle stealing out to the border! I numbered each tentacle, and each part that would be in a different fabric on that tentacle. 1, 2, 3, 4 would be the foreground tentacles in a brighter colour

A close up of the Octopus would explain what I am saying…

Octopus Garden Quilt
A close up of the Octopus to show the gradations in colour between the tentacles in the foreground and those at the back. The undersides were done in a lighter colour

Each small piece was then traced on to Heat n Bond Lite (pink), leaving an extra 1/6″ on the edge that was to be overlapped by another piece. All the pieces were laid on the fabric top, the paper removed one by one, and the fabric was ironed on to the quilt top.

I machine stitched it with invisible nylon thread on the top and white cotton in the bobbin. I could have been neater 🙁

Learning: Here I realised that I should have handled it one tentacle at a time. Ironed one (the lowermost), stitched it, then the next… because by the time I was through with ironing it, edges had started to come off! The very small pieces even came off as I was stitching. That is why a few of the tentacles are wonky! I suppose I should overstitch the edges with satin stitch, now that I own a Brother, but I think I like the raw edged look:-) Or maybe, I am just too lazy.

For the backing I had fabric that was just 36″ wide and a quilt nearly 44″ wide. So I decided to add a contrast turquoise to make it measure up!  Alsa! The turquoise was  also a yard width, and only a metre (40″). Eureka! add some of the main print from the front in the shape of a coral rock! I had always wanted to experiment with wavy edges – so they came in next. Here is the end result

Convergence Quilt - Octopus Garden quilt back
Octopus Garden quilt back

I used an old shawl as the batting and quilted it with waves.

For the binding I joined the two solid backing fabrics and cut them diagonally to obtain a bias binding. Originally I machine stitched the binding ( from the back to the front!) because I was in a hurry.  I thought it was quite hideous, and ripped, folding down the edges with invisible hemming.

So

I’d ask my friends to come and see

An Octopus’s Garden with me!

Convergence Quilt with appliqued octopus
Octopus’s Garden Quilt

Of course, my Octopus has been christened  Paul,after  my favourite Beatle!

Convergence Quilt - Octopus's Garden
We’d sing and shout, and swim about
the coral that lies beneath the waves…

I do plan to add some embellishment to this quilt, so watch this space… 🙂

Wedding Ring Reversible Mug Rug

This is an adaptation of the traditional wedding ring block pattern into a mug rug! It is a wedding anniversary gift for my sister-in-law and her husband of 47 years.

20120730-111708.jpg
I wanted to make the mug rug reversible, and this is a picture of the back.

20120730-111809.jpg
I foundation pieced two wedding rings, about 10″ outer diameter. The centre circles have a flannel insert. I discovered that I had made a miscalculation, and these were half an inch too big! Nothing could be done now, so I slip-stitched them by hand to the interlaced wedding rings, taking the excess fabric to the back.
With no access to a sewing machine, I decided to hand quilt them. I quite like the extra personal touch the hand quilting gives to the gift:-)
It so happens that the monthly challenge on my quilt forum Desi Quilters for July 2012 is monochromatic quilts! So this could be my entry for the challenge.

Here is a closer look at the mug rug:

20120730-113518.jpg

And of the back!

20120730-113621.jpg

%d bloggers like this: