My doctor says I still cannot get back to my sewing machine for another week or so at least! What could be worse? But, at least, I am allowed on the laptop for longer hours now. So I thought I would sit and chat with you and share a bit more about the evolution of the blocks for the quilt Round the Year. ( I did tell you I use a free software Quilt Assistant to design blocks for my quilt, didn’t I?)
Here are versions of the card trick block I tried out before settling on the one we finally made for the Round the Year Quilt!
Don’t you think the circular cards blocks are pretty? Perhaps this will still make it to the final sixteen for the Block of the Month Quilt…
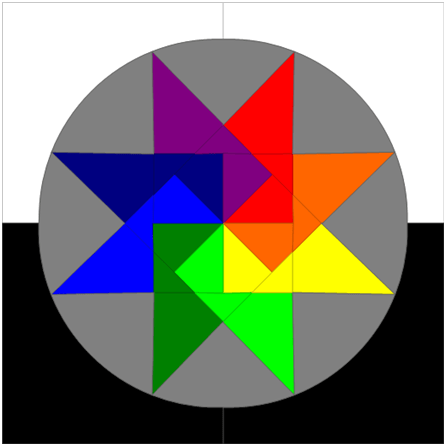
And here is an eight point star…
…which became this Sapphire Block…
Jaya Parker made this stunning Block 4, inspired by the colours of Swarowski Aurora Borealis Crystal
The Ribbon Star was designed because I so wanted to try out a hexagonal log cabin.
But it was abandoned in favour of the Venus , also pieced like ( half a) log cabin.
Do you know I still have all the templates for these blocks? Not tested, though! They are more difficult than the blocks we are making for the Round the Year quilt.
I hope you enjoyed looking at them. Once I am done with this BOM, perhaps I will try these too and share the patterns with you…
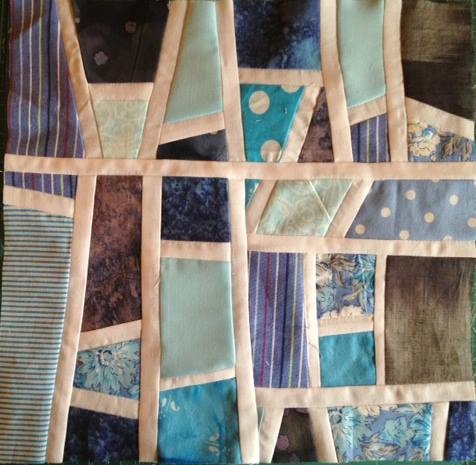
Sapphire Fire is the fourth block in the Dusk colourway in the Block of the Month Quilt, Dreamcatcher Round the Year. The templates and instructions for the other colourway “Rainbow” have already been posted last week.
Like the previous three blocks, this one is also paper foundation pieced and finishes at 18″ square with a 15″ inset circle. The pattern, fabric requirement and piecing instructions can be downloaded from the links at the end of this post.
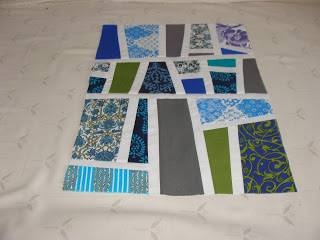
I am yet to make this block in this colourway. I plan to use 4 shades of blue fabric from deep to light in this block, contrasted with 4 fabrics ranging from deep orange through light orange and gold to yellow. The background is planned in 2 shades of grey. Here is a look at some of the fabric I have been auditioning for the block! It is Fossil Fern by Benartex – I just love that fabric!
Fabric for the Sapphire Fire Block
Meanwhile, I am utilising this post to list out of a few do’s and don’t’s to keep in mind when paper piecing the blocks from this quilt!
Templates
Reminder – the templates for the Round the Year quilt blocks are printed mirror images.
Check to see if the templates are to be printed in portrait or landscape mode – adjust the printer setting accordingly.
Take print outs of the Template file with printer settings at 100% or actual size.
I often have people ask me if they can increase the printer settings to, say, 120% if a larger block is needed. It does not work that way, if you have the ¼” seam allowance added on to the template ( as is the case with the Dreamcatcher Round the Year block templates). You will end up increasing the seam allowance also to 120%!
4. I hate all the paper wastage involved when printing the templates – often one template occupies one whole page! Where possible, I like to use my unthreaded sewing machine to needle punch up to 7-8 templates at a time from waste paper stapled to a printed template. Tissue paper works great!
5. I like to cut the templates a bit larger on all sides and trim them after piecing. It may be just superstition, I don’t know! I just like the thought of some margin in case things go wrong somewhere!
Cutting Fabric
6. This can never be stressed enough – starch and press your fabric! It makes all the difference between a block that looks like it has been pieced by an experienced quilter versus a beginner! Every minute spent on this stage will be well worth it!
7. What I love about paper piecing is that you don’t have to be very accurate when cutting the fabric. All my fabric requirement charts give you plenty of margin. Personally, I like to keep a boxful of all the scraps from the quilt blocks to look into before I start cutting fresh fabric.
8. After cutting the fabric pieces, I can save a lot of heartburn if I remember to pin the pieces to the respective templates! At this stage, I also get a chance to check if I have missed out on a piece or two.
Piecing
9. I like to sort out the templates shape wise unless specifically asked not to. There is a possibility you can chain piece them and why miss the opportunity?
10. Set your machine stitch length to 1.5 (or about 15-20 stitches per inch). You want to be able to tear away the paper, without getting the stitches all loosened up.
11. It may sound obvious, but please remember to begin with piece #1 and #2 when you start piecing a template!
Now to the piecing itself:
Place fabric piece #1 with the wrong side touching the paper on the unprinted side. Hold it against the light to see that the entire area of piece #1 is covered plus a ¼” seam allowance.
Place piece#2 on top of piece #1, right sides together. ALWAYS – right sides touching each other. Align the edges of the two pieces at seam between #1 and #2 – overlapping ¼” beyond the seam line.
Pin the two pieces together before flipping to printed side of paper and stitching on seam line.
Trim the seam allowance to ¼”.
Press open fabric piece #2 and hold the template against light to check that it covers the printed area #2 plus ¼” seam allowance on all sides.
We are now ready to stitch piece #3…repeat as for pieces #1 and #2!
Repeat for all the numbered pieces – in the correct order, till the whole template is pieced.
12. When all the templates are pieced and ready to be assembled, trim the templates to the right size – to the outer dotted line in the case of my block templates.
Assembly
13. Each of the block patterns includes a Master Template, which is a guide to how the templates are to be assembled. REMEMBER – The Master Template is also a mirror image and shows the printed side of the paper templates.
( You can also use the Master Template to try out your own colour schemes; use colour pencils! )
14. Unlike in the case of the templates, numbering or alphabetical order does not work here! So that it is not necessary that A is joined to B is joined to C etc…Follow the assembly instructions given in the pattern (Instructions File). In case of confusion – yes – refer to the Master template.
15. There are several alignment markers in the form of crosses and tiny lines cutting across the seam line. Use these to pin the templates together.
16. You can tear away much of the paper before you start assembling the templates, especially if it does not have any alignment markers!
17. What you need to be careful at this stage is which edges you join and which template is on top when it goes under the needle. How do I know? Guess!
I think I have listed all the things to be taken care of when paper piecing these blocks! In no time you should have a perfectly pieced and assembled block. If you can think of anything else, do share it here!
Before I forget, here are the promised pattern downloads for the Sapphire Fire Block! The files are huge, and may take time to download. You need Adobe Reader on your system(downloadable free online) to be able to view/ download these files. Happy piecing and quilting!
Instructions – for Sapphire Fire, Block Four of Dreamcatcher Dusk Round the Year Quilt.
Paper piecing templates – for Sapphire Fire, Block Four of Dreamcatcher Dusk Round the Year Quilt.
Please note that the downloadable patterns and instruction files for the Dreamcatcher Round the Year quilt blocks are being migrated to my store MadsPatch and will not be available for download for free from 15th November 2020 onwards.
The pattern and piecing instructions for the Card Trick , the third of the blocks in my BOM quilt Round the Year were posted by me a few days ago.
Incidentally, there are 26 templates and 14o pieces in this block…just so that you can boast about it!
Assembly
1. First, lay out all the pieced templates using the master template as a guide.
Pieced templates arranged using the master template as a guide
2. Assembling the Inner Circle
– Pin together each triangular ‘card’ to the corresponding wedge . If one makes a mistake and joins wrong pieces together at this stage, the ‘trick’ will not work, so follow the master template strictly!
For accurate piecing, I find the alignment markers and crosses on the printed templates very helpful.
‘Vertical’ pin pushed through marker before securing the templates
All inner templates ready for pinning together in pairs
Secured with pins…
3. Sew to join together, removing pins as you are a stitch or two away.
Fix the thread as you begin
…pulling out the pins as you approach them
Chain piecing saves time and thread!
Remove extraneous paper – from the seams and pieces without alignment markers. When the seams are pressed flat, some paper at the corners will go under the upcoming seam, and will be near impossible to remove later. Take care of that. Tweezers help, as well as the ripper.
Remove paper from seam …
Paper torn off from seam corners, leaving alignment markers intact
4. Referring to the master template, join the segments in pairs, aligning on the markers with vertical pins pushed through. When securing with pins, I ensure that the head of the pin is either on my right ( since I am right handed) or towards me as the fabric goes under the needle. This makes it easy for me to pull out the pin slowly , without any fear of getting poked!
Refer to the master template …
5. Join segment AI to CK to form a quarter circle.
6. Join segment EM to GO to form a quarter circle.
This is as good a time as any to flip over to the fabric side to check if you have got everything in order! The little coloured piece on the wedge should be the same colour as the adjoining segment on its left.
7. Join the 2 quarters at edges C and E to make the top half circle.
Top half of circle is ready!
8. Join segment BJ to DL to form a quarter circle, and finally
9. Join FN to HP to form the last of the quarter circles.
10. Join these two quarter circles along edges D and F and the other half of the circle is done!
11. Now to assemble the arcs. There are only 6 arcs, so they will be joined in threes for the top and bottom halves.
QRS makes one half of the ring, and TUV makes the other, moving anti clockwise as you look at the printed side.
Joining the arcs
12. Finally, the final step for assembling the circle! Joining the ring half to the circle half. Do not spare the pins at this stage! I put pins on every seam joint and on some alignment markers too!
Pin copiously!
Ready to stitch
13. I find it cumbersome to stitch a curved seam with the paper attached !
It is cumbersome to stitch a curved seam with the paper attached
Knowing my arc is securely pinned and correctly aligned to the circle, I can afford to tear away bits of paper on the seam. I also have a 1/4″ stitch on my Hasina, my HQV machine so I am assured of an accurate seam!
You will notice I do not remove all the paper, as I will need the alignment markers on the outer edge of the arc when I join this to the background.
Paper removed from under the seam area eases sewing
Here is one half of my circle assembled, the other half awaits its turn!
Time to gloat!
14. Once both the half circles are ready, we can move to the background. Using the template W ( made of 2 paper pieces glued together) we had cut 4 fabric pieces a bit larger on the long straight edges . We join these in pairs, W to X and Y to Z.
15. Join one half of the circle to WX and the other to YZ.
16. Join the two block halves together to form the full square block, and trim it down to 1
An alternative method for joining the circle to the background is to join the two halves of the circle and appliqué the circle on to a background square, using your favourite method. If using this method, cut your square about an inch larger and trim to size after appliqueing.
There is also a freezer paper method for joining a circle to a background square, for which several free tutorials are available online.
I hope you will enjoy making this block which comes up so magically! Do share a picture of your completed block on my facebook page, the like button is on the side bar to the right!
There is something so fascinating about bee blocks! My son had got engaged at the time these blocks were being sewn. How appropriate that they should go into a quilt for him and his wife on their anniversary! I thought about the difficult time our family was going through with my daughter critically ill, around the same time. Somewhere, the love and care that each quilter poured into each of these blocks reached out to me and my family… As for the blocks themselves, as I quilted them I wondered about the story behind each print. I thought of a quilter generously cutting up some favourite new fabric to put into her block. Or were they scraps left over from a dress made for a daughter or a grand daughter? A much loved cushion? Or even a quilt? Who was using them now ? The child scraps, travelling miles away from their home to be made into a quilt which will now go all the way across the oceans to America…How very special bee blocks are!
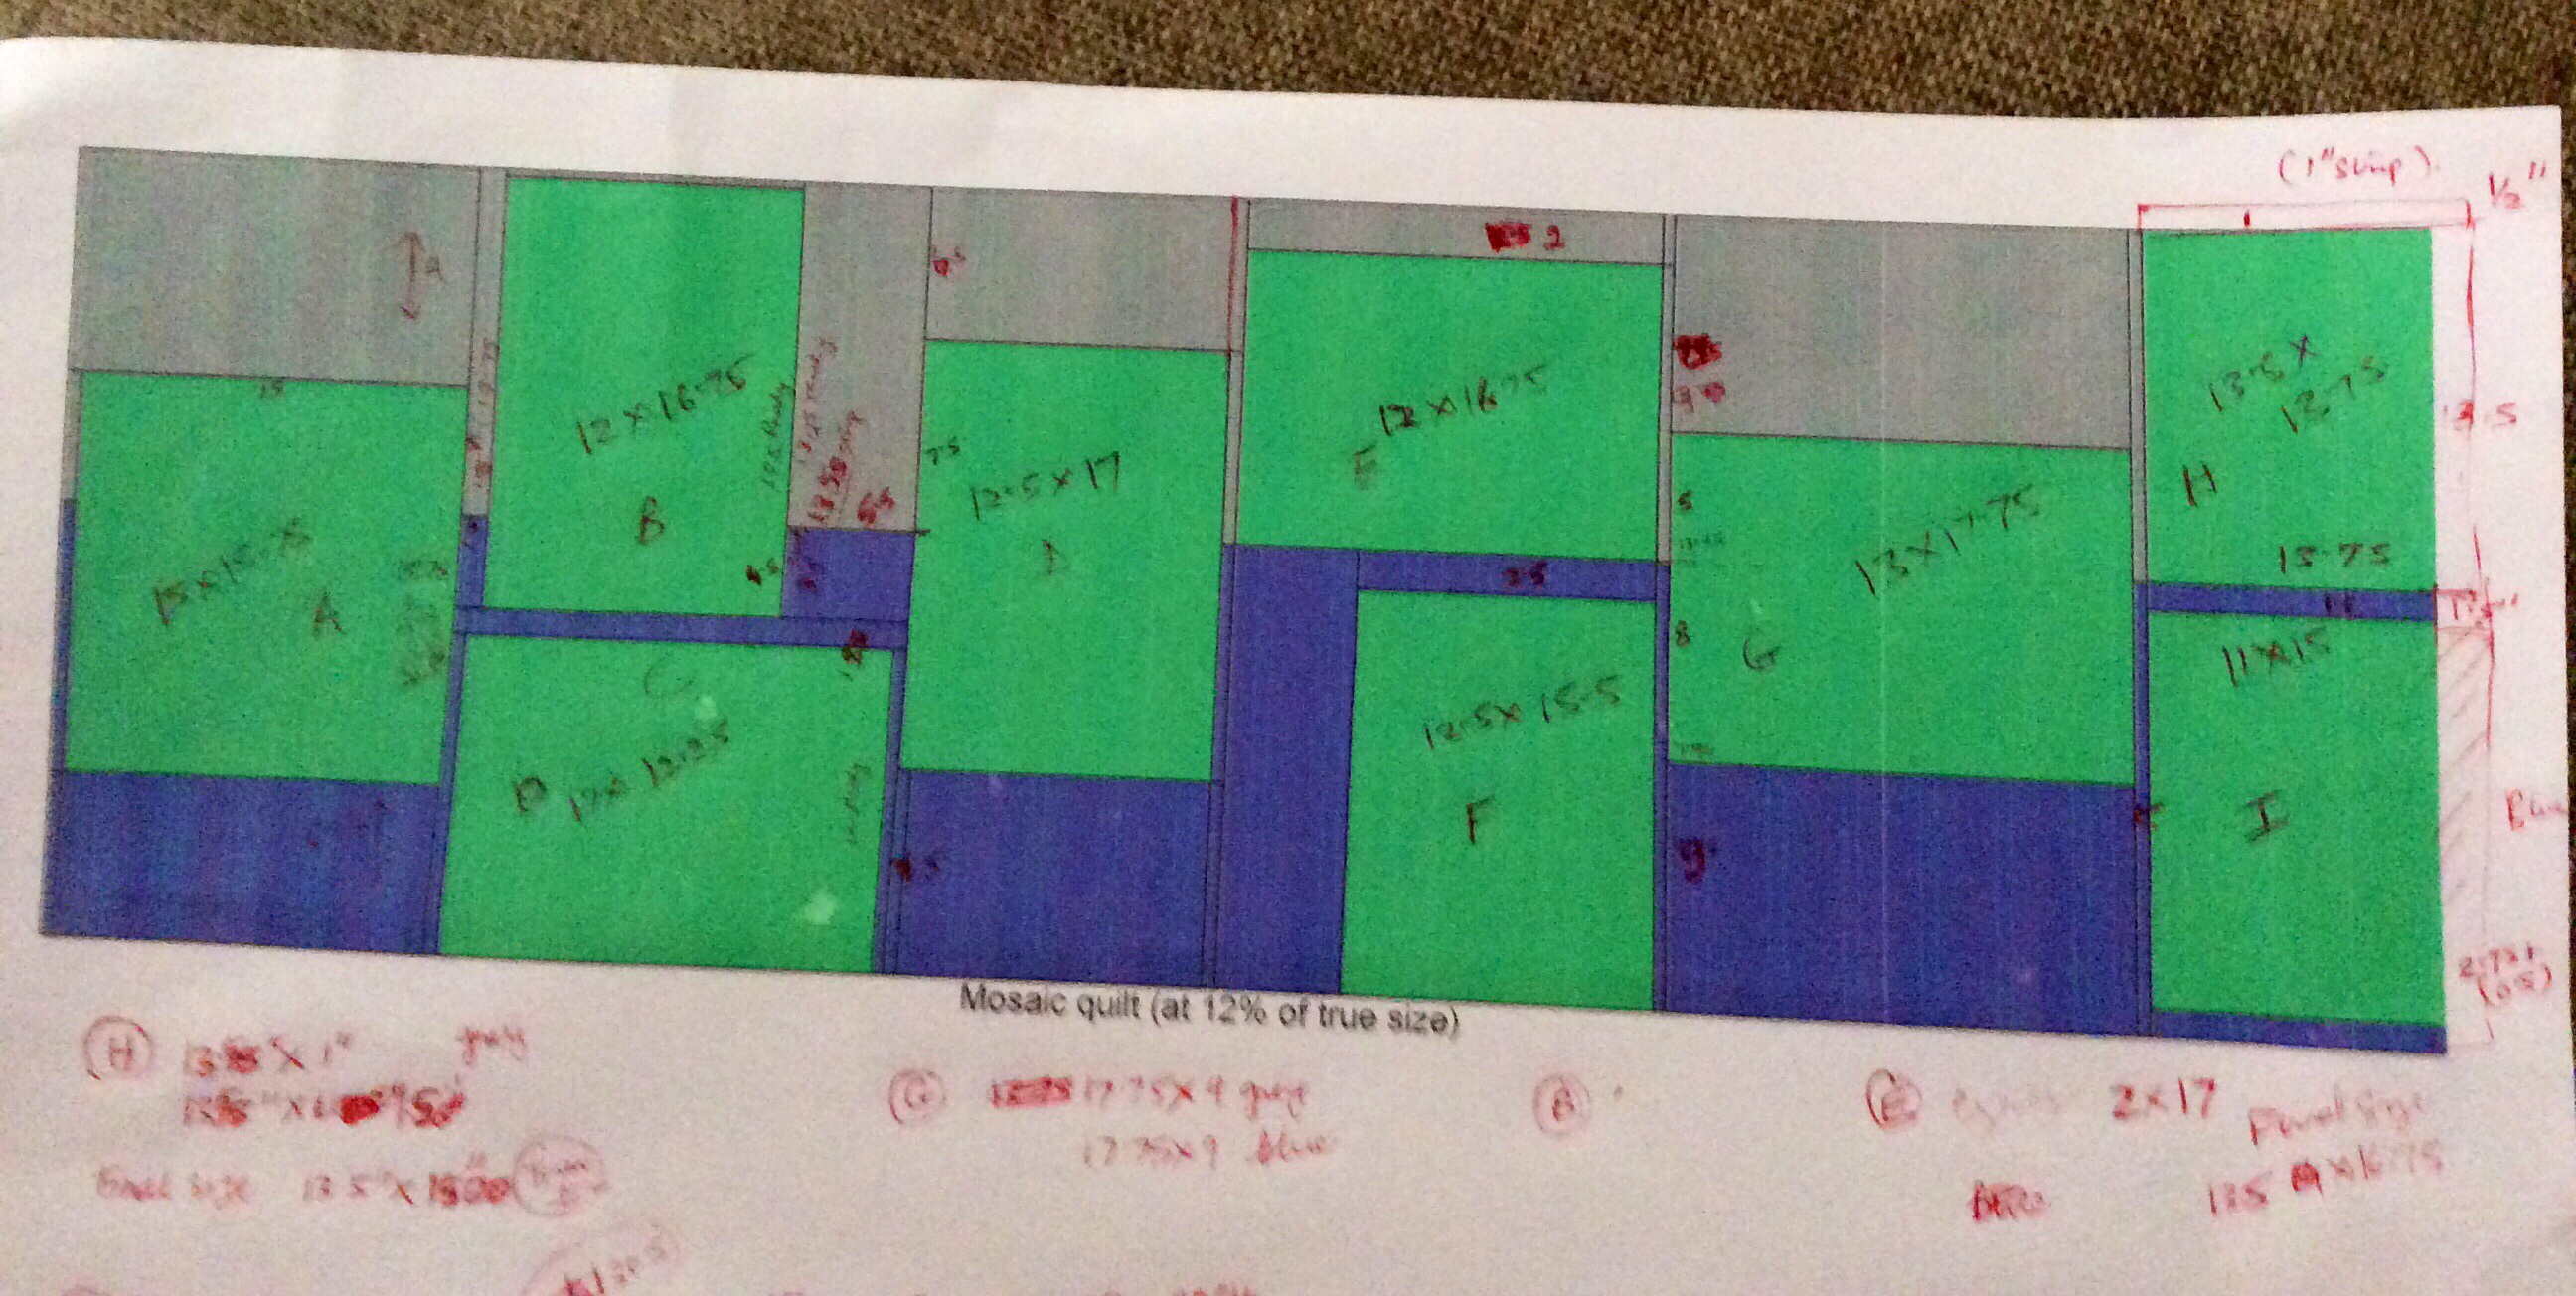
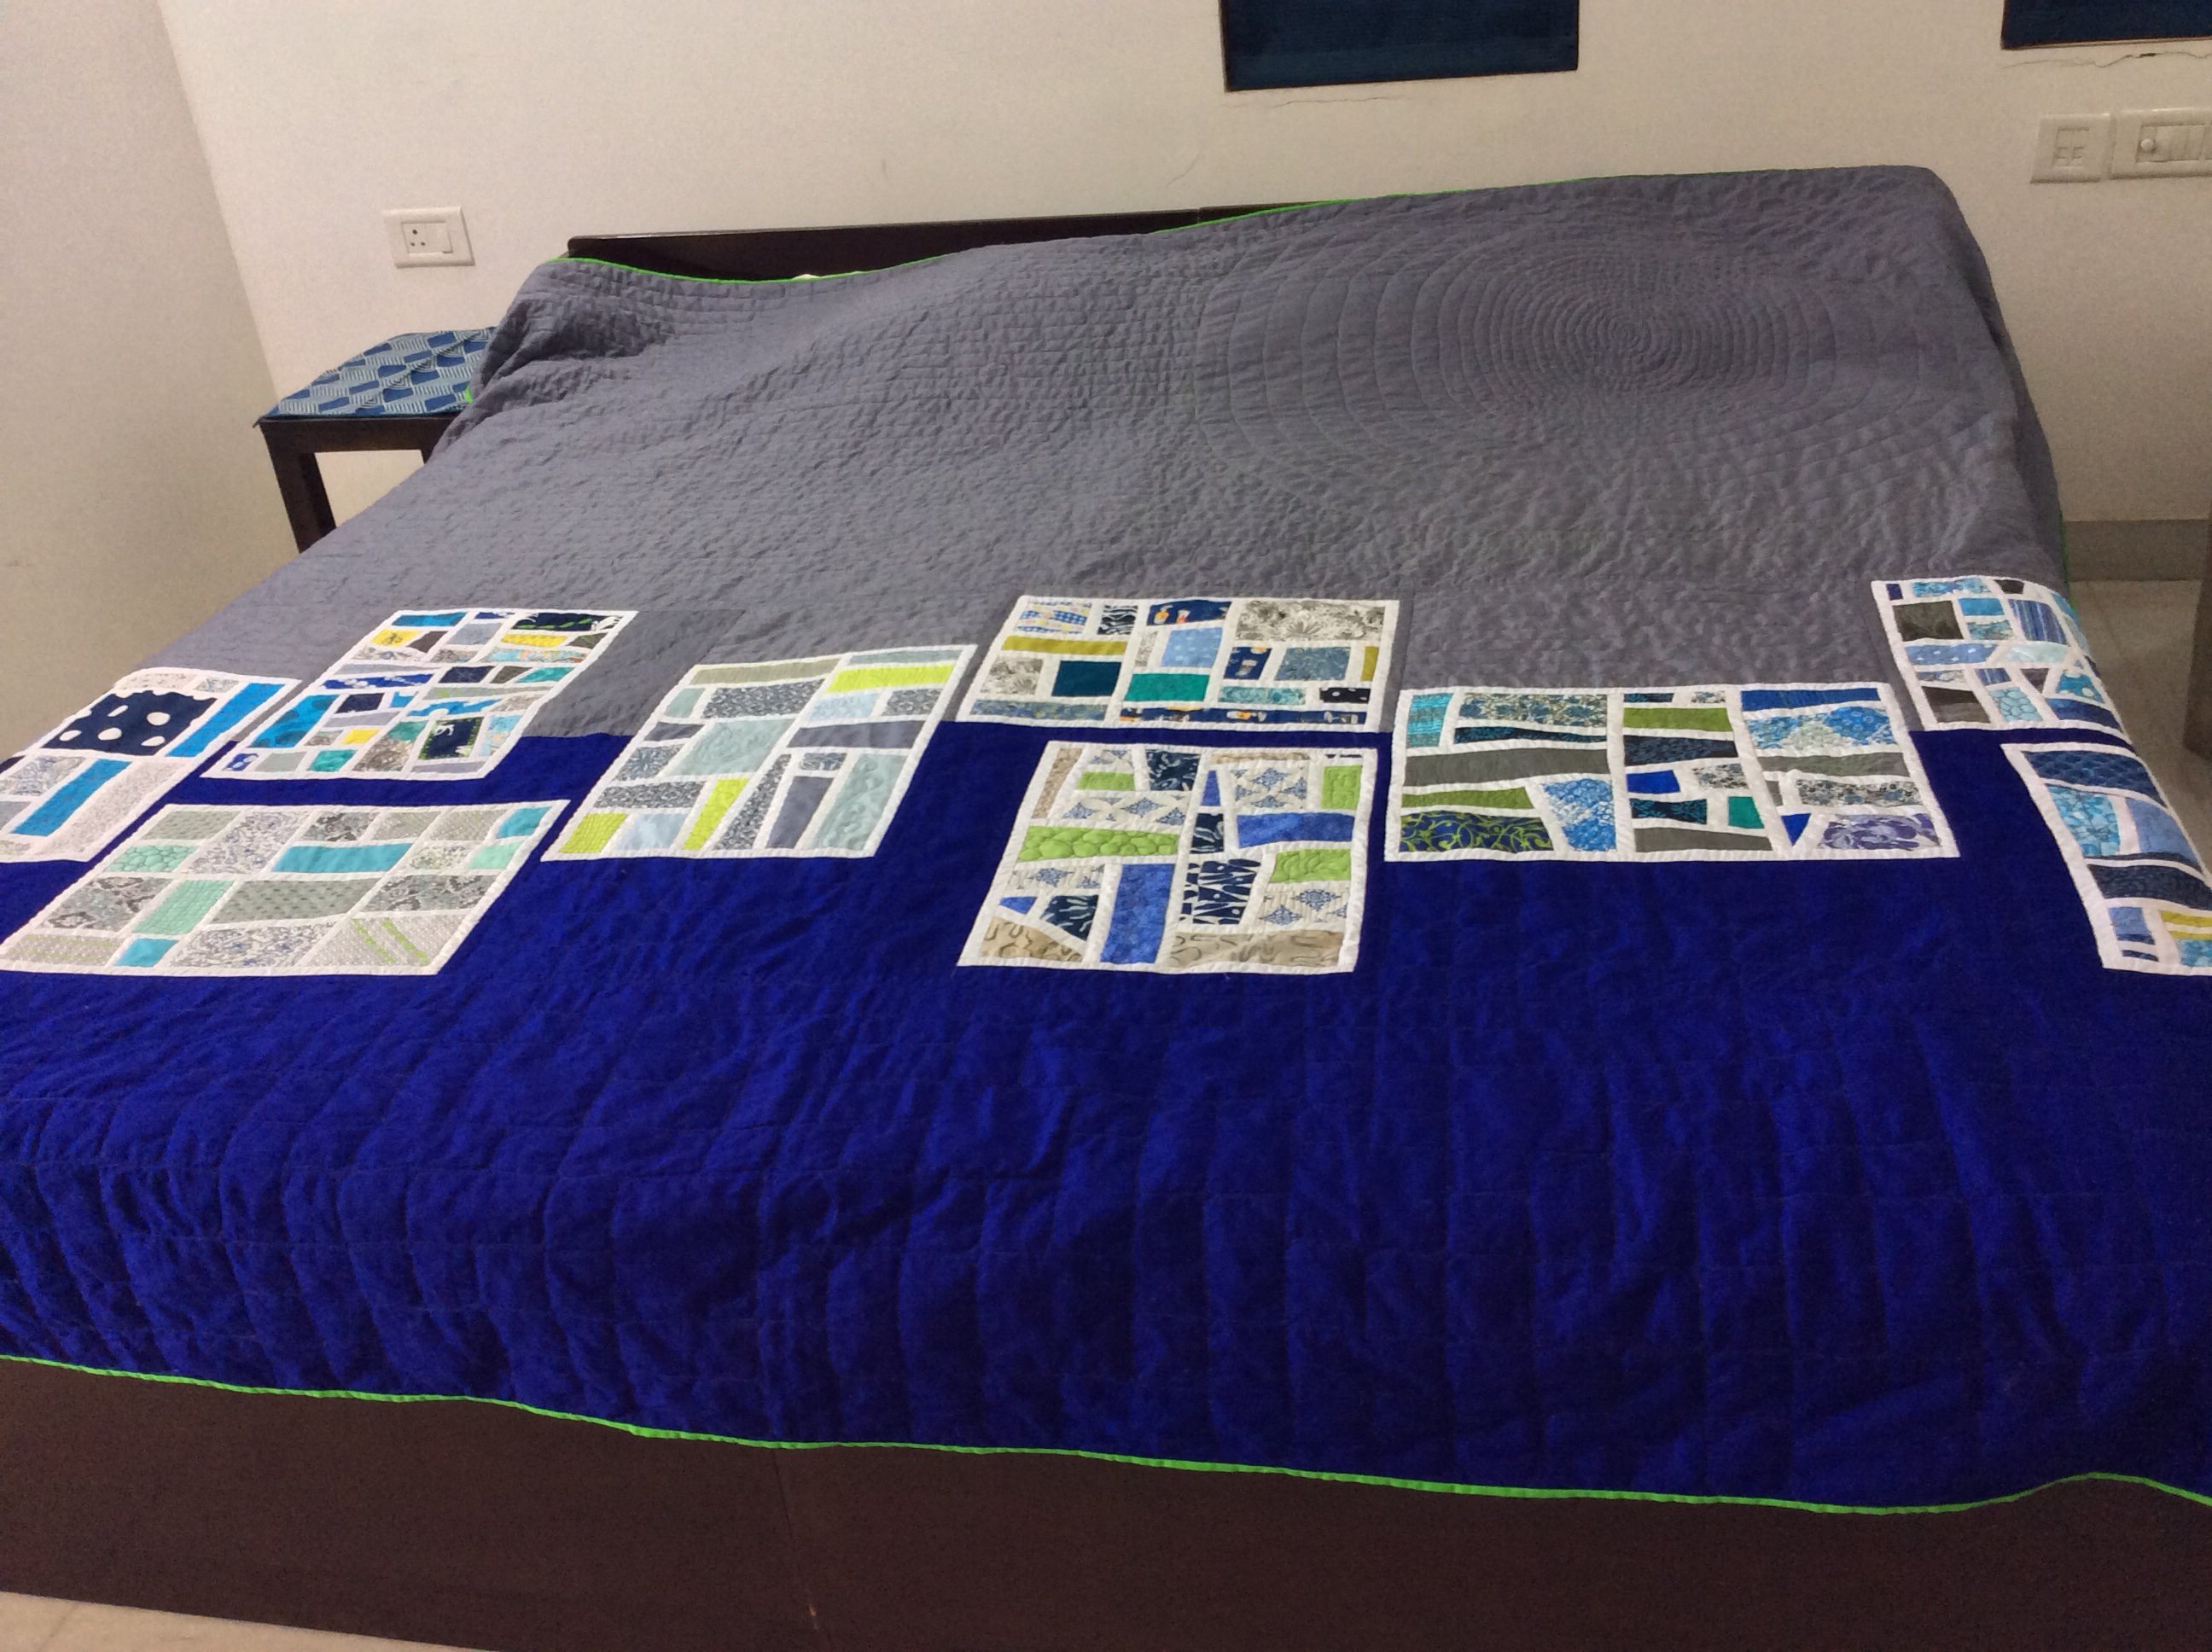
I had a total of 9 blocks, all of different sizes and putting them together to make a whole quilt was impossible. To cut a long story short, I decided to put the blocks together in a horizontal row of 30″ with grey above and royal blue below! Then began the calculations as I wanted a straight line across where blue met grey! I worked on the free quilt design software, QuiltAssistant and came up with this!
9 Blocks arranged in a 30″ row
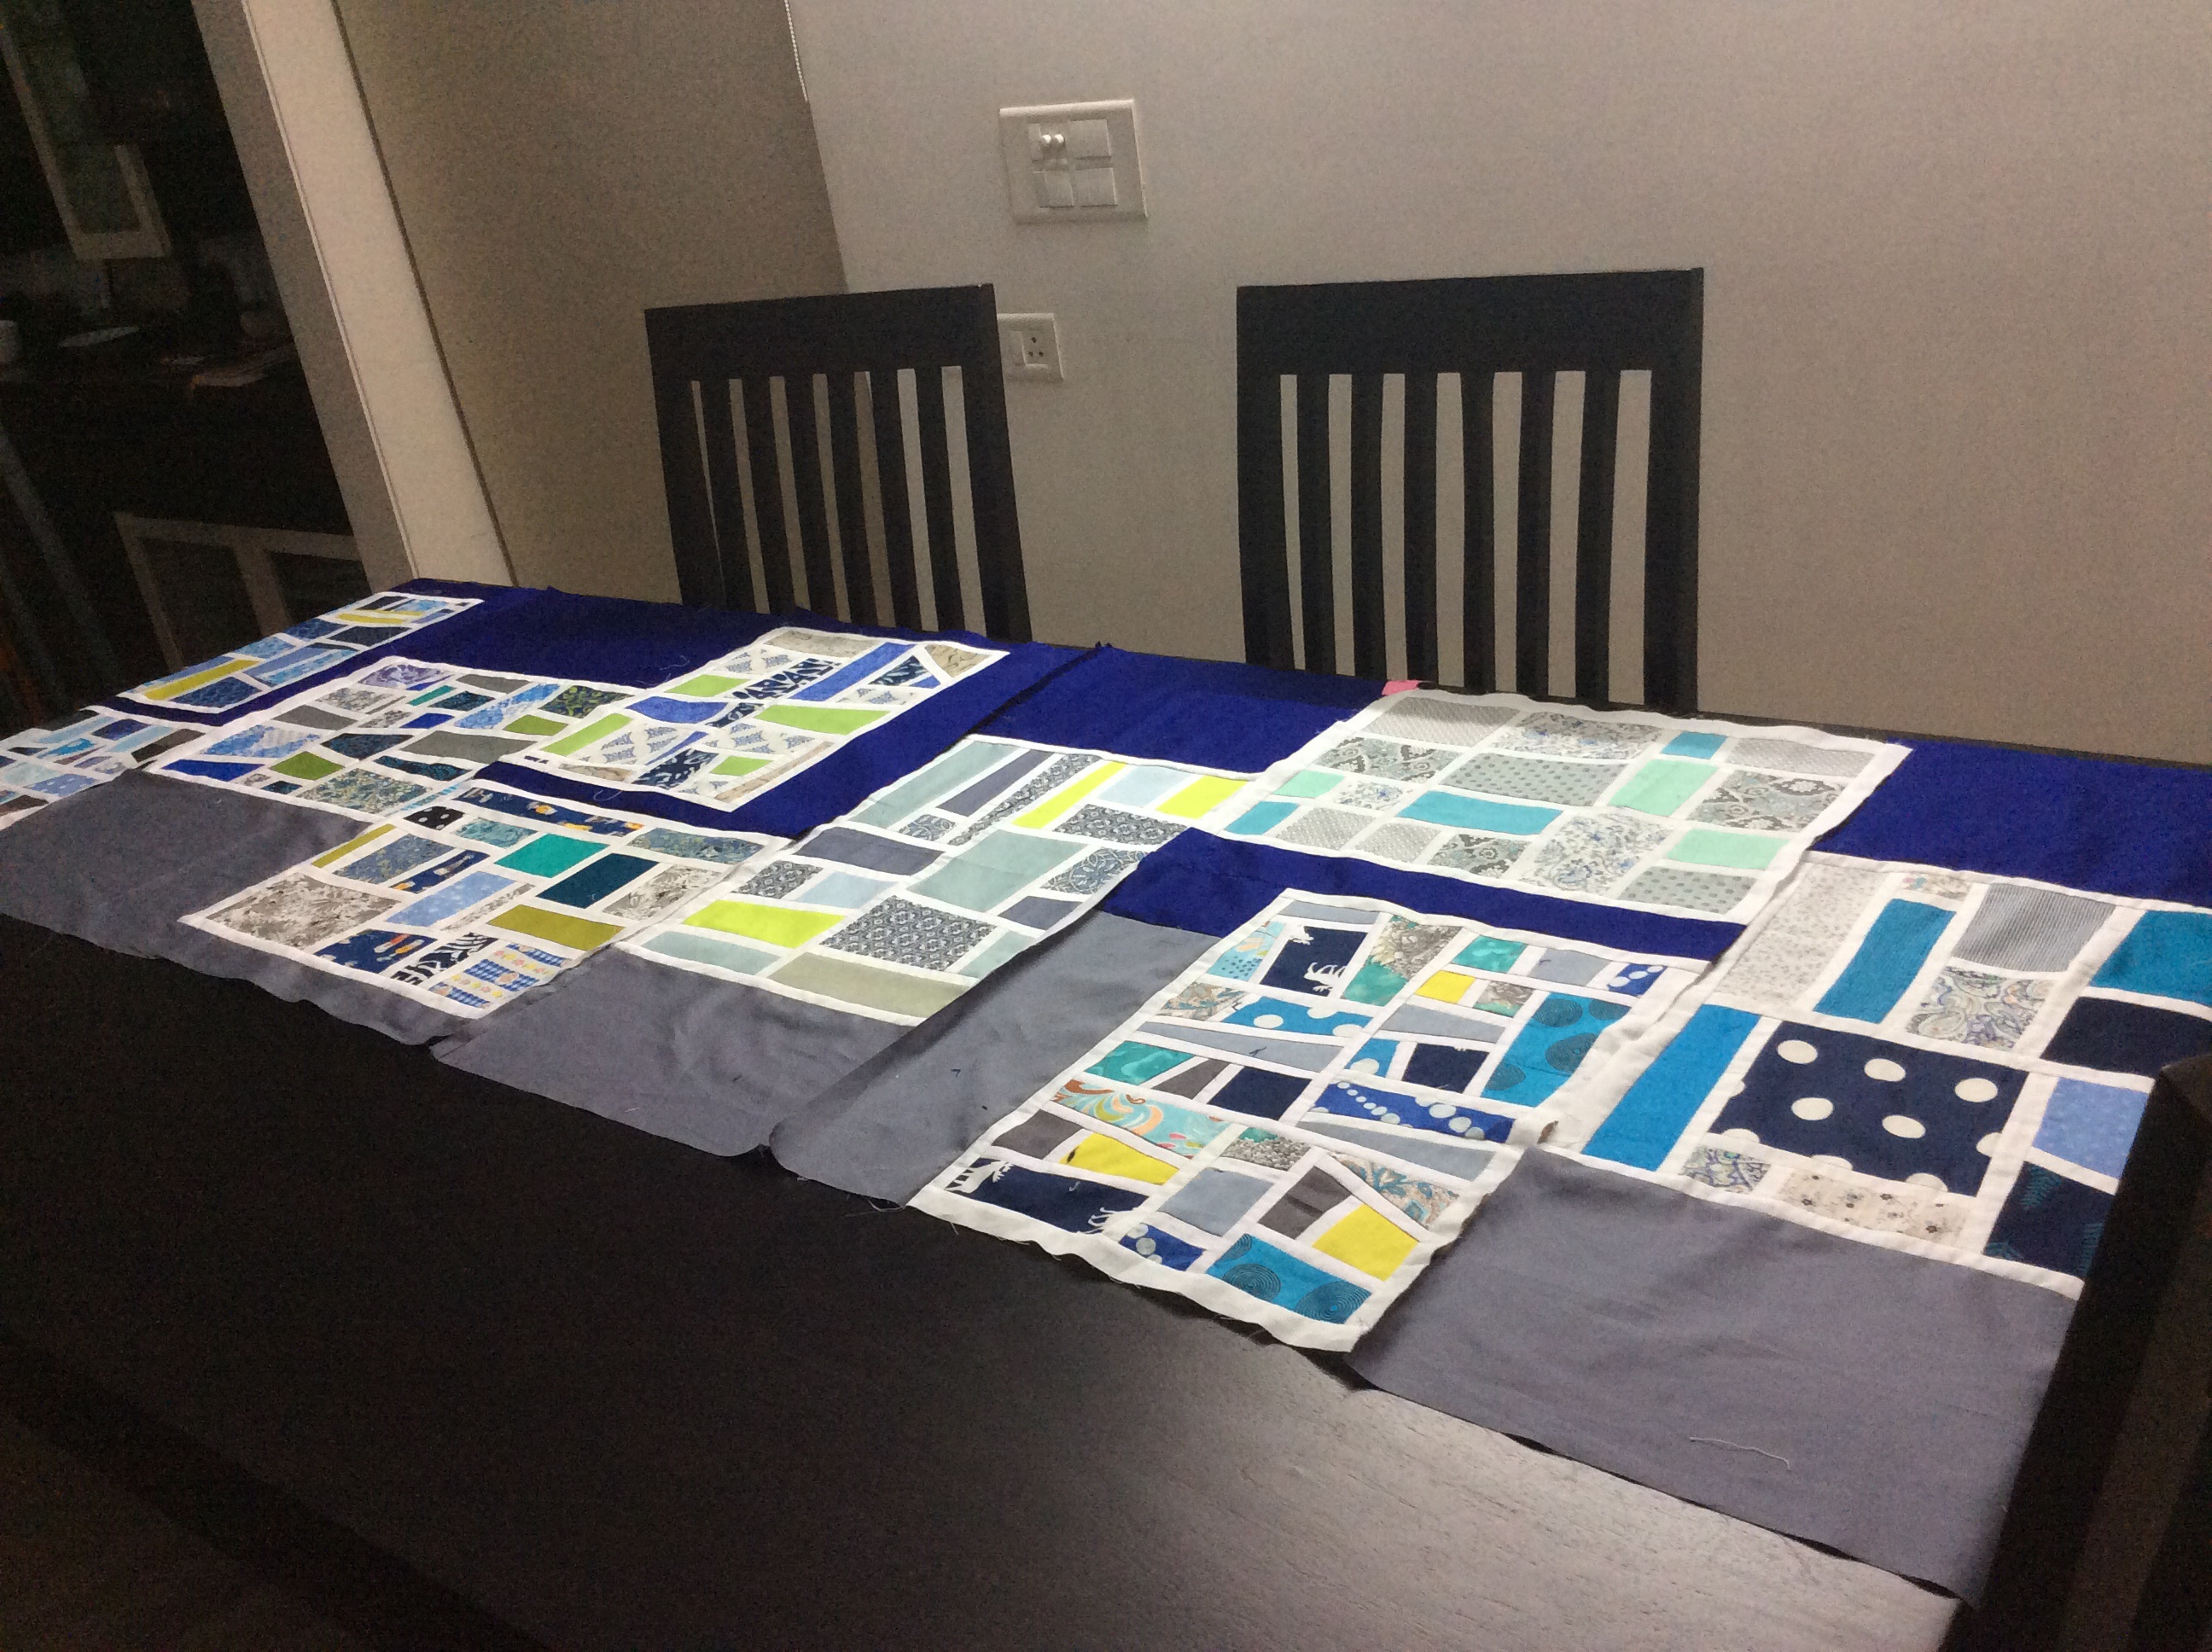
Each giant block was a different width and quilt as you go (qayg) seemed to be the only option for putting it together! I used a great tute at the Quilting Edge, but I hated the qayg! The quilt came together in 3 panels, finally.
I used a cambric print in royal blue for the backing, joining up the qayg blocks and panels with narrow strips of a blue and lime green fabric. The batting was a thin 120gsm polyfibre.
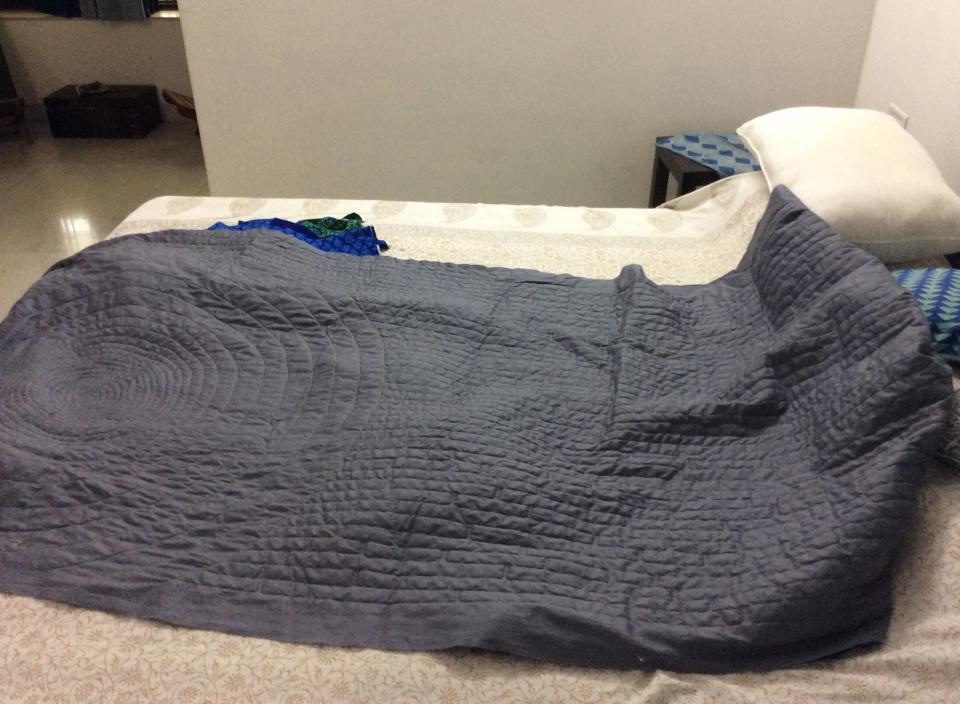
The 46″ wide grey was quilted with a giant spiral covering almost the width of the panel, in a variegated grey thread in the centre and lime green on the outer circles. The rest of the panel was majorly filled up with a boxy version of the “etch and sketch”” filler stitch by Leah Day, petering out into wavy lines ending in tiny spirals on the left edge. To do this, I drew lines 1″ apart on the top and worked on that. Here, the quilting was in lime green thread near the spiral and a dark grey matching the fabric in the rest.
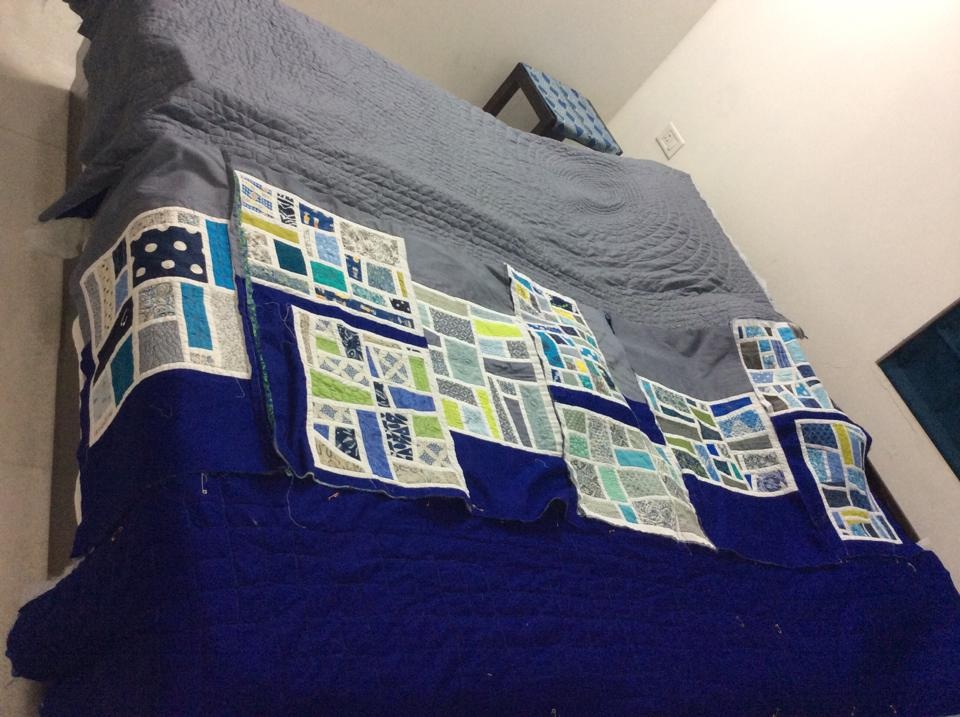
For the royal blue, I used Leah Day’s ‘cubic ripples’ as an inspiration, but gave them more structure and developed it into a ‘Tetris’ game like pattern. I drew lines at 2″ apart vertically on the 16″ row and quilted 2″ and 4″ squares and 2″x 4″ rectangles. This was a fun design, as I challenged myself not to stack up similar ’tiles’ in close proximity.
For the binding I chose a lime green to brighten up the drab grey which made up half the quilt. I cut the binding the wrong width – just 1.5″ but there was no way I was going to waste 400″ inches of binding. And I had already sewn half a side before it struck me what I was doing! So I decided to go ahead with it; I do want to think the 1/4″ binding adds a touch of elegance to the quilt – so “not over the top”!
All the quilting was done on my Husqavarna Viking Topaz 20 with its inbuilt auto sensor system for fabric thickness. I had some problems initially when using the spring action fmq foot, but when I switched to the echo quilting foot, I soon got the hang of the right rhythm and everything went smoothly – like a dream!
So here are the pictures, I’ll shut up and let them do the talking…
Mod Mosaic blocks in a row – the rightmost is the ninth – made by Sandhya S!
A giant spiral 38″ in diameter to offset and soften the rectangular blocks. The lines were added to accentuate the horizontal panels.
The quilted blocks being assembled through QAYG
A dash of lime to brighten up the proceedings
“Tetris” tiles quilted on the blue panel
The quilt is a square, may be used either way?
The spiral circle spacing gradually increases from 1/2″ on inner circles to 2″ outside
Now to pack it up!
Ready for packing? Not before one last look at it!
With blessings and love, from Ma!
Thank you, all you beautiful ladies, who made the blocks for this quilt!
I had posted the instructions for piecing the second block of my block of the month quilt, Round the Year, here When I left you, this is where we were, 16 templates pieced and ready for assembly, using the master template as a guide.
Evening at the Pond templates ready to be assembled
Actually, with this picture, gasping in admiration at what you had put together!
Paper piecing done!
So after you’ve finished admiring your templates, head back to the sewing machine. This will come up really fast, and before you know, your block will be ready! The order of piecing will be 1. Template A to template I; B to J; C to K….H to P! Place templates A and I right sides together and push pins to align them. Secure with pins along the seam line and remove the hanging pins.
Pond and flying geese template pinned togetherHanging pins removed
Sew all the pairs, AI, BJ, CK…HP. Remove the paper from the seams and the paper pieces that do not have alignment markers.
Press seam line in alternate directions – as in the corresponding pond template.
And then there were eight!
Join these eight segments in pairs to make quarter circles. AI to BJ, CK to DL, EM to FN and GO to HP. If you want you can remove the paper pieces on the pond templates now.
Align the two adjoining segments with pins. I need to be very careful at this stage, as I always end up joining the pairs along the wrong edges – pinning helps prevent that.
Two segments being aligned together with pins
…the hanging pins on the other side
Secure the two sub blocks together with pins and remove the hanging pins. Ready to sew!
Ready to go under the needle
The quarters are finally ready to be joined to the respective background pieces.
Rainbow against a blue sky!The rainbow against a cloudy sky…
The next block is ready to be revealed on the first of the next month! While you get your second block ready, I’ll get my blogpost ready! Do post pictures of your block on my facebook page Patchwork of My Life!


You must be logged in to post a comment.